Utilizando plantillas WebGL
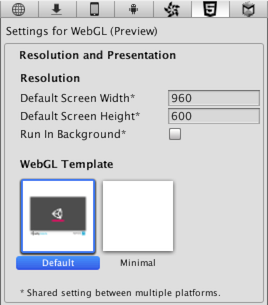
Cuando usted construya un proyecto WebGL, Unity incrustar el player (reproductor) en una página HTML para que pueda ser reproducido en el navegador. La página por defecto es una página blanca simple con una barra de carga en un canvas gris. Alternativamente, usted puede seleccionar una plantilla minima (con solamente el código repetitivo necesario para ejecutar el contenido WebGL) en el inspector de los Player Settings (menú: Edit > Project Settings > Player).
Las páginas integradas de HTML están bien para pruebas y demostrar un reproductor mínimo pero para propósitos de producción, a veces se desea ver el reproductor alojado en la página dónde eventualmente será desplegada. Por ejemplo, si el contenido de Unity interactúa con otros elementos en la página vía la interfaz de llamado externa entonces debe ser probada con una página que proporciones esos elementos de interacción. Unity le permite a usted proporcionar sus propias páginas para alojar el reproductor utilizando WebGL templates (muy similar a las Web Player Templates).
Estructura de una WebGL Template (Plantilla)
Las plantillas personalizadas son agregada a un proyecto al crear una carpeta llamada (WebGLTemplates" en la carpeta Assets - las plantillas en sí son sub-carpetas dentro de esta carpeta. Cada carpeta de plantilla contiene un archivo index.html con otros recursos que la página necesite, como imágenes o stylesheets.
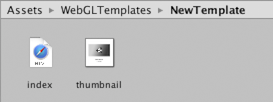
Once created, the template will appear among the options on the Player Settings inspector. (the name of the template will be the same as its folder). Optionally, the folder can contain a file named thumbnail.png, which should have dimensions of 128x128 pixels. The thumbnail image will be displayed in the inspector to hint at what the finished page will look like.
The html file needs to contain a canvas element with the id “canvas”. Then you must insert the UNITY_WEBGL_LOADER_GLUE tag, which will generate the required script tags to embed the Unity content, which will then render to that canvas element.
Template Tags
Durante el proceso de construcción, Unity buscará stringsde etiquetas especiales en el texto de la página y las reemplazará con los valores proporcionados por el editor. Estos incluyen el nombre, las dimensiones en pantalla y otra información útil sobre el player.
Las etiquetas están delimitadas por signos de porcentaje (%) en la fuente de la página. Por ejemplo, si el nombre del producto está definido como “MyPlayer” en los Player Settings:-
<title>%UNITY_WEB_NAME%</title>
…in the template’s index file will be replaced with
<title>MyPlayer</title>
…in the host page generated for the build. The complete set of tags is given below:-
UNITY_WEB_NAME: Name of the player.
UNITY_WEBGL_LOADER_GLUE: This will inject the necessary script tags to embed the WebGL content. This is required to be in the template’s index.html file.
UNITY_WIDTH and UNITY_HEIGHT: Onscreen width and height of the player in pixels.
UNITY_DEVELOPMENT_PLAYER: 1 when building a development player, 0 otherwise.
UNITY_CUSTOM_SOME_TAG: If you add a tag to the index file with the form UNITY_CUSTOM_XXX, then this tag will appear in the Player Settings when your template is selected. For example, if something like
<title>Unity Player | %UNITY_CUSTOM_MYTAG%</title>
…is added to the source, the Player Settings will look like this:-
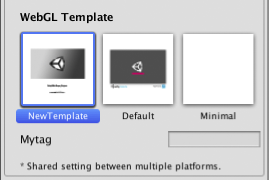
The textbox next to the tag’s name contains the text that the custom tag will be replaced with during the build.
Ejemplo
Para ilustrar el uso de la etiquetas de plantilla, aquí está la fuente HTML que Unity utiliza para su plantilla minima de WebGL.
<!doctype html>
<html lang="en-us">
<head>
<meta charset="utf-8">
<meta http-equiv="Content-Type" content="text/html; charset=utf-8">
<title>Unity WebGL Player | %UNITY_WEB_NAME%</title>
<link rel="stylesheet" href="TemplateData/style.css">
<link rel="shortcut icon" href="TemplateData/favicon.ico" />
<script src="TemplateData/UnityProgress.js"></script>
</head>
<body class="template">
<p class="header"><span>Unity WebGL Player | </span>%UNITY_WEB_NAME%</p>
<div class="template-wrap clear">
<canvas class="emscripten" id="canvas" oncontextmenu="event.preventDefault()" height="%UNITY_HEIGHT%px" width="%UNITY_WIDTH%px"></canvas>
<div class="logo"></div>
<div class="fullscreen"><img src="TemplateData/fullscreen.png" width="38" height="38" alt="Fullscreen" title="Fullscreen" onclick="SetFullscreen(1);" /></div>
<div class="title">%UNITY_WEB_NAME%</div>
</div>
<p class="footer">« created with <a href="http://unity3d.com/" title="Go to unity3d.com">Unity</a> »</p>
%UNITY_WEBGL_LOADER_GLUE%
</body>
</html>
Agregando una barra de progreso
El contenido de Unity WebGL no va a automáticamente renderizar una barra de progreso para usted cuando cargue - la plantilla necesita manejar esto. La plantilla por defecto incluida en Unity contiene un archivo UnityProgress.js que implementa una barra de progreso simple. usted puede re-utilizar esta para sus propias plantillas, o utilizarla como una referencia para crear su propia. Debido a que la barra de progreso es completamente implementada en JavaScript, usted puede personalizar completamente o remplazarla para mostrar cualquier cosa que usted quiera como un indicio de progresión.