Time
| Note |
|---|
| To use Bolt, which is Unity’s visual scripting solution, you must purchase it on the Unity Asset Store. |
Wait
Wait units allow you to delay the execution of the rest of your flow. The delay can be either a set amount of seconds, or a condition that has to be fulfilled before moving on.
Asynchronicity (delayed execution) in Unity is handled by coroutines (not multithreading). This means we need to tell Bolt to run our flow as a coroutine in order to support wait units. Thankfully, all you have to do is enable the Coroutine checkbox on the initial event that starts the flow. You can do find it in the graph inspector:
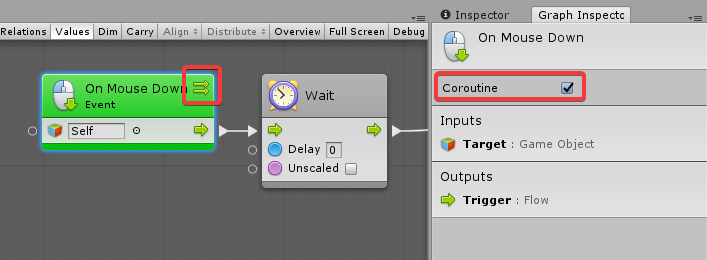
When you do, a small dual-arrow icon will appear on the event, indicating that it runs as a coroutine.
If you forget to enable the coroutine checkbox, you’ll get an error at runtime saying a port ‘can only be triggered in a coroutine’ when reaching a wait unit.
All wait units can be also used inside loops and sequences.
Wait For Seconds
The Wait For Seconds unit is the simplest and most common wait unit. It delays the execution by a certain number of seconds:

Wait Until
The Wait Until unit stops execution until a given condition is met. For example, you could wait until an object is close enough:

Wait While
The Wait While unit is the opposite of the Wait Until unit: it stops execution as long as a given condition is met. For example, you could wait while an object is too far:

Wait For Frame
As the name implies, Wait For End Of Frame and Wait For Next Frame units allow you to delay execution until a specific point in Unity’s update loop is met. For more information, see: Execution Order of Events.
Wait For Flow
The Wait For Flow unit allows you to delay execution until all input flows have been entered at least once. It’s a useful way of grouping conditions that occur over multiple events or frames. In other languages, this concept is sometimes called “promises”.
Cooldown

The Cooldown unit allows you to easily implement a time restriction when the input flow can only be triggered so often.
When the cooldown is available, the input flow gets transferred to the Ready port. When it is not, it gets transferred to the Not Ready port.
The Duration port determines how long it takes for the cooldown to become available again. Checking Unscaled will make it ignore the time scale.
The Tick port gets called at every frame while a cooldown is active. It is a good place to update any GUI code that show an indicator of the remaining duration until the action can be called again. In order to get that value, you have two options: Remaining, which returns the number of seconds until ready, and Remaining %, which returns a value between 0 and 1, respectively from ready to not ready.
As soon as the cooldown becomes ready, the Completed port will get triggered once. You do not need to constantly pass input flow for this port to get triggered.
Finally, you can force the cooldown to become ready and reset its internal timer by triggering the Reset port.
Here’s an example of how to implement a simple cooldown firing mechanic
with a masked spriteA 2D graphic objects. If you are used to working in 3D, Sprites are essentially just standard textures but there are special techniques for combining and managing sprite textures for efficiency and convenience during development. More info
See in Glossary and text that indicate how much time is remaining
until we can fire again:

Timer

The Timer unit allows you to easily implement and monitor a time pausable progression.
The Duration port determines how long it takes for the cooldown to become available again. Checking Unscaled will make it ignore the time scale.
A timer is started by triggering the Start input, which will in turn trigger the Started output.
It can be paused and resumed with the Pause and Resume inputs, or it can alternate between these states with the Toggle input.
The Tick port gets called at every frame while a timer is active. In order to get the time measurements, you have two options: Elapsed, which returns the time since the timer was started, or Remaining, which returns the time until the timer completes.
You can get each of these measurements in absolute number of seconds, or in %, which returns a value between 0 and 1, useful for lerping.
As soon as the timer finishes, the Completed port will get triggered once.
Here’s an example of how to implement a simple autodestroy mechanic on a sprite that will progressively color it red before destroying:
