Flow States and Super States
| Note |
|---|
| To use Bolt, which is Unity’s visual scripting solution, you must purchase it on the Unity Asset Store. |
Before starting this section of the manual, we assume that you’ve read the Introduction, that you’re familiar with the Basic Concepts and that you’ve created a State Machine. You should also have a good grip on how to use Flow Graphs, because they are found everywhere inside state graphs.
At this point, you should have a state graph with a single start node.
States
States are self-contained behaviours that
tell an object how it should behave when it’s, well, in a particular
state. They are often used for artificial intelligence (AI) behaviour or
for object or sceneA Scene contains the environments and menus of your game. Think of each unique Scene file as a unique level. In each Scene, you place your environments, obstacles, and decorations, essentially designing and building your game in pieces. More info
See in Glossary structure.
For example, a state machineThe set of states in an Animator Controller that a character or animated GameObject can be in, along with a set of transitions between those states and a variable to remember the current state. The states available will depend on the type of gameplay, but typical states include things like idling, walking, running and jumping. More info
See in Glossary for an enemy NPC could have 4 states,
“Patrolling”, “Chasing”, “Attacking” and “Fleeing”, while a state
machine for a door could have 3 states, “Locked”, “Unlocked” and “Open”.
In Bolt, there are two kinds of states.
- Flow States: States that contain a nested flow graphs. This means you can use all the units and connections from the previous section in each state. Most of the states you will create will be flow states.
- Super States: States that contain another nested state graph. They allow for the creation of hierarchical finite state machines (HSFM), that is, state machines within state machines. They are useful for advanced re-use and organization of your graphs.
Both types of states are “nesters”, meaning that they work exactly like
machines: their sub-graph can either be embedded, or referenced from a
macro. Their inspectorA Unity window that displays information about the currently selected GameObject, Asset or Project Settings, alowing you to inspect and edit the values. More info
See in Glossary looks and behaves in the same way.
States are connected together with Transitions. We’ll get to them in the next article. For now, let’s focus on the state itself.
Creating States
To display the state creation menu, simply right-click anywhere in the empty grid. For now, simply choose Create Flow State.

Just like units in flow graphs, the new state is dimmed because it is never entered. You can disable Dim in the toolbar if you don’t want this behaviour.
Start State(s)
You can choose at which state the graph starts by choosing one or more Start State(s). To do so, just right click your state and choose Toggle Start. Start states are highlighted in green.
Unlike most finite state machine tools, Bolt allows for multiple start states. This means you can have parallel FSM’s running in the same graph or even joining at some point. However, most often, you’ll only need a single start state.
Any State
You can use the Any State to trigger transitions to other states, no matter which state is currently active. However, this state cannot receive any transition or execute any action.

Reading States
Let’s take a look at the anatomy of a state.

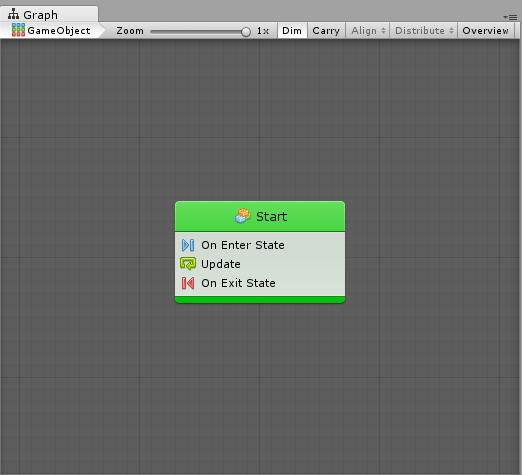
The top part of a state is its header. It displays the title and summary of its nested graph. These have no impact on functionality; they’re simply a way for you to identify and comment your states. You can tell that it is a flow state by its little flow graph icon.
You’ll notice that unlike units, states aren’t much by themselves. Their inspector looks and works exactly like the one for machines. You can choose the source for the state’s nested graph and open it by clicking the Edit Graph button. You can also double-click on the state node to open its nested graph.
Flow States
What you see as the body of a flow state is a list of all the events used in its nested flow graph. By default, new flow states are created with the On Enter State, Update and On Exit State events for convenience, but you can delete those if you don’t need them and add any other event that you want.
Let’s go ahead and double-click the state to open it.

In the breadcrumbs at the top left, you can see that we are now within the state graph on our game object, inside the Start state.

You can use this part of the toolbarA row of buttons and basic controls at the top of the Unity Editor that allows you to interact with the Editor in various ways (e.g. scaling, translation). More info
See in Glossary to navigate back to parent graphs
at any time.
At the top of the graph inspector, when you have no node selected, you can edit the title and summary of that state.

You can ignore the input and output port definitions below. They are only used for Super Units, not for Flow States.
Last but not least, the graph is pre-populated with 3 events. On Enter State gets called when an incoming transition leads to the parent state, and On Exit State gets called before the state is exited by one of its outgoing transitions. Update gets called at every frame while the state is active. Every event you add to a flow graph will only be listening while the parent state is active.
The rest of this graph works exactly like normal flow graphs. There are no restrictions on the units that can be used.
Super States
Super states are created and edited exactly like flow states. The major difference, of course, is that their graph is not a flow graph, but another state graph. When super states are entered, all the start states of their nested graph get entered. When super states are exited, every state and transition of the nested graph is made inactive.