绑定到没有 ListView 的列表
版本:2023.2+
您可以绑定到没有 ListView 的列表。为此,请将每个元素绑定到序列化对象数组中的项,并跟踪数组大小的值。在某些情况下,例如撤消或重置操作,数组大小可能会发生变化。
此示例演示了如何在没有 ListView 的情况下绑定到列表。
示例概述
此示例创建了 TexturePreviewElements 列表并将该列表绑定到 Texture2D 对象的基础列表。
您可以在此 GitHub 代码仓库中找到此示例创建的完整文件。
先决条件
本指南适用于熟悉 Unity 编辑器、UI 工具包和 C# 脚本的开发者。在开始之前,请熟悉以下内容:
创建包含列表的对象
创建一个包含列表的 C# 类。此列表是绑定的目标。
- 使用任何模板在 Unity 中创建项目。
- 在项目 (Project) 窗口中,创建一个名为
bind-to-list-without-ListView的文件夹来存储所有文件。 - 创建一个名为
TexturePackAsset.cs的 C# 脚本,并将其内容替换为以下代码:
using System.Collections.Generic;
using UnityEngine;

namespace UIToolkitExamples
{
    [CreateAssetMenu(menuName = "UIToolkitExamples/TexturePackAsset")]
    public class TexturePackAsset : ScriptableObject
    {
        public List<Texture2D> textures;

        public void Reset()
        {
            textures = new() { null, null, null, null };
        }
    }
}
创建一个自定义控件并设置其样式
使用 C# 创建一个自定义控件,表示对 2D 纹理资源的引用,并使用 USS 设置其样式。
- 在该文件夹中,创建一个名为
Editor的文件夹。 - 在 Editor 文件夹中,创建一个名为
TexturePreviewElement.cs的 C# 脚本。 - 将
TexturePreviewElement.cs的内容替换为以下内容:
using System;
using UnityEditor.UIElements;
using UnityEngine;
using UnityEngine.UIElements;
using Object = UnityEngine.Object;

namespace UIToolkitExamples
{
    [UxmlElement]
    public partial class TexturePreviewElement : BindableElement, INotifyValueChanged<Object>
    {
        public static readonly string ussClassName = "texture-preview-element";

        Image m_Preview;
        ObjectField m_ObjectField;
        Texture2D m_Value;

        public TexturePreviewElement()
        {
            AddToClassList(ussClassName);

            // Create a preview image.
            m_Preview = new Image();
            Add(m_Preview);

            // Create an ObjectField, set its object type, and register a callback when its value changes.
            m_ObjectField = new ObjectField();
            m_ObjectField.objectType = typeof(Texture2D);
            m_ObjectField.RegisterValueChangedCallback(OnObjectFieldValueChanged);
            Add(m_ObjectField);

            styleSheets.Add(Resources.Load<StyleSheet>("texture_preview_element"));
        }

        void OnObjectFieldValueChanged(ChangeEvent<Object> evt)
        {
            value = evt.newValue;
        }

        public void SetValueWithoutNotify(Object newValue)
        {
            if (newValue == null || newValue is Texture2D)
            {
                // Update the preview Image and update the ObjectField.
                m_Value = newValue as Texture2D;
                m_Preview.image = m_Value;
                // Notice that this line calls the ObjectField's SetValueWithoutNotify() method instead of just setting
                // m_ObjectField.value. This is very important; you don't want m_ObjectField to send a ChangeEvent.
                m_ObjectField.SetValueWithoutNotify(m_Value);
            }
            else throw new ArgumentException($"Expected object of type {typeof(Texture2D)}");
        }

        public Object value
        {
            get => m_Value;
            // The setter is called when the user changes the value of the ObjectField, which calls
            // OnObjectFieldValueChanged(), which calls this.
            set
            {
                if (value == this.value)
                    return;

                var previous = this.value;
                SetValueWithoutNotify(value);

                using (var evt = ChangeEvent<Object>.GetPooled(previous, value))
                {
                    evt.target = this;
                    SendEvent(evt);
                }
            }
        }
    }
}
- 在 Editor 文件夹中,创建一个名为
Resources的文件夹。 - 在 Resources 文件夹中,创建一个名为
texture_preview_element.uss的样式表 (StyleSheet),并将其内容替换为以下内容:
.texture-preview-element {
    width: 200px;
    height: 200px;
}

.texture-preview-element > .unity-image {
    flex-grow: 1;
}
创建自定义编辑器并设置绑定
使用创建资源的 C# 脚本创建自定义 Editor。
要在__ UI__(即用户界面,User Interface)让用户能够与您的应用程序进行交互。Unity 目前支持三种 UI 系统。更多信息
See in Glossary 中的 TexturePreviewElements 数量发生变化时更改纹理列表的大小,请调用 SetupList() 方法并遍历序列化列表中的条目列表。
要将每个 TexturePreviewElement 绑定到纹理列表,请使用 TexturePackAsset.textures 的属性名称调用 BindProperty()。
- 在 Editor 文件夹中创建一个名为
TexturePackEditor.cs的 C# 脚本,并将其内容替换为以下代码:
using UnityEditor;
using UnityEditor.UIElements;
using UnityEngine;
using UnityEngine.UIElements;

namespace UIToolkitExamples
{
    [CustomEditor(typeof(TexturePackAsset))]
    public class TexturePackEditor : Editor
    {
        [SerializeField]
        VisualTreeAsset m_VisualTreeAsset;

        public override VisualElement CreateInspectorGUI()
        {
            var editor = m_VisualTreeAsset.CloneTree();

            var container = editor.Q(className: "preview-container");

            SetupList(container);

            // Watch the array size to handle the list being changed
            var propertyForSize = serializedObject.FindProperty(nameof(TexturePackAsset.textures) + ".Array");
            propertyForSize.Next(true); // Expand to obtain array size
            editor.TrackPropertyValue(propertyForSize, prop => SetupList(container));

            editor.Q<Button>("add-button").RegisterCallback<ClickEvent>(OnClick);

            return editor;
        }

        void SetupList(VisualElement container)
        {
            var property = serializedObject.FindProperty(nameof(TexturePackAsset.textures) + ".Array");

            var endProperty = property.GetEndProperty();

            property.NextVisible(true); // Expand the first child.

            var childIndex = 0;

            // Iterate each property under the array and populate the container with preview elements
            do
            {
                // Stop if we've reached the end of the array
                if (SerializedProperty.EqualContents(property, endProperty))
                    break;

                // Skip the array size property
                if (property.propertyType == SerializedPropertyType.ArraySize)
                    continue;

                TexturePreviewElement element;

                // Find an existing element or create one
                if (childIndex < container.childCount)
                {
                    element = (TexturePreviewElement)container[childIndex];
                }
                else
                {
                    element = new TexturePreviewElement();
                    container.Add(element);
                }

                element.BindProperty(property);

                ++childIndex;
            }
            while (property.NextVisible(false));   // Never expand children.

            // Remove excess elements if the array is now smaller
            while (childIndex < container.childCount)
            {
                container.RemoveAt(container.childCount - 1);
            }
        }

        void OnClick(ClickEvent evt)
        {
            var property = serializedObject.FindProperty(nameof(TexturePackAsset.textures));
            property.arraySize += 1;
            serializedObject.ApplyModifiedProperties();
        }
    }
}
- 创建一个名为
texture_pack_editor.uxml的 UI 文档,并将其内容替换为以下内容:
<ui:UXML xmlns:ui="UnityEngine.UIElements" xmlns:uie="UnityEditor.UIElements" xmlns="UnityEngine.UIElements" example="UIToolkitExamples" editor-extension-mode="True">
    <ui:ScrollView>
        <ui:VisualElement class="preview-container" style="flex-wrap: wrap; flex-direction: row; justify-content: space-around;" />
    </ui:ScrollView>
    <ui:Button name="add-button" text="Add" />
</ui:UXML>
- 在项目 (Project) 窗口中,选择 TexturePackEditor.cs。
- 在检视面板 (Inspector) 中将 texture_pack_editor.uxml 拖动到 Visual Tree Asset 上。
测试绑定
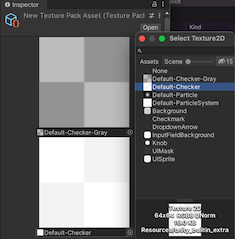
- 从菜单中选择资源 (Assets) > 创建 (Create) > UIToolkitExamples > TexturePackAsset。这将创建名为 New Texture Pack Asset 的资源。
- 在项目 (Project) 窗口中,选择 New Texture Pack Asset。这会在检视面板 (Inspector) 中显示四个 TexturePreviewElement 元素。
- 为这些元素分配 2D 图像资源,或使用添加 (Add) 按钮添加新元素。如果在 Inspector UI 中作出更改,则
TexturePackAsset.textures对象的属性会更改。
提示:要导入一些纹理并将其分配给列表中的不同条目,请尝试此免费的 Playground Asset Store 插件。