与 UXML 和 C# 脚本绑定
版本:2021.3+
此示例演示了如何使用 UXML 创建绑定和设置绑定路径,以及使用 C# 脚本调用 Bind() 方法。
示例概述
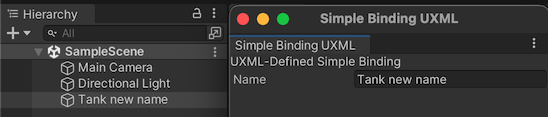
此示例创建了一个自定义 Editor 窗口,其中包含一个绑定到场景中任何游戏对象的名称属性的 TextField。
您可以在此 GitHub 代码仓库中找到此示例创建的完整文件。
先决条件
本指南适用于熟悉 Unity 编辑器、UI 工具包和 C# 脚本的开发者。在开始之前,请熟悉以下内容:
在 UXML 中定义绑定路径
定义 UXML 中的视觉元素和绑定路径。
使用任何模板在 Unity 中创建项目。
在项目 (Project) 窗口中,创建一个名为
bind-with-uxml-csharp的文件夹来存储所有文件。-
创建一个名为
binding_example.uxml的__ UI__(即用户界面,User Interface)让用户能够与您的应用程序进行交互。Unity 目前支持三种 UI 系统。更多信息
See in Glossary 文档,并将其内容替换为以下内容:<UXML xmlns:ui="UnityEngine.UIElements"> <ui:VisualElement name="top-element"> <ui:Label name="top-label" text="UXML-Defined Simple Binding"/> <ui:TextField name="GameObjectName" label="Name" text="" binding-path="m_Name"/> </ui:VisualElement> </UXML>
用 C# 创建绑定
在 C# 脚本中创建绑定并对 Bind() 方法进行显式调用。
创建一个名为
Editor的文件夹。在 Editor 文件夹中,创建一个名为
SimpleBindingExampleUXML.cs的 C# 脚本文件。-
将
SimpleBindingExampleUXML.cs的内容替换为以下内容:using UnityEditor; using UnityEngine; using UnityEditor.UIElements; using UnityEngine.UIElements; namespace UIToolkitExamples { public class SimpleBindingExampleUXML : EditorWindow { [SerializeField] VisualTreeAsset visualTree; [MenuItem("Window/UIToolkitExamples/Simple Binding Example UXML")] public static void ShowDefaultWindow() { var wnd = GetWindow<SimpleBindingExampleUXML>(); wnd.titleContent = new GUIContent("Simple Binding UXML"); } public void CreateGUI() { visualTree.CloneTree(rootVisualElement); OnSelectionChange(); } public void OnSelectionChange() { GameObject selectedObject = Selection.activeObject as GameObject; if (selectedObject != null) { // Create the SerializedObject from the current selection SerializedObject so = new SerializedObject(selectedObject); // Bind it to the root of the hierarchy. It will find the right object to bind to. rootVisualElement.Bind(so); } else { // Unbind the object from the actual visual element rootVisualElement.Unbind(); // Clear the TextField after the binding is removed var textField = rootVisualElement.Q<TextField>("GameObjectName"); if (textField != null) { textField.value = string.Empty; } } } } } 在项目 (Project) 窗口中,选择
SimpleBindingExampleUXML.cs并将binding_example.uxml拖动到 检视面板 (Inspector) 中的 Visual Tree 字段。
测试绑定
- 在 Unity 中,选择窗口 (Window) > UIToolkitExamples > 简单绑定示例 UXML (Simple Binding Example UXML)。此时将显示一个带有文本字段的自定义编辑器 (Editor) 窗口。
- 在场景中选择任意游戏对象。游戏对象的名称将显示在编辑器 (Editor) 窗口的文本字段中。
- 如果在文本字段中更改游戏对象的名称,那么该游戏对象的名称就会改变。