绑定到嵌套属性
版本:2021.3+
此示例演示了如何使用 UXML 中的 BindableElement 的 binding-path 属性将字段绑定到 SerializedObject 的嵌套属性。
示例概述
此示例使用以下代码创建自定义 Inspector__ UI__(即用户界面,User Interface)让用户能够与您的应用程序进行交互。Unity 目前支持三种 UI 系统。更多信息
See in Glossary:
- 绑定到游戏对象名称和 USS 变换比例的两个字段
- 绑定到 SerializedObject 的嵌套属性的两个字段
您可以在此 GitHub 代码仓库中找到此示例创建的完整文件。
先决条件
本指南适用于熟悉 Unity 编辑器、UI 工具包和 C# 脚本的开发者。在开始之前,请熟悉以下内容:
创建可破坏的坦克对象
创建一个 C# 脚本来定义一个坦克类,该类具有生命值,可被破坏。
使用任何模板在 Unity 中创建项目。
在 Project 窗口中,创建一个名为
bind-nested-properties的文件夹来存储所有文件。-
创建一个名为
DestructibleTankScript.cs的 C# 脚本,并将其内容替换为以下内容:using System; using UnityEngine; using UnityEngine.Serialization; [Serializable] public struct Health { public int armor; public int life; } [ExecuteInEditMode] public class DestructibleTankScript : MonoBehaviour { public string tankName = "Tank"; public float tankSize = 1; public Health health; private void Update() { gameObject.name = tankName; gameObject.transform.localScale = new Vector3(tankSize, tankSize, tankSize); } public void Reset() { health.armor = 100; health.life = 10; } }
创建 UXML 和 Inspector UI
使用 BindableElement 创建 UXML 文件。将 BindableElement 的 binding-path 设置为 health 属性,并将 BindableElement 的每个子元素的 binding-path 设置为 health 的 armor 和 life 属性。
在 bind-nested-properties 文件夹中,创建一个名为
Editor的文件夹。-
在 Editor 文件夹中,创建一个名为
tank_inspector_styles.uss的 USS 文件,并将其内容替换为以下内容:.container { background-color: rgb(80, 80, 80); flex-direction: column; } Label { background-color: rgb(80, 80, 80); } TextField:hover { background-color: rgb(255, 255, 0); } FloatField { background-color: rgb(0, 0, 255); } -
创建一个名为
destructible_tank_editor.uxml的 UI 文档,并将其内容替换为以下内容:<UXML xmlns="UnityEngine.UIElements" xmlns:ue="UnityEditor.UIElements"> <Style src="tank_inspector_styles.uss"/> <VisualElement name="row" class="container"> <Label text="Tank Script - Custom Inspector" /> <ue:PropertyField binding-path="tankName" name="tank-name-field" /> <ue:PropertyField binding-path="tankSize" name="tank-size-field" /> <BindableElement binding-path="health"> <ue:PropertyField binding-path="armor"/> <ue:PropertyField binding-path="life"/> </BindableElement> </VisualElement> </UXML>
创建自定义 Editor
创建一个 C# 脚本,为 DestructibleTankScript 注册自定义 Editor。
-
创建一个名为
DestructibleTankEditor.cs的 C# 脚本,并将其内容替换为以下内容:using UnityEditor; using UnityEngine; using UnityEngine.UIElements; [CustomEditor(typeof(DestructibleTankScript))] public class DestructibleTankEditor : Editor { [SerializeField] VisualTreeAsset visualTreeAsset; public override VisualElement CreateInspectorGUI() { return visualTreeAsset.CloneTree(); } } 在 Project 窗口中选择
DestructibleTankEditor.cs。在 Inspector 中将
destructible_tank_editor.uxml拖动到 Visual Tree Asset。
测试绑定
- 在 Unity 中,将空游戏对象添加到场景中。
- 选择游戏对象。
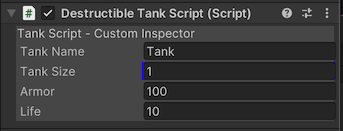
- 在 Inspector 中添加 Destructible Tank Script 组件。将 Armor 和 Life 字段绑定到
health.armor和health.life属性。如果更改 Inspector 中的值,则基础属性的值会更改。