创建列表视图运行时 UI
版本:2022.3+
此示例演示如何创建列表视图运行时__ UI__(即用户界面,User Interface)让用户能够与您的应用程序进行交互。Unity 目前支持三种 UI 系统。更多信息
See in Glossary。此示例直接使用 UXML 和 USS 文件来创建 UI 的结构和样式。如果您不熟悉 UI 工具包并希望使用 UI Builder 创建 UI,请参阅使用 UI Builder 创建示例 UI。
示例概述
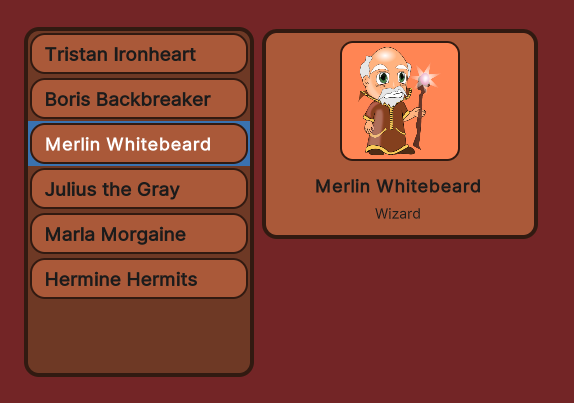
此示例将创建一个简单的角色选择画面。单击左侧列表中的角色名称时,角色的详细信息将显示在右侧。
可以在此 GitHub 代码仓库中找到此示例创建的完整文件。
先决条件
本指南适用于熟悉 Unity 编辑器、UI 工具包和 C# 脚本的开发者。在开始之前,请熟悉以下内容:
创建主 UI 文档
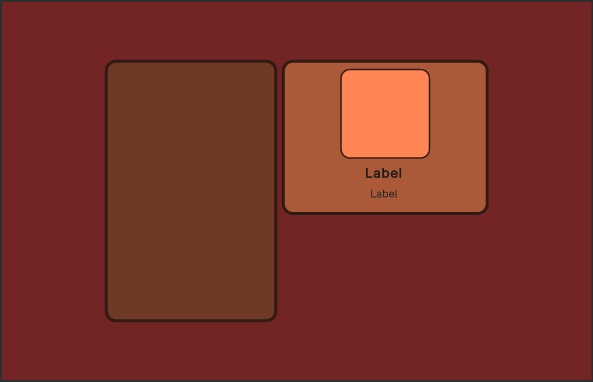
创建主视图 UI 文档和 USS 文件以设置视觉元素的样式。在 UI 文档中添加两个视觉元素作为容器:一个包含角色名称列表,另一个包含所选角色的详细信息。
使用任何模板在 Unity 中创建项目。
在项目窗口中,创建一个名为
UI的文件夹来存储所有 UI 文档和样式表文件。-
在
UI文件夹中,创建一个名为MainView.uxml的 UI 文档,其中包含以下内容:<ui:UXML xmlns:ui="UnityEngine.UIElements" xmlns:uie="UnityEditor.UIElements" editor-extension-mode="False"> <Style src="MainView.uss" /> <ui:VisualElement name="background"> <ui:VisualElement name="main-container"> <ui:ListView focusable="true" name="character-list" /> <ui:VisualElement name="right-container"> <ui:VisualElement name="details-container"> <ui:VisualElement name="details"> <ui:VisualElement name="character-portrait" /> </ui:VisualElement> <ui:Label text="Label" name="character-name" /> <ui:Label text="Label" display-tooltip-when-elided="true" name="character-class" /> </ui:VisualElement> </ui:VisualElement> </ui:VisualElement> </ui:VisualElement> </ui:UXML> 在
UI文件夹中,创建一个名为MainView.uss的 USS 样式表,其中包含以下内容:
#background {
    flex-grow: 1;
    align-items: center;
    justify-content: center;
    background-color: rgb(115, 37, 38);
}

#main-container {
    flex-direction: row;
    height: 350px;
}

#character-list {
    width: 230px;
    border-color: rgb(49, 26, 17);
    border-width: 4px;
    background-color: rgb(110, 57, 37);
    border-radius: 15px;
    margin-right: 6px;
}

#character-name {
    -unity-font-style: bold;
    font-size: 18px;
}

#character-class {
    margin-top: 2px;
    margin-bottom: 8px;
    padding-top: 0;
    padding-bottom: 0;
}

#right-container {
    justify-content: space-between;
    align-items: flex-end;
}

#details-container {
    align-items: center;
    background-color: rgb(170, 89, 57);
    border-width: 4px;
    border-color: rgb(49, 26, 17);
    border-radius: 15px;
    width: 252px;
    justify-content: center;
    padding: 8px;
    height: 163px;
}

#details {
    border-color: rgb(49, 26, 17);
    border-width: 2px;
    height: 120px;
    width: 120px;
    border-radius: 13px;
    padding: 4px;
    background-color: rgb(255, 133, 84);
}

#character-portrait {
    flex-grow: 1;
    -unity-background-scale-mode: scale-to-fit;
}

.unity-collection-view__item {
    justify-content: center;
}
创建列表条目 UI 文档
为列表中的各个条目创建 UI 文档和样式表。角色列表条目由彩色背景帧和角色名称组成。

-
在
UI文件夹中,创建一个名为ListEntry.uxml的 UI 文档,其中包含以下内容:<ui:UXML xmlns:ui="UnityEngine.UIElements" xmlns:uie="UnityEditor.UIElements" editor-extension-mode="False"> <Style src="ListEntry.uss" /> <ui:VisualElement name="list-entry"> <ui:Label text="Label" display-tooltip-when-elided="true" name="character-name" /> </ui:VisualElement> </ui:UXML> 在
UI文件夹中,创建名为ListEntry.uss的样式表文件,其中包含以下内容:
#list-entry {
    height: 41px;
    align-items: flex-start;
    justify-content: center;
    padding-left: 10px;
    background-color: rgb(170, 89, 57);
    border-color: rgb(49, 26, 17);
    border-width: 2px;
    border-radius: 15px;
}

#character-name {
    -unity-font-style: bold;
    font-size: 18px;
    color: rgb(49, 26, 17);
}
创建要显示的样本数据
创建示例数据以填充 UI 中的角色列表。对于角色列表,创建一个包含角色名称、类和人物图像的类。
在 Asset 文件夹中,创建一个名为
Scripts的文件夹来存储 C# 脚本。-
在
Scripts文件夹中,创建一个名为CharacterData.cs的 C# 脚本,其中包含以下内容:using UnityEngine; public enum ECharacterClass { Knight, Ranger, Wizard } [CreateAssetMenu] public class CharacterData : ScriptableObject { public string CharacterName; public ECharacterClass Class; public Sprite PortraitImage; } 在 Assets 文件夹中,创建一个名为
Resources的文件夹。在
Resources文件夹中,创建一个名为Characters的文件夹来存储所有示例角色数据。在
Characters文件夹中,右键单击并选择创建 (Create) > 角色数据 (Character Data) 以创建ScriptableObject实例。创建更多
CharacterData实例并在其中填充占位数据。
设置场景
在 SampleScene 中创建一个 UIDocument 游戏对象,并将 UI 文档添加为源资产。
- 在 SampleScene 中,选择游戏对象 (GameObject) > UI 工具包 (UI Toolkit) > UI 文档 (UI Document)。
- 在层级视图 (Hierarchy) 窗口中选择 UIDocument 游戏对象。
- 将 MainView.uxml 从项目窗口拖动到检视面板窗口中 UI 文档组件的源资产 (Source Asset) 字段。这会将源资产引用到 UXML 文件。
为列表条目和主视图创建控制器
使用以下类创建两个 C# 脚本:
- 用于在列表条目的 UI 中显示角色实例数据的
CharacterListEntryController类。它需要访问角色名称的标签,并将其设置为显示给定角色实例的名称。 - 主视图中角色列表的
CharacterListController类,以及一个将其实例化并分配给视觉树的MonoBehaviour脚本。
注意:CharacterListEntryController 类不是 MonoBehaviour。由于 UI 工具包中的视觉元素不是游戏对象,因此无法对其附加组件。而是将类附加到 CharacterListController 类的 userData 属性。
-
在
Scripts文件夹中,创建一个名为CharacterListEntryController.cs的 C# 脚本,其中包含以下内容:using UnityEngine.UIElements; public class CharacterListEntryController { Label m_NameLabel; // This function retrieves a reference to the // character name label inside the UI element. public void SetVisualElement(VisualElement visualElement) { m_NameLabel = visualElement.Q<Label>("character-name"); } // This function receives the character whose name this list // element is supposed to display. Since the elements list // in a `ListView` are pooled and reused, it's necessary to // have a `Set` function to change which character's data to display. public void SetCharacterData(CharacterData characterData) { m_NameLabel.text = characterData.CharacterName; } } -
在
Scripts文件夹中,创建一个名为CharacterListController.cs的 C# 脚本,其中包含以下内容:using System.Collections.Generic; using UnityEngine; using UnityEngine.UIElements; public class CharacterListController { // UXML template for list entries VisualTreeAsset m_ListEntryTemplate; // UI element references ListView m_CharacterList; Label m_CharClassLabel; Label m_CharNameLabel; VisualElement m_CharPortrait; List<CharacterData> m_AllCharacters; public void InitializeCharacterList(VisualElement root, VisualTreeAsset listElementTemplate) { EnumerateAllCharacters(); // Store a reference to the template for the list entries m_ListEntryTemplate = listElementTemplate; // Store a reference to the character list element m_CharacterList = root.Q<ListView>("character-list"); // Store references to the selected character info elements m_CharClassLabel = root.Q<Label>("character-class"); m_CharNameLabel = root.Q<Label>("character-name"); m_CharPortrait = root.Q<VisualElement>("character-portrait"); FillCharacterList(); // Register to get a callback when an item is selected m_CharacterList.selectionChanged += OnCharacterSelected; } void EnumerateAllCharacters() { m_AllCharacters = new List<CharacterData>(); m_AllCharacters.AddRange(Resources.LoadAll<CharacterData>("Characters")); } void FillCharacterList() { // Set up a make item function for a list entry m_CharacterList.makeItem = () => { // Instantiate the UXML template for the entry var newListEntry = m_ListEntryTemplate.Instantiate(); // Instantiate a controller for the data var newListEntryLogic = new CharacterListEntryController(); // Assign the controller script to the visual element newListEntry.userData = newListEntryLogic; // Initialize the controller script newListEntryLogic.SetVisualElement(newListEntry); // Return the root of the instantiated visual tree return newListEntry; }; // Set up bind function for a specific list entry m_CharacterList.bindItem = (item, index) => { (item.userData as CharacterListEntryController)?.SetCharacterData(m_AllCharacters[index]); }; // Set a fixed item height matching the height of the item provided in makeItem. // For dynamic height, see the virtualizationMethod property. m_CharacterList.fixedItemHeight = 45; // Set the actual item's source list/array m_CharacterList.itemsSource = m_AllCharacters; } void OnCharacterSelected(IEnumerable<object> selectedItems) { // Get the currently selected item directly from the ListView var selectedCharacter = m_CharacterList.selectedItem as CharacterData; // Handle none-selection (Escape to deselect everything) if (selectedCharacter == null) { // Clear m_CharClassLabel.text = ""; m_CharNameLabel.text = ""; m_CharPortrait.style.backgroundImage = null; return; } // Fill in character details m_CharClassLabel.text = selectedCharacter.Class.ToString(); m_CharNameLabel.text = selectedCharacter.CharacterName; m_CharPortrait.style.backgroundImage = new StyleBackground(selectedCharacter.PortraitImage); } }
将控制器脚本附加到主视图
该 CharacterListController 不是 MonoBehaviour,因此不能将其直接附加到游戏对象。为了克服此问题,请创建一个 MonoBehaviour 脚本,将其附加到与 UIDocument 相同的游戏对象。在此脚本中,无需实例化 MainView.uxml,因为 UIDocument 组件已经实例化了该数据。相反,请访问 UIDocument 组件以获取已实例化视觉树的引用。然后,创建 CharacterListController 实例并传入视觉树的根元素以及用于各个列表元素的 UXML 模板。
注意:当 UI 重新加载时,同一游戏对象上任何包含 UIDocument 组件的关联 MonoBehaviour 组件在重新加载之前被禁用,然后在重新加载后重新启用。因此,必须将 UI 相关代码放在此 MonoBehaviour 的 OnEnable 和 OnDisable 方法中。有关更多信息,请参阅在游戏视图中渲染 UI。
-
在
Scripts文件夹中,创建一个名为MainView.cs的 C# 脚本,其中包含以下内容:using UnityEngine; using UnityEngine.UIElements; public class MainView : MonoBehaviour { [SerializeField] VisualTreeAsset m_ListEntryTemplate; void OnEnable() { // The UXML is already instantiated by the UIDocument component var uiDocument = GetComponent<UIDocument>(); // Initialize the character list controller var characterListController = new CharacterListController(); characterListController.InitializeCharacterList(uiDocument.rootVisualElement, m_ListEntryTemplate); } } 在 SampleScene 中,选择 UIDocument。
在检视面板 (Inspector) 窗口中,将
MainView.cs拖动到添加组件 (Add Component)。将 ListEntry.uxml 拖动到列表条目模板 (ListEntry Template) 字段。
进入运行模式可在游戏视图中查看 UI 显示情况。