使用 C# 脚本创建自定义编辑器窗口
版本:2022.3+
此示例演示了如何使用 C# 脚本创建自定义编辑器窗口,以响应用户输入、使__ UI__(即用户界面,User Interface)让用户能够与您的应用程序进行交互。Unity 目前支持三种 UI 系统。更多信息
See in Glossary 大小可调整以及处理热重载。
自定义编辑器窗口是从 EditorWindow 类派生的类。UI 工具包使用 CreateGUI 方法将控件添加到编辑器 UI,Unity 在需要显示窗口时自动调用 CreateGUI 方法。此方法的工作方式与 Awake 或 Update 等方法相同。
创建自定义编辑器窗口时,请遵循以下准则:
- 在
CreateGUI方法中放置依赖 UXML/USS 加载的代码,以确保所有必要的资产都可用。 - 将事件注册代码保留在
CreateGUI中或调用CreateGUI后。
下图显示了编辑器窗口的执行顺序:
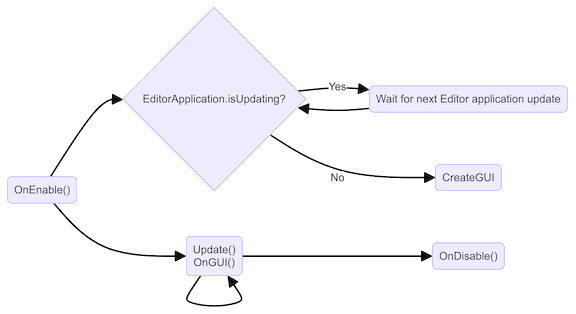
有关更多信息,请参阅 EditorWindow 类文档。
示例概述
本指南将实现一个精灵浏览器,它会查找并显示项目中的所有精灵,并将其显示在列表中。如果在列表中选择精灵,精灵的图像将显示在窗口的右侧。
可以在此 GitHub 代码仓库中找到此示例创建的完整文件。
先决条件
本指南适用于熟悉 Unity 编辑器、UI 工具包和 C# 脚本的开发者。在开始之前,请熟悉以下内容:
创建编辑器窗口脚本
若要向 UI 添加 UI 控件,可以将可视元素添加到视觉树。UI 工具包使用 VisualElement.Add() 方法将子项添加到现有视觉元素,并通过 rootvisualElement 属性访问编辑器窗口的视觉树。
- 使用任何模板在 Unity 中创建项目。
- 在项目 (Project) 窗口中,右键单击并选择创建 (Create) > UI 工具包 (UI Toolkit) > 编辑器窗口 (Editor Window)。
- 在 C# 框中输入
MyCustomEditor。 - 清除 UXML 和 USS 复选框。
- 选择确认 (Confirm)。
- 从菜单中选择窗口 (Window) > UI 工具包 (UI Toolkit) > 我的自定义编辑器 (MyCustomEditor) 以打开窗口。该窗口会显示一个标签,其中显示文本”Hello World!From C#“。
创建精灵列表
为了显示精灵列表,该示例使用 AssetDatabase 查找项目中的所有精灵。对于精灵浏览器,请添加一个 TwoPaneSplitView,将可用窗口空间拆分为两个面板:一个大小固定,一个大小灵活。调整窗口大小时,仅调整灵活窗格的大小,而固定大小的窗格保持不变。
-
在文件的顶部,添加铺所需的以下指令:
using System.Collections.Generic; -
将
CreateGUI()中的代码替换为以下代表。这会枚举项目中的所有精灵。public void CreateGUI() { // Get a list of all sprites in the project var allObjectGuids = AssetDatabase.FindAssets("t:Sprite"); var allObjects = new List<Sprite>(); foreach (var guid in allObjectGuids) { allObjects.Add(AssetDatabase.LoadAssetAtPath<Sprite>(AssetDatabase.GUIDToAssetPath(guid))); } } -
在
CreateGUI()中,添加以下代码。这会创建一个 TwoPaneSplitview 并添加两个子元素作为不同控件的占位符。// Create a two-pane view with the left pane being fixed. var splitView = new TwoPaneSplitView(0, 250, TwoPaneSplitViewOrientation.Horizontal); // Add the view to the visual tree by adding it as a child to the root element. rootVisualElement.Add(splitView); // A TwoPaneSplitView needs exactly two child elements. var leftPane = new VisualElement(); splitView.Add(leftPane); var rightPane = new VisualElement(); splitView.Add(rightPane); -
从菜单中选择窗口 (Window) > UI 工具包 (UI Toolkit) > 我的自定义编辑器 (MyCustomEditor) 以打开窗口。该窗口显示具有两个空面板的拆分视图。移动分隔条可以查看其实际效果。
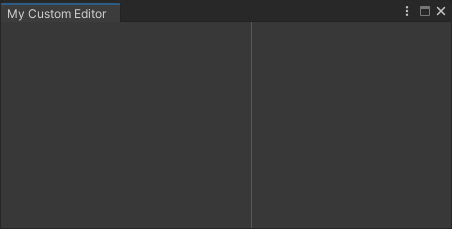
具有两个拆分窗格的窗口
添加列表视图
对于精灵浏览器,左窗格将是一个列表,其中包含项目中所有精灵的名称。ListView 控件派生自 VisualElement,因此很容易修改代码以使用 ListView 而不是 VisualElement。
ListView 控件显示一个可选项目的列表。系统对其进行了优化,以创建足够覆盖可见区域的元素,并在列表滚动时池化并回收视觉元素。这样可以优化性能并减少内存占用,即使在具有许多项的列表中也是如此。
要利用这一点,请使用以下内容初始化 ListView:
- 数据项数组
- 用于在列表中创建单个视觉列表条目的回调函数
- 绑定函数,使用数据数组中的项初始化视觉列表条目
您可以为列表中的每个元素创建复杂的 UI 结构。为便于演示,此示例使用一个简单的文本标签来显示精灵名称。
-
在
CreateGUI()中,将左面板更改为 ListView 而不是VisualElement:public void CreateGUI() { ... var leftPane = new ListView(); splitView.Add(leftPane); ... } -
在
CreateGUI()的底部,添加以下代码以初始化 ListView:public void CreateGUI() { ... // Initialize the list view with all sprites' names leftPane.makeItem = () => new Label(); leftPane.bindItem = (item, index) => { (item as Label).text = allObjects[index].name; }; leftPane.itemsSource = allObjects; } -
从菜单中选择窗口 (Window) > UI 工具包 (UI Toolkit) > 我的自定义编辑器 (MyCustomEditor) 以打开自定义编辑器窗口。此窗口将显示类似下图的可滚动列表视图和可选项目。
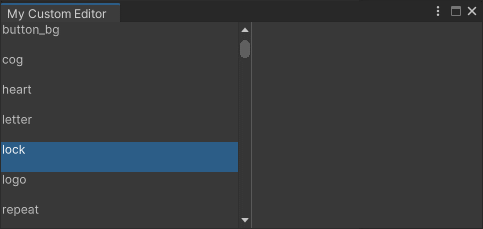
具有精灵名称的 ListView
添加回调
要从列表中选择精灵时在右侧面板上显示精灵的图像,请使用左侧面板的 selectionChanged 属性并添加回调函数。
要显示图像,请为所选精灵创建一个新的图像控件,并在添加控件之前使用 VisualElement.Clear() 删除所有先前的内容。
提示:如果您丢失了窗口并且菜单无法重新打开,请使用菜单窗口 (Window) > 面板 (Panels) > 关闭所有浮动面板 (Close all floating panels) 关闭所有浮动面板,或者重置您的窗口布局。
-
添加一个当左窗格列表中的选项更改时的回调函数。
public void CreateGUI() { ... // React to the user's selection leftPane.selectionChanged += OnSpriteSelectionChange; } private void OnSpriteSelectionChange(IEnumerable<object> selectedItems) { } -
回调函数需要访问 TwoPaneSplitview 的右窗格。为此,请将
CreateGUI()内部创建的右窗格更改为成员变量:private VisualElement m_RightPane; public void CreateGUI() { ... m_RightPane = new VisualElement(); splitView.Add(m_RightPane); ... } -
将以下代码添加到
OnSpriteSelectionChange函数。这会清除窗格中的所有先前内容,获取选定的精灵,并添加新的图像控件来显示精灵。private void OnSpriteSelectionChange(IEnumerable<object> selectedItems) { // Clear all previous content from the pane. m_RightPane.Clear(); // Get the selected sprite and display it. var enumerator = selectedItems.GetEnumerator(); if (enumerator.MoveNext()) { var selectedSprite = enumerator.Current as Sprite; if (selectedSprite != null) { // Add a new Image control and display the sprite. var spriteImage = new Image(); spriteImage.scaleMode = ScaleMode.ScaleToFit; spriteImage.sprite = selectedSprite; // Add the Image control to the right-hand pane. m_RightPane.Add(spriteImage); } } } -
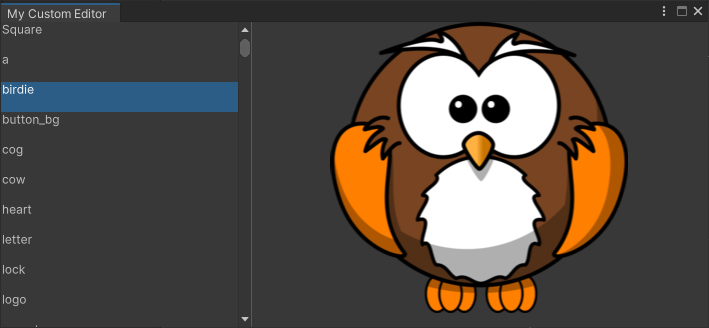
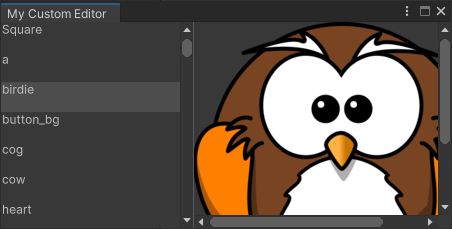
从菜单中选择窗口 (Window) > UI 工具包 (UI Toolkit) > 我的自定义编辑器 (MyCustomEditor) 以打开自定义编辑器窗口。从左侧列表中选择精灵时,精灵的图像将显示在窗口的右侧,类似于下图。
精灵浏览器实际效果
使 UI 可调整大小
编辑器窗口可在其最小和最大允许尺寸内调整大小。要设置这些尺寸,请写入 EditorWindow.minSize 和 EditorWindow.maxSize 属性。要防止窗口调整大小,请为这两个属性指定相同的尺寸。
如果窗口尺寸太小而无法显示整个 UI,则可以使用 ScrollView 元素为窗口提供滚动。左窗格上的 ListView 在内部使用 ScrollView,但右窗格是常规 VisualElement。要使右窗格可调整大小,请将其更改为具有双向滚动的 ScrollView。
-
在
ShowMyEditor()函数的底部添加以下代码以限制窗口的大小:public static void ShowMyEditor() { ... // Limit size of the window. wnd.minSize = new Vector2(450, 200); wnd.maxSize = new Vector2(1920, 720); } -
在
CreateGUI()中,将右窗格VisualElement更改为具有双向滚动的ScrollView:public void CreateGUI() { ... m_RightPane = new ScrollView(ScrollViewMode.VerticalAndHorizontal); splitView.Add(m_RightPane); ... } -
从菜单中选择窗口 (Window) > UI 工具包 (UI Toolkit) > 我的自定义编辑器 (MyCustomEditor) 以打开自定义编辑器窗口。精灵浏览器窗口现在有滚动条。调整窗口大小以查看滚动条的实际效果。
带有滚动条的编辑器窗口
支持在编辑器窗口中热重载
重新编译脚本或编辑器进入运行模式时,会发生 C# 域重新加载。在刚刚创建的编辑器窗口中,打开精灵浏览器,选择一个精灵,然后进入运行模式。窗口将重置,选择将消失。
正确的编辑器窗口需要与热重载工作流程配合使用。由于 VisualElement 对象不可序列化,因此每次重新加载时都必须重新创建 UI。这意味着在重新加载完成后会调用 CreateGUI() 方法。这允许您在 EditorWindow 类中存储必要的数据,从而恢复重新加载前的 UI 状态。
-
添加成员变量至
MyCustomEditor类,以将所选索引保存在精灵列表中。进行选择时,此成员变量会存储 ListView 的新选择索引。public class MyCustomEditor : EditorWindow { [SerializeField] private int m_SelectedIndex = -1; .... } -
在
CreateGUI()底部添加以下代码可存储和恢复所选列表索引。public void CreateGUI() { ... // Restore the selection index from before the hot reload. leftPane.selectedIndex = m_SelectedIndex; // Store the selection index when the selection changes. leftPane.selectionChanged += (items) => { m_SelectedIndex = leftPane.selectedIndex; }; } 从菜单中选择窗口 (Window) > UI 工具包 (UI Toolkit) > 我的自定义编辑器 (MyCustomEditor) 以打开自定义编辑器窗口。从列表中选择精灵并进入运行模式以测试热重载。
请参考以下已完成的脚本:
using System.Collections.Generic;
using UnityEditor;
using UnityEngine;
using UnityEngine.UIElements;

public class MyCustomEditor : EditorWindow
{
    [SerializeField] private int m_SelectedIndex = -1;
    private VisualElement m_RightPane;

    [MenuItem("Window/UI Toolkit/MyCustomEditor")]
    public static void ShowMyEditor()
    {
        // This method is called when the user selects the menu item in the Editor.
        EditorWindow wnd = GetWindow<MyCustomEditor>();
        wnd.titleContent = new GUIContent("My Custom Editor");

        // Limit size of the window.
        wnd.minSize = new Vector2(450, 200);
        wnd.maxSize = new Vector2(1920, 720);
  }

  public void CreateGUI()
  {
      // Get a list of all sprites in the project.
      var allObjectGuids = AssetDatabase.FindAssets("t:Sprite");
      var allObjects = new List<Sprite>();
      foreach (var guid in allObjectGuids)
      {
        allObjects.Add(AssetDatabase.LoadAssetAtPath<Sprite>(AssetDatabase.GUIDToAssetPath(guid)));
      }

      // Create a two-pane view with the left pane being fixed.
      var splitView = new TwoPaneSplitView(0, 250, TwoPaneSplitViewOrientation.Horizontal);

      // Add the panel to the visual tree by adding it as a child to the root element.
      rootVisualElement.Add(splitView);

      // A TwoPaneSplitView always needs two child elements.
      var leftPane = new ListView();
      splitView.Add(leftPane);
      m_RightPane = new ScrollView(ScrollViewMode.VerticalAndHorizontal);
      splitView.Add(m_RightPane);

      // Initialize the list view with all sprites' names.
      leftPane.makeItem = () => new Label();
      leftPane.bindItem = (item, index) => { (item as Label).text = allObjects[index].name; };
      leftPane.itemsSource = allObjects;

      // React to the user's selection.
      leftPane.selectionChanged += OnSpriteSelectionChange;

      // Restore the selection index from before the hot reload.
      leftPane.selectedIndex = m_SelectedIndex;

      // Store the selection index when the selection changes.
      leftPane.selectionChanged += (items) => { m_SelectedIndex = leftPane.selectedIndex; };
  }

  private void OnSpriteSelectionChange(IEnumerable<object> selectedItems)
  {
      // Clear all previous content from the pane.
      m_RightPane.Clear();

      var enumerator = selectedItems.GetEnumerator();
      if (enumerator.MoveNext())
      {
          var selectedSprite = enumerator.Current as Sprite;
          if (selectedSprite != null)
          {
              // Add a new Image control and display the sprite.
              var spriteImage = new Image();
              spriteImage.scaleMode = ScaleMode.ScaleToFit;
              spriteImage.sprite = selectedSprite;

              // Add the Image control to the right-hand pane.
              m_RightPane.Add(spriteImage);
          }
      }
  }
}