在 URP 中的兼容性模式下执行全屏 blit 的示例
本页上的示例描述了如何创建执行全屏位图传输的自定义渲染器功能。
注意:Unity 不再开发或改进不使用Render Graph API 的渲染路径。在开发新的图形功能时,请改用 Render Graph API。要使用此页面上的说明,请在 URP 图形设置(项目设置 (Project Settings) > 图形 (Graphics))中启用兼容性模式(禁用 Render Graph)(Compatibility Mode (Render Graph Disabled))。
示例概述
此示例将实现以下解决方案:
该示例包括执行渲染的 GPU 端的着色器。着色器使用__ XR__虚拟现实(VR)、增强现实(AR)和混合现实(MR)应用的泛指术语。支持这些形式的交互式应用程序的设备可被称为 XR 设备。更多信息
See in Glossary 采样器宏对颜色缓冲区进行采样。
先决条件
此示例需要满足以下条件:
- Scriptable Render Pipeline Settings 属性是指 URP 资源(项目设置 (Project Settings) > 图形 (Graphics) > 可编程渲染管线设置 (Scriptable Render Pipeline Settings))。
创建示例场景和游戏对象
要按照此示例中的步骤操作,请创建一个包含以下游戏对象的新场景:
-
创建一个立方体。确保可从主摄像机清楚看见该立方体。
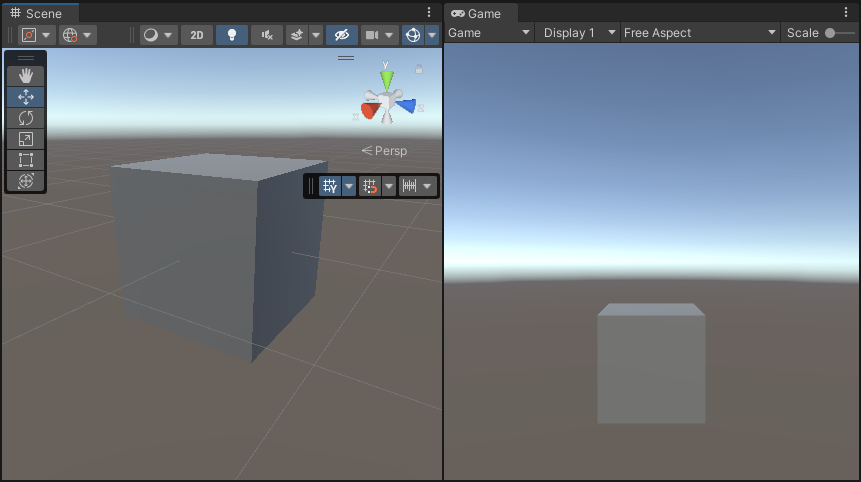
现在准备好了执行此示例中的步骤所需的场景。
实现示例
此部分假设已创建一个场景,如创建示例场景和游戏对象部分所述。
-
创建一个新的 C# 脚本。将其命名为
ColorBlitRendererFeature.cs。此脚本实现自定义渲染器功能。using UnityEngine; using UnityEngine.Rendering; using UnityEngine.Rendering.Universal; internal class ColorBlitRendererFeature : ScriptableRendererFeature { public Shader shader; [Range(0f, 1f)] public float intensity = 1f; Material m_Material; ColorBlitPass m_RenderPass; // Use this method to add one or more Render Passes into the rendering sequence of the renderer with the EnqueuePass method. public override void AddRenderPasses(ScriptableRenderer renderer, ref RenderingData renderingData) { if (m_Material == null) return; if (renderingData.cameraData.cameraType != CameraType.Game) return; m_RenderPass.SetIntensity(intensity); renderer.EnqueuePass(m_RenderPass); } // Use the Create method to initialize the resources. This method only runs in the first frame. // Use the Dispose method to clean up the resources before the renderer feature is disabled. public override void Create() { m_Material = CoreUtils.CreateEngineMaterial(shader); m_RenderPass = new ColorBlitPass(m_Material); } protected override void Dispose(bool disposing) { CoreUtils.Destroy(m_Material); } } -
创建一个新的 C# 脚本。将其命名为
ColorBlitPass.cs。此脚本实现自定义渲染通道以执行自定义__ blit__“位块传输 (Bit Block Transfer)”的简写。blit 操作是将数据块从内存中的一个位置传输到另一个位置的过程。
See in Glossary 绘制调用。此渲染通道使用 AddBlitPass 执行 blit 操作。
注意:请勿在 URP XR 项目中使用
cmd.Blit方法,因为该方法与 URP XR 集成存在兼容性方面的问题。使用cmd.Blit可能会隐式启用或禁用 XR 着色器关键字,而这会破坏 XR SPI 渲染。using UnityEngine; using UnityEngine.Rendering.RenderGraphModule; using UnityEngine.Rendering; using UnityEngine.Rendering.Universal; using UnityEngine.Rendering.RenderGraphModule.Util; public class ColorBlitPass : ScriptableRenderPass { private const string k_PassName = "ColorBlitPass"; private Material m_Material; private float m_Intensity; private static readonly int k_IntensityID = Shader.PropertyToID("_Intensity"); public ColorBlitPass(Material mat) { m_Material = mat; renderPassEvent = RenderPassEvent.BeforeRenderingPostProcessing; } public void SetIntensity(float intensity) { m_Intensity = intensity; } // Use the RecordRenderGraph method to configure the input and output parameters for the AddBlitPass method and execute the AddBlitPass method. public override void RecordRenderGraph(RenderGraph renderGraph, ContextContainer frameData) { var resourceData = frameData.Get<UniversalResourceData>(); // The following line ensures that the render pass doesn't blit // from the back buffer. if (resourceData.isActiveTargetBackBuffer) { Debug.LogError($"Skipping render pass. ColorBlitRendererFeature requires an intermediate ColorTexture, we can't use the BackBuffer as a texture input."); return; } var source = resourceData.activeColorTexture; // Define the texture descriptor for creating the destination render graph texture. var destinationDesc = renderGraph.GetTextureDesc(source); destinationDesc.name = $"CameraColor-{k_PassName}"; destinationDesc.clearBuffer = false; destinationDesc.depthBufferBits = 0; // Create the texture. TextureHandle destination = renderGraph.CreateTexture(destinationDesc); // The AddBlitPass method adds the render graph pass that blits from the source to the destination texture. RenderGraphUtils.BlitMaterialParameters para = new(source, destination, m_Material, 0); para.material.SetFloat(k_IntensityID, m_Intensity); renderGraph.AddBlitPass(para, passName: k_PassName); // Use the destination texture as the camera texture to avoid the extra blit from the destination texture back to the camera texture. resourceData.cameraColor = destination; } } -
创建执行 blit 操作的着色器。调用着色器文件
ColorBlit.shader。顶点函数输出全屏四边形位置。片元函数对颜色缓冲区进行采样并将color * float4(0, _Intensity, 0, 1)值返回给渲染目标。Shader "ColorBlit" { SubShader { Tags { "RenderType"="Opaque" "RenderPipeline" = "UniversalPipeline"} ZWrite Off Cull Off Pass { Name "ColorBlitPass" HLSLPROGRAM #include "Packages/com.unity.render-pipelines.universal/ShaderLibrary/Core.hlsl" #include "Packages/com.unity.render-pipelines.core/Runtime/Utilities/Blit.hlsl" #pragma vertex Vert #pragma fragment Frag float _Intensity; float4 Frag(Varyings input) : SV_Target { // This function handles the different ways XR platforms handle texture arrays. UNITY_SETUP_STEREO_EYE_INDEX_POST_VERTEX(input); // Sample the texture using the SAMPLE_TEXTURE2D_X_LOD function float2 uv = input.texcoord.xy; half4 color = SAMPLE_TEXTURE2D_X_LOD(_BlitTexture, sampler_LinearRepeat, uv, _BlitMipLevel); // Modify the sampled color return half4(0, _Intensity, 0, 1) * color; } ENDHLSL } } } -
将
ColorBlitRendererFeature添加到通用渲染器资源。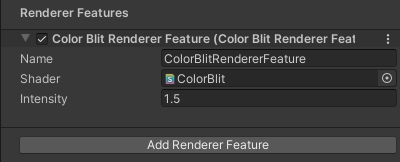
添加渲染器功能 有关如何添加渲染器功能的信息,请参阅如何向渲染器添加渲染器功能页面。
对于此示例,请将 Intensity 属性设置为 1.5。
-
Unity 会显示以下视图:
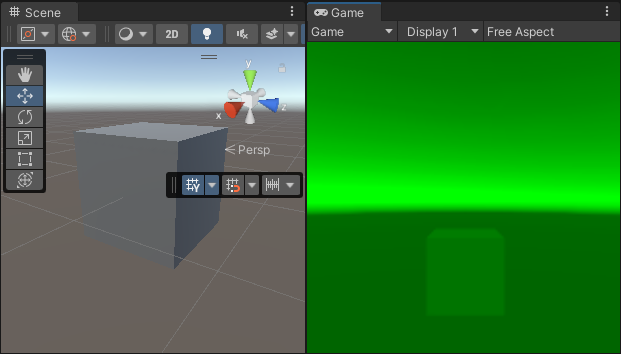
最终场景和游戏视图 注意:要在 XR 中可视化该示例,请将项目配置为使用 XR SDK。将 MockHMD XR 插件添加到项目中。将 Render Mode 属性设置为单通道实例化。
此示例已完成。
其他资源
有关在兼容性模式下执行 blit 操作的更多信息,请参阅 URP 14 (Unity 2022) 文档中的纹理使用部分。