内置渲染管线中的反射着色器示例
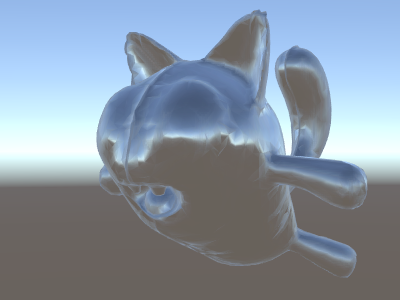
如果在场景中使用天空盒作为反射源(请参阅光照 (Lighting) 窗口),则在本质上会创建一个包含天空盒数据的“默认”探针。反射探针内部是立方体贴图纹理;我们将扩展上面的世界空间法线着色器来对其进行深入了解。
代码现在开始变得有点复杂。当然,如果您希望着色器能够自动处理光源、阴影、反射以及光照系统的其余部分,使用表面着色器会容易得多。此示例旨在向您展示如何以“手动”方式使用光照系统的各个部分。
Shader "Unlit/SkyReflection"
{
    SubShader
    {
        Pass
        {
            CGPROGRAM
            #pragma vertex vert
            #pragma fragment frag
            #include "UnityCG.cginc"

            struct v2f {
                half3 worldRefl : TEXCOORD0;
                float4 pos : SV_POSITION;
            };

            v2f vert (float4 vertex : POSITION, float3 normal : NORMAL)
            {
                v2f o;
                o.pos = UnityObjectToClipPos(vertex);
                // compute world space position of the vertex
                float3 worldPos = mul(_Object2World, vertex).xyz;
                // compute world space view direction
                float3 worldViewDir = normalize(UnityWorldSpaceViewDir(worldPos));
                // world space normal
                float3 worldNormal = UnityObjectToWorldNormal(normal);
                // world space reflection vector
                o.worldRefl = reflect(-worldViewDir, worldNormal);
                return o;
            }

            fixed4 frag (v2f i) : SV_Target
            {
                // sample the default reflection cubemap, using the reflection vector
                half4 skyData = UNITY_SAMPLE_TEXCUBE(unity_SpecCube0, i.worldRefl);
                // decode cubemap data into actual color
                half3 skyColor = DecodeHDR (skyData, unity_SpecCube0_HDR);
                // output it!
                fixed4 c = 0;
                c.rgb = skyColor;
                return c;
            }
            ENDCG
        }
    }
}
以上示例使用了内置着色器 include 文件中的部分内容:
- 来自内置着色器变量 unity_SpecCube0 的 unity_SpecCube0、unity_SpecCube0_HDR、Object2World、UNITY_MATRIX_MVP 包含激活的反射探针的数据。
- UNITY_SAMPLE_TEXCUBE 是一个用于采样立方体贴图的内置宏。通常使用标准 HLSL 语法声明和使用大多数常规立方体贴图(__samplerCUBE__ 和 texCUBE__),但 Unity 中的反射探针立方体贴图以特殊方式声明以节省采样器字段。如果您不知道这是什么,请不要担心,只需要知道:要使用 unity_SpecCube0__ 立方体贴图,必须使用 UNITY_SAMPLE_TEXCUBE 宏。
- UnityCG.cginc 中的 UnityWorldSpaceViewDir 函数以及来自同一文件的 DecodeHDR 函数。后者用于从反射探针数据中获取实际颜色(因为 Unity 以特殊编码方式存储反射探针立方体贴图)。
- reflect 只是一个内置的 HLSL 函数,用于计算给定法线周围的矢量反射。