使用车轮碰撞体创建汽车
本教程将介绍如何使用 PhysX 车轮碰撞体创建一辆具备基本功能的四轮汽车。
这些步骤包括:
- 准备项目
- 准备汽车模型
- 添加车轮碰撞体,并设置其位置和半径
- 添加脚本控制汽车行为,包括汽车移动和车轮旋转
- 测试汽车
准备项目
要按照以下说明操作,您需要:
- 一个新的空场景
- 已导入到开放项目中的演示汽车模型(下载:car.fbx)
- 汽车行驶的地面。
要创建地面,请执行以下操作:
- 创建一个平面游戏对象并将其重命名为
Ground。此平面是汽车行驶的地面。 - 将其位置设置为 (0,0,0),并将其缩放设置为 (100,1,100)。
准备汽车模型
首先,将汽车模型放置在场景中:
- 在项目窗口中,选择导入的
Car资产。 - 提取汽车模型的纹理,以便 Unity 可以在场景中显示这些纹理。为此,请在检视面板窗口中导航到导入设置 (Import Settings) 并执行以下操作:
- 选择材质 (Materials)
- 选择材质 (Textures) > 提取材质 (Extract Textures)。在打开的文件资源管理器中,将它们保存在
Assets文件夹中(默认位置)。 - 选择应用 (Apply)。
- 将汽车资产放置在场景中,位于地面之上或正上方。
在层级视图窗口中查看汽车游戏对象的层级视图。有一个名为 Car 的根游戏对象以及车身模型和每个车轮模型的子游戏对象。
配置车身以进行碰撞:
- 在
Car根游戏对象上,添加一个刚体组件。 - 将刚体的质量 (Mass) 设置为 `1500``。此值以公斤为单位定义汽车的重量。它是车轮碰撞体的默认悬架设置的合适重量。有关更多信息,请参阅 车轮碰撞体悬架:质量和悬浮值 。
- 在
Car Body游戏对象上,添加一个网格碰撞体组件。 - 在新的网格碰撞体组件上,启用凸面体 (Convex)。
添加车轮碰撞体
要将车轮碰撞体添加到车轮模型,需要在与车轮模型相同的位置创建四个新的单独游戏对象(但不能作为车轮的子游戏对象)。
要在大致相同的位置进行此设置,一种快速方法是复制车轮游戏对象,然后配置新的游戏对象:
- 选择所有四个车轮游戏对象。
- 复制游戏对象 (Ctrl/Cmd+D)。
- 选择所有四个重复项并执行以下操作:
- 删除网格渲染器和网格过滤器组件
- 添加车轮碰撞体组件
- 重命名新的车轮碰撞体游戏对象。默认情况下,Unity 会为重复的游戏对象提供相同的名称,并在括号中添加一个数字;例如,
Wheel Back Left (1)。为清楚起见,请在游戏对象名称中添加“Collider”一词;例如,Wheel Back Left collider。
汽车游戏对象层级视图现在应该如下所示:
接下来,需要调整车轮碰撞体的位置和大小以匹配车轮模型。
选择车轮碰撞体时,场景视图会显示一个辅助图标,用于可视化车轮碰撞体设置(请参阅车轮碰撞体可视化)。您可以使用辅助图标根据车轮模型的位置和大小检查车轮碰撞体的位置和大小。
要更清楚地查看车轮方向和辅助图标,请将场景的绘制模式 (Draw mode) 设置为线框 (Wireframe),并将场景方向 (Scene orientation) 设置为等距 (Isometric)。
设置车轮碰撞体位置
首次使用添加车轮碰撞体中所述工作流程添加车轮碰撞体时,车轮碰撞体太低(在场景视图中,车轮碰撞体圆圈显示在车轮模型网格下方)。这是因为悬架距离 (Suspension Distance) 从这些游戏对象的位置开始,向下延伸悬架距离 (Suspension Distance) 设置中指定的距离。场景视图可视化将悬架距离 (Suspension Distance) 显示为沿车轮碰撞体辅助图标 Y 轴的橙色线。
绿色圆形轮廓显示车轮在悬架距离范围的中间点,当汽车未在其悬架上压扁或升高时,应被视为车轮的正常位置。因此,每个车轮碰撞体的绿色轮廓需要在其相应的车轮网格上居中。
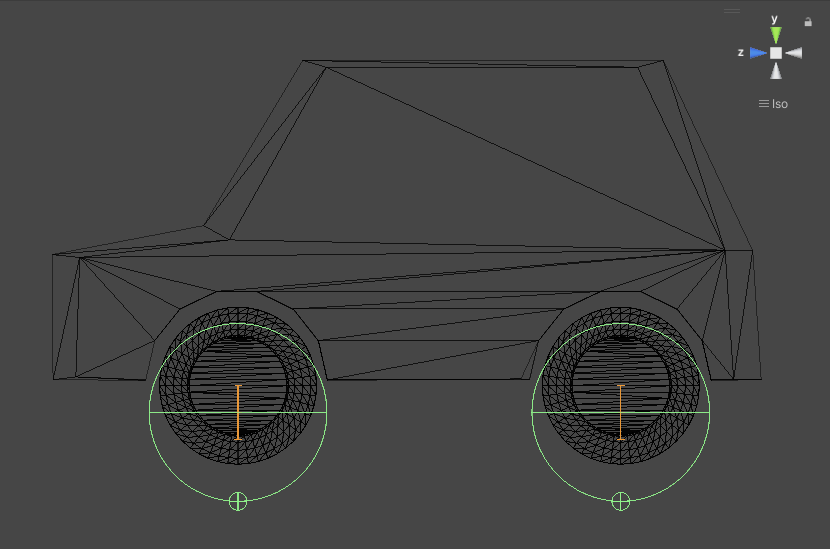
要更正此问题,必须将车轮碰撞体游戏对象向上(在 Y 轴上)移动车轮碰撞体的悬架距离 (Suspension Distance) 值的一半。在此示例项目中,悬架距离 (Suspension Distance) 为 0.3(默认值),因此需要将车轮碰撞体游戏对象向上移动 0.15 个单位。
Unity 允许在数字字段中输入简单的数学运算。您可以使用此功能以添加到 Y 轴值。
- 选择所有四个车轮碰撞体游戏对象。
- 在检视面板中,导航到变换组件的位置 (Position) 属性。
- 在 Y 轴值中,将光标放在该值的末尾。将
+0.15添加到值的末尾(例如,如果值为 0.5,则值现在应为0.5+0.15)。 - 按回车键。
Unity 将 +0.15 应用于上一个值,使车轮碰撞体游戏对象在 Y 轴上向上移动 0.15 个单位。
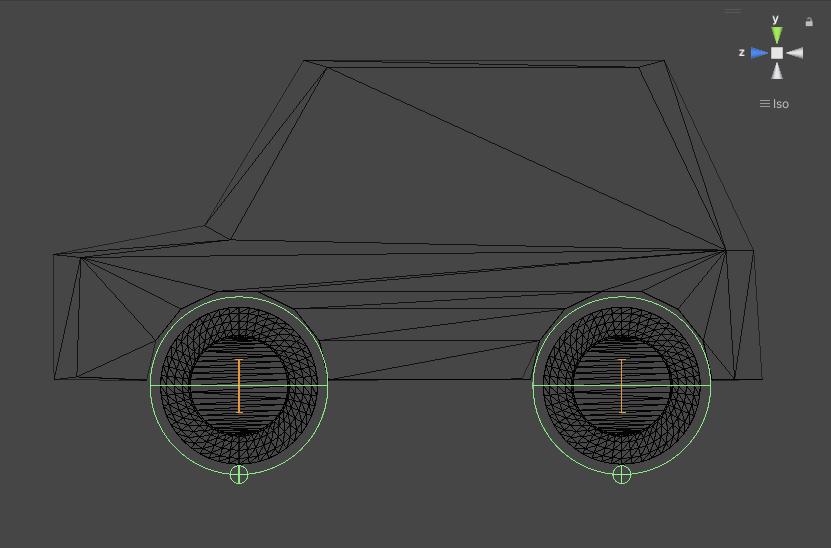
车轮碰撞体辅助图标现在应该完美地在车轮网格上居中:
设置车轮碰撞体半径
首次使用添加车轮碰撞体中所述的工作流程添加车轮碰撞体时,车轮碰撞体太大(在场景视图中,车轮碰撞体辅助图标大于车轮模型网格)。
要准确更正此问题,就需要知道车轮模型的确切半径。此信息应该可从 3D 建模软件或创建模型的技术美术师处获得。
在此示例项目中,车轮模型的半径为 0.44。
- 选择所有四个车轮碰撞体游戏对象
- 在检视面板中,导航到车轮碰撞体组件的半径 (Radius) 属性
- 将半径 (Radius) 设置为
0.44。
如果车轮模型的确切半径未知或无法取得,可使用车轮碰撞体辅助图标将其半径与模型近似匹配。或者,可以使用球形碰撞体来获取半径,因为球形碰撞体会自动调整大小以包含其关联模型的网格。
要使用球形碰撞体获取半径,请执行以下操作:
- 选择任何车轮模型游戏对象。
- 添加球形碰撞体。
- 请注意球形碰撞体的半径 (Radius) 属性值。
- 移除球形碰撞体。
- 选择所有四个车轮碰撞体游戏对象。
- 在检视面板中,导航到车轮碰撞体组件的半径 (Radius) 属性。
- 将车轮碰撞体半径 (Radius) 设置为您记下的球形碰撞体半径 (Radius) 值。
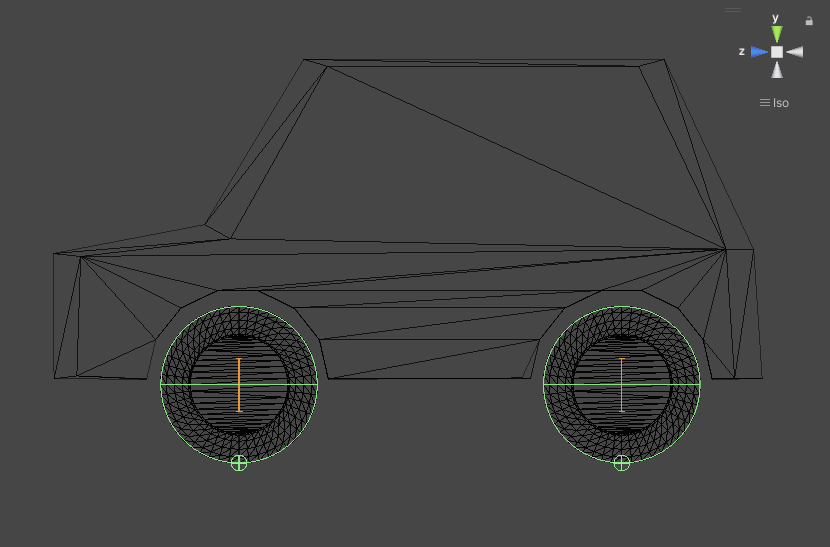
车轮碰撞体现在应该与车轮模型的位置和大小完全匹配。
添加脚本来控制汽车行为
要控制汽车,您需要向项目中添加脚本来执行以下操作:
- 控制汽车移动:根据用户输入将转向、扭矩和制动值发送到车轮碰撞体。
- 控制车轮移动:根据每个车轮碰撞体的状态移动和旋转车轮网格。
在此示例中,我们使用两个脚本来执行此操作:CarControl.cs 和 WheelControl.cs。
添加汽车移动控件
创建一个名为 CarControl.cs 的 C# 文件,然后粘贴到以下代码中:
using UnityEngine;

public class CarControl : MonoBehaviour
{
    public float motorTorque = 2000;
    public float brakeTorque = 2000;
    public float maxSpeed = 20;
    public float steeringRange = 30;
    public float steeringRangeAtMaxSpeed = 10;
    public float centreOfGravityOffset = -1f;

    WheelControl[] wheels;
    Rigidbody rigidBody;

    // Start is called before the first frame update
    void Start()
    {
        rigidBody = GetComponent<Rigidbody>();

        // Adjust center of mass vertically, to help prevent the car from rolling
        rigidBody.centerOfMass += Vector3.up * centreOfGravityOffset;

        // Find all child GameObjects that have the WheelControl script attached
        wheels = GetComponentsInChildren<WheelControl>();
    }

    // Update is called once per frame
    void Update()
    {

        float vInput = Input.GetAxis("Vertical");
        float hInput = Input.GetAxis("Horizontal");

        // Calculate current speed in relation to the forward direction of the car
        // (this returns a negative number when traveling backwards)
        float forwardSpeed = Vector3.Dot(transform.forward, rigidBody.velocity);


        // Calculate how close the car is to top speed
        // as a number from zero to one
        float speedFactor = Mathf.InverseLerp(0, maxSpeed, forwardSpeed);

        // Use that to calculate how much torque is available
        // (zero torque at top speed)
        float currentMotorTorque = Mathf.Lerp(motorTorque, 0, speedFactor);

        // …and to calculate how much to steer
        // (the car steers more gently at top speed)
        float currentSteerRange = Mathf.Lerp(steeringRange, steeringRangeAtMaxSpeed, speedFactor);

        // Check whether the user input is in the same direction
        // as the car's velocity
        bool isAccelerating = Mathf.Sign(vInput) == Mathf.Sign(forwardSpeed);

        foreach (var wheel in wheels)
        {
            // Apply steering to Wheel colliders that have "Steerable" enabled
            if (wheel.steerable)
            {
                wheel.WheelCollider.steerAngle = hInput * currentSteerRange;
            }

            if (isAccelerating)
            {
                // Apply torque to Wheel colliders that have "Motorized" enabled
                if (wheel.motorized)
                {
                    wheel.WheelCollider.motorTorque = vInput * currentMotorTorque;
                }
                wheel.WheelCollider.brakeTorque = 0;
            }
            else
            {
                // If the user is trying to go in the opposite direction
                // apply brakes to all wheels
                wheel.WheelCollider.brakeTorque = Mathf.Abs(vInput) * brakeTorque;
                wheel.WheelCollider.motorTorque = 0;
            }
        }
    }
}
将此 CarControl.cs 脚本添加到 Car 根游戏对象。
CarControl.cs 脚本根据用户输入处理汽车行为,例如加速度、扭矩和制动。有关详细信息,请参阅代码注释。
CarControl.cs 脚本的某些元素是指在下一部分中创建的 WheelControl.cs 脚本。
添加车轮移动控件
创建一个名为 WheelControl.cs 的 C# 文件,然后粘贴到以下代码中:
using UnityEngine;

public class WheelControl : MonoBehaviour
{
    public Transform wheelModel;

    [HideInInspector] public WheelCollider WheelCollider;

    // Create properties for the CarControl script
    // (You should enable/disable these via the
    // Editor Inspector window)
    public bool steerable;
    public bool motorized;

    Vector3 position;
    Quaternion rotation;

    // Start is called before the first frame update
    private void Start()
    {
        WheelCollider = GetComponent<WheelCollider>();
    }

    // Update is called once per frame
    void Update()
    {
        // Get the Wheel collider's world pose values and
        // use them to set the wheel model's position and rotation
        WheelCollider.GetWorldPose(out position, out rotation);
        wheelModel.transform.position = position;
        wheelModel.transform.rotation = rotation;
    }
}
将此脚本添加到每个车轮碰撞体游戏对象。
WheelControl.cs 脚本使用 WheelCollider.GetWorldPose 获取车轮碰撞体在场景中的位置。然后,脚本将该位置信息分配给指定的车轮模型游戏对象。有关详细信息,请参阅代码注释。
WheelControl.cs 脚本的每个实例都必须引用其相应的车轮模型游戏对象。
要为每个车轮碰撞体分配正确的车轮模型游戏对象,请执行以下操作:
- 选择车轮碰撞体游戏对象
- 在检视面板窗口中,导航到脚本创建的车轮控制 (Wheel Control) 组件
- 将车轮模型 (Wheel Model) 设置为相应的车轮模型游戏对象(例如,在“左后轮碰撞体 (Wheel Rear Left collider)”游戏对象上,分配“左后轮 (Wheel Rear Left)”车轮模型游戏对象):
- 对每个车轮碰撞体重复操作。
还需要选择哪些车轮从 CarControl 脚本接收电机输入和转向输入。要通过车轮控制 (Wheel Control) 属性模拟四轮驱动汽车,请执行以下操作:
- 在所有四个车轮碰撞体游戏对象上,启用机动 (Motorized)。
- 在两个前轮碰撞体游戏对象上,启用可转向 (Steerable)。
测试汽车
要测试汽车,请进入播放模式并使用箭头或 WASD 键移动和转向。请注意,输入控件仅在游戏视图获得焦点时才有效。
要更好地查看汽车在场景中移动,请执行以下操作:
- 排列编辑器窗口,使场景视图和游戏视图同时可见。
- 将场景视图的焦点锁定到汽车。为此,请在场景视图中选择
Car根游戏对象,然后按 Shift + F。
现在进行基本设置后,可以尝试更改不同的设置来观察它们对汽车移动的影响。您还可以按照以下说明操作不同的汽车型号,并观察其设置的异同。