创建具有两个属性的自定义控件
版本:2023.2+
此示例演示了如何创建具有两个属性的简单自定义控件。
概述示例
此示例创建一个名为 MyElement 的自定义控件,该控件带有两个属性,并将其暴露给 UXML 和__ UI__(即用户界面,User Interface)让用户能够与您的应用程序进行交互。Unity 目前支持三种 UI 系统。更多信息
See in Glossary Builder。此示例还演示了如何在 UI Builder 中将自定义控件添加到 UI。
可以在此 GitHub 代码仓库中找到此示例创建的完整文件。
先决条件
本指南适用于熟悉 Unity、UI 工具包和 C# 脚本的开发人员。在开始之前,请熟悉以下内容:
创建示例
要在 C# 中创建新的自定义控件类,请从 VisualElement 类继承该类。这允许在 C# 中创建和使用此元素,但不会在 UXML 和 UI Builder 中自动显示该元素。要显示此属性,请添加 UxmlElement 属性。要显示这些属性,需对每个想要在 UXML 和 UI Builder 中可见的属性添加 UxmlAttribute 属性。
- 使用任何模板创建 Unity 项目。
- 在
Assets文件夹中,创建一个名为MyElement.cs的 C# 脚本,其中包含以下内容:
using UnityEngine;
using UnityEngine.UIElements;

[UxmlElement]
partial class MyElement : VisualElement
{
    string _myString = "default_value";
    int _myInt = 2;

    [UxmlAttribute]
    public string myString
    {
        get => _myString;
        set
        {
            _myString = value;
            Debug.Log($"myString set to: {_myString}");
            // React here, e.g. update UI
        }
    }

    [UxmlAttribute]
    public int myInt
    {
        get => _myInt;
        set
        {
            _myInt = value;
            Debug.Log($"myInt set to: {_myInt}");
            // React here, e.g. update UI
        }
    }
}
创建一个 UXML 以查看属性
- 创建任意名称的 UXML 文件。
- 双击该 UXML 文件可在 UI Builder 中将其打开。
- 在 UI Builder 的 库 (Library) 部分中,选择 项目 (Project) > 自定义控件 (C#) (Custom Controls (C#)) > MyElement。
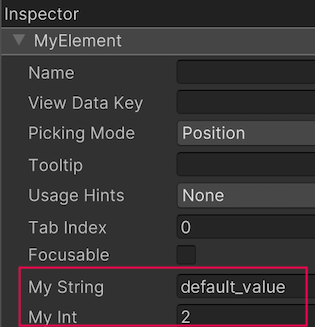
- 将 MyElement 拖动到层级视图 (Hierarchy) 窗口。
- 要查看 MyElement 的自定义属性,请转到 MyElement 的检视面板 (Inspector) 选项卡: