SpeedTree Model tab reference
Use the Model tab to change the model settings for imported SpeedTree assets.
To change materials settings for the SpeedTree model, refer to SpeedTree Import Settings Materials tab reference.
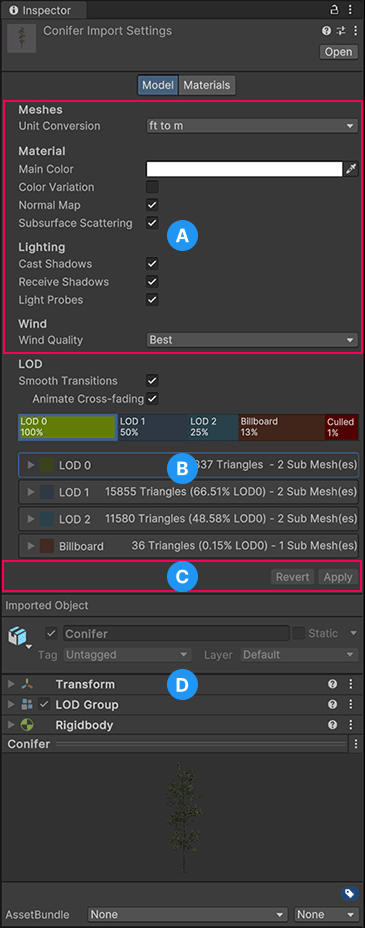
The Model tab has these sections:
(A) The Meshes, MaterialAn asset that defines how a surface should be rendered. More info
See in Glossary, Lighting, Additional Settings, and Wind sections allow you to adjust global import settings for the model.
(B) The LODThe Level Of Detail (LOD) technique is an optimization that reduces the rendering workload to improve performance. More info
See in Glossary section has a specialized variation of the LOD GroupA component to manage level of detail (LOD) for GameObjects. More info
See in Glossary component for importing SpeedTree models. You can set smooth transitions between LOD levels, adjust thresholds for each LOD level, and use the level-specific LOD options to turn off resource-heavy effects.
(C) The Revert and Apply options always appear, but you can only select them after you make changes to the import settings. If you change settings in the Remapped Materials section of the Materials tab, the Apply & Generate Materials option appears.
(D) The properties for the GameObject (read-only) appear at the bottom of the Inspector view, including a preview of the SpeedTree Model.
Meshes
| Property | Description |
|---|---|
| Unit Conversion | Apply a global scale to the imported SpeedTree model. The following options are available:
|
| Scale Factor | Scale the model by a custom value. This property is visible only when Unit Conversion is set to Custom. |
Material
| Property | Description |
|---|---|
| Main Color | Choose a color to modulate the diffuse lighting component. |
| Color Variation | Enable color variation for the model. This property uses Main Color and Variation Color (RGB) Intensity (A) along with the model’s world position to pick the final color. Color variation helps add a more natural look to clusters of SpeedTree models. |
| Variation Color (RGB), Intensity (A) | Choose the color and intensity used in the Color Variation process. This property is visible only when Color Variation is enabled. |
| Normal Map | Enable Bump mapsAn image texture used to represent geometric detail across the surface of a mesh, for example bumps and grooves. Can be represented as a heightmap or a normal map. More info See in Glossary on the model. |
| Subsurface Scattering | Enable subsurface scattering effects. This shader effect simulates the light scattered out the back side of leaves and other two-sided SpeedTree materials. |
Lighting
| Property | Description |
|---|---|
| Cast Shadows | Let the model cast shadows on its environment when directly lit by a light source. |
| Receive Shadows | Let the model receive shadows from other GameObjects in the scene. |
| Light Probes | Enable Light Probes rendering for the model. |
Additional Settings
| Property | Description |
|---|---|
| Motion Vectors | Set the Motion Vector property for the Mesh Renderer of each LOD GameObject. For details about the motion vector rendering options, refer to the Mesh Renderer component. |
| Generate Colliders | Generate mesh colliders for the model. This property is available only for .st9 files. |
Wind
The following options are available for .spm or .st files.
To adjust wind for .st9 files, refer to the Wind tab.
| Property | Description |
|---|---|
| Wind Quality | Choose the level of wind quality to use for this asset. Options with more wind effects have a higher performance cost. The following options are available:
|
LOD
Note: This section assumes you have already read the documentation on the LOD Group component. The section on Working with SpeedTree Models explains key concepts and workflow information that are crucial for understanding how to import SpeedTree models.
The LOD Group component for the SpeedTree Importer is different from the generic LOD Group component that appears on a SpeedTree instance in Unity:
- Fade Mode options aren’t available because the Fade Mode is already set to Speed Tree.
- The playhead for the preview is missing because you can only preview the LOD transitions when an instance of the model is placed in the scene.
- The options governing the LOD transitions are the same as the LOD Group component, with the only difference being the Smooth Transitions property. Enable Smooth Transitions to reveal the other properties for LOD transition animations: Animate Cross-fading, Crossfade Width, and Fade Out Width.
- Each LOD level has its own set of options that allow you to enable or disable resource-heavy effects.
The LOD Group selection bar
The LOD Group selection bar represents the different LOD levels as colored boxes. When a level box is selected, a blue outline appears around it:

The percentage that appears in each LOD level box represents the threshold at which that level becomes active, based on the ratio of the GameObject’s screen space height to the total screen height.
To select a level, click on the level box. To change the percentage value for a level, drag the boundary to the left or right of the level container. You can also customize which properties are enabled or disabled on each level as an optimization strategy.
Level-specific LOD options
For each LOD level defined on your SpeedTree asset, you can customize a variety of properties. The properties correspond to other settings in the Model tab and override global import settings.
To set LOD options on a specific LOD level, select the LOD level box on the LOD Group selection bar and enable Customize LOD options.
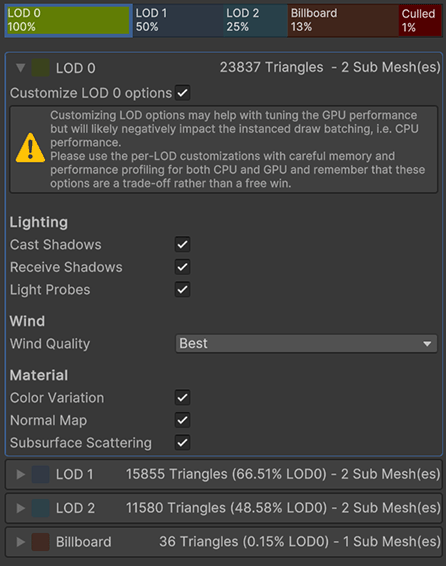
When you enable customization for an LOD level, the SpeedTree Importer generates a new material for that LOD level.
Note: Customized LOD levels negatively affect batching and instancing and increase memory consumption. But customizations can help with some GPU bottleneck scenarios if you disable shader-heavy effects for an LOD level. Profile your scene for CPU and GPU before and after you customize to see the impact on performance.
Billboard LODs
Billboards are treated differently from other LOD meshes:
- If billboards are available in the SpeedTree model, customizations are automatically enabled.
- Some resource-heavy properties such as Light Probes and Wind are disabled by default or have reduced value range for performance reasons.