Using the Animation View
The Animation View can be used to preview and edit Animation Clips for animated Game Objects in Unity. The Animation View can be opened from the Window->Animation menu.
Viewing Animations on a GameObject
The Animation View is tightly integrated with the Hierarchy View, the Scene View, and the Inspector. Similar to the Inspector, the Animation View will show the timeline and keyframes of the animation for the currently selected Game Object. You can select a Game Object using the Hierarchy View or the Scene View. (If you select a Prefab in the Project View you can inspect its animation timeline as well, but you have to drag the Prefab into the Scene View in order to be able to edit the animation.)
The Animated Properties List
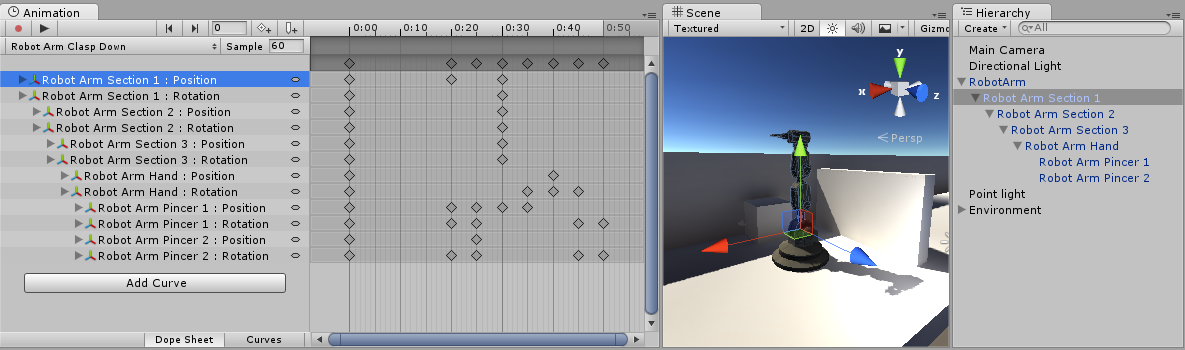
At the left side of the Animation View is a list of the animated properties. In a newly created clip where no animation has yet been recorded, this list will be empty. When you begin to animate various properties within this clip, the animated properties will appear here. If the animation controls multiple child objects, the list will also include a hierarchical list of each child object’s animated properties. In the example above, various parts of the Robot Arm hierarchy are all animated within the same animation clip, and each animated GameObject is shown according to its hierarchical position in relation to the root object which has the Animator component attached.
Each property can be folded and unfolded to reveal the exact values recorded at each keyframe. The value fields will show the interpolated value if the playback head (the red line) is in-between keyframes. These fields can be edited directly. If changes are made when the playback head is over a keyframe, the keyframe’s values will be modified. If changes are made when the playback head is between keyframes (and therefore the value shown was an interpolated value), a new keyframe will be created at that point with the new value that you entered.

The Animation Timeline
On the right side of the Animation View is the timeline for the current clip. The keyframes for each animated property appear in this timeline. The timeline view has two modes, “Dope Sheet” and “Curves”. You can toggle between these modes by clicking the respective buttons at the bottom of the animated property list area:

These offer two alternate views of the animation timeline and keyframe data, with each mode having its own benefits.
Dope Sheet Timeline Mode
The Dope Sheet mode offers a more compact view, allowing you to view each property’s keyframe seqence in an individual horizontal track. This allows you have a simple overview of the keyframe timing for multiple properties or objects.

Curves Timeline Mode
Curves mode offers a view of how the values for each animated property changes over time in a resizable graph. All selected properties appear overlaid within the same graph view. This mode allows you to have great control over viewing and editing the values, and how they are interpolated between.

When using curves mode to view your animation it’s important to understand that sometimes the various ranges for each property may differ greatly. For example, consider a simple animation clip for a spinning bouncing cube. The bouncing Y position value may vary between the range 0 to 2 (meaning the cube bounces 2 units high during the animation), however the rotation value will go from 0 to 360. When viewing these two curves at the same time, the position animation curves will be very difficult to make out because the view will be zoomed out to fit the 0–360 range within the window:

You can click on individual properties in the list to automatically re-scale the curves view to fit the range for that value, or you can manually adjust the zoom of the curves window by using the special drag handles at each end of the view’s scrollbar sliders.

Creating a New Animation Clip
To animate Game Objects in Unity, the object or objects need an Animator Component attached. This Animator Component must reference an Animator Controller, which in turn contains references to one or more Animation Clips.
When using the Animation View to begin animating a GameObject in Unity, these items will be automatically created, attached and set-up for you.
To create a new Animation Clip for the selected Game Object, click the selection box at the upper right of the Animation View and select [Create New Clip]. You will then be prompted to save an Animation Clip somewhere in your Assets folder. If the Game Object already has an Animator Component attached, with an Animator Controller assigned, the new clip will be added as a state in the existing Animator Controller.

If the Game Object doesn’t have an Animator Component already at this stage, a number of things happen automatically:
- A new Animator Controller asset will be will be created
- The new clip being created will be added into the Animator Controller as the default state
- An Animator Component will be added to the GameObject being animated
- The Animator Component will have the new Animator Controller assigned to it
The result of this automatic sequence is that you can begin the animation process of a new object by clicking the record button or selecting [Create New Clip], and all the required elements of the animation system are set up for you.
The diagram below shows how these pieces are assigned, starting from the new animation clip created in the Animation Window:

In the image below, you can see a game object selected that is not animated. We have just a simple cube, with no Animator component. The Animation, Hierarchy, Project and Inspector windows are arranged side-by-side for clarity.

By pressing the record button in the Animation view (left), or choosing “[Create New Clip]” from the selection box in the Animation view, a new animation clip is created. Unity will ask to pick the name & location to save this new Animation Clip. Unity also creates an Animator Controller asset with the same name as the selected GameObject, adds an Animator component to the GameObject, and connects the assets up appropriately.

Animating a Game Object
Once you have saved the new animation clip asset, you are ready to begin adding keyframes to the clip. To begin editing an Animation Clip for the selected Game Object, click on the Animation Record button. This will enter Animation Record Mode, where changes to the Game Object are recorded into the Animation Clip.

You can stop the Animation Record Mode at any time by clicking the Animation Mode button again. This will revert the Game Object to the state it was in prior to entering the Animation Mode.
The changes you make to the GameObject will be recorded as keyframes at the current time shown by the red line in the Animation Window.
You can animate any property of the object by manipulating the object while in Animation Record Mode. Moving, Rotating or Scaling the object will add corresponding keyframes for those properties in the animation clip. Adjusting values directly in the object’s inspector will also add keyframes while in Record mode. This applies to any property in the inspector, including numeric values, checkboxes, colours, and most other values.
Any animated properties of the GameObject are shown listed in the property list on the left-hand side of the Animation Window. Properties which are not animated are not shown in this window. Any new properties that you animate, including properties on child objects, are added to the property list area as soon as you start animating them.
Transform properties are special in that the .x, .y, and .z properties are linked, so that curves are added three at a time.
You can also browse all animatable properties on the current GameObject (and its children) by clicking the Add Curve button.
Any property can be animated by selecting it from the “Add Curves” button popup menu.

When in Animation Mode, a red vertical line will show which frame of the Animation Clip is currently previewed. The Inspector and Scene View will show the Game Object at that frame of the Animation Clip. The values of the animated properties at that frame are also shown in a column to the right of the property names.
In Animation Mode a red vertical line shows the currently previewed frame.

Time Line
You can click anywhere on the Time Line to preview or modify that frame in the Animation Clip. The numbers in the Time Line are shown as seconds and frames, so 1:30 means 1 second and 30 frames.

Frame Navigation
You can also use the following keyboard shortcuts to navigate between frames:
- Press Comma (,) to go to the previous frame.
- Press Period (.) to go to the next frame.
- Hold Alt and press Comma (,) to go to the previous keyframe.
- Hold Alt and press Period (.) to go to the next keyframe.

Animation Mode
In Animation Mode you can move, rotate, or scale the Game Object in the Scene View. This will automatically create Animation Curves for the position, rotation, and scale properties of the Animation Clip if they didn’t already exist, and keys on those Animation Curves will automatically be created at the currently previewed frame to store the respective Transform values you changed.
You can also use the Inspector to modify any of the animatable properties of the Game Object. This too will create Animation Curves as needed, and create keys on those Animation Curves at the currently previewed frame to store your changed values.
Keyframe Creation
You can manually create a keyframe using the Add Keyframe button. This will create a key for all the properties that are currently selected in the Animation View. This is useful for selectively adding keys to specific properties only.

Playback
The Animation Clip can be played back at anytime by clicking the Play button in the Animation View.

Locking The Window
You can lock the animation editor window so that it will not automatically switch to reflect the currently selected Game Object in the hierarchy or scene. Locking the window is useful if you want to focus on the animation for one particular object, while being able to select and manipulate other objects in the scene.

More Information
To learn more about navigating the Curve View, see the section on Using Animation Curves.