URP에서 셰이더에 텍스처 드로우
이 예제의 Unity 셰이더는 메시에 텍스처를 그립니다.
컬러 입력을 제공하는 URP 언릿 셰이더 섹션의 Unity 셰이더 소스 파일을 사용하고__ ShaderLab__셰이더 오브젝트의 구조를 정의하기 위한 Unity 언어입니다. 자세한 정보
See in Glossary 코드에 다음 변경 사항을 적용하십시오.
-
프로퍼티 블록에서 기존 코드를
_BaseMap프로퍼티 정의로 교체합니다.Properties { [MainTexture] _BaseMap("Base Map", 2D) = "white" {} }프로퍼티 블록에서 텍스처 프로퍼티를 선언하면 Unity가 Base Map 레이블이 있는
_BaseMap프로퍼티를 머티리얼에 추가하고 타일링 및 오프셋 컨트롤을 추가합니다.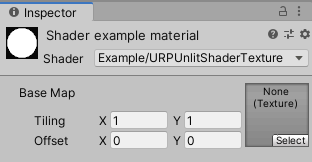
“타일링 및 오프셋 컨트롤이 있는 텍스처 프로퍼티” [MainTexture]속성을 사용하여 프로퍼티를 선언할 때 Unity는 이 프로퍼티를 머티리얼의 메인 텍스처로 사용합니다.참고: 호환성의 이유로
_MainTex프로퍼티 이름은 예약된 이름입니다. Unity는[MainTexture]속성이 없더라도 이름이_MainTex인 프로퍼티를 메인 텍스처로 사용합니다. -
struct Attributes및struct Varyings에서 텍스처의 UV 좌표에 대한uv변수를 추가합니다.float2 uv : TEXCOORD0; -
텍스처를 2D 텍스처로 정의하고 그에 대한 샘플러를 지정합니다. CBUFFER 블록 앞에 다음 라인을 추가합니다.
TEXTURE2D(_BaseMap); SAMPLER(sampler_BaseMap);TEXTURE2D 및 SAMPLER 매크로는
Core.hlsl에서 참조되는 파일 중 하나에서 정의됩니다. -
타일링과 오프셋이 동작하려면 CBUFFER 블록에서
_ST접미사로 텍스처 프로퍼티를 선언해야 합니다._ST접미사는 일부 매크로(예:TRANSFORM_TEX)가 사용하기 때문에 필요합니다.참고: Unity 셰이더가 SRP 배처와 호환되도록 만들려면
UnityPerMaterial이라는 이름으로 단일CBUFFER블록 내에서 모든 Material 프로퍼티를 선언하십시오. SRP 배처에 대한 상세 내용은 SRP(스크립터블 렌더 파이프라인) 배처에 대한 기술 자료를 참조하십시오.CBUFFER_START(UnityPerMaterial) float4 _BaseMap_ST; CBUFFER_END -
타일링 및 오프셋 변환을 적용하려면 버텍스 셰이더에 다음 줄을 추가합니다.
OUT.uv = TRANSFORM_TEX(IN.uv, _BaseMap);TRANSFORM_TEX매크로는Macros.hlsl파일에 정의되어 있습니다.#include선언에는 해당 파일에 대한 참조가 포함되어 있습니다. -
프래그먼트 셰이더에서
SAMPLE_TEXTURE2D매크로를 사용하여 텍스처를 샘플링합니다.half4 frag(Varyings IN) : SV_Target { half4 color = SAMPLE_TEXTURE2D(_BaseMap, sampler_BaseMap, IN.uv); return color; }
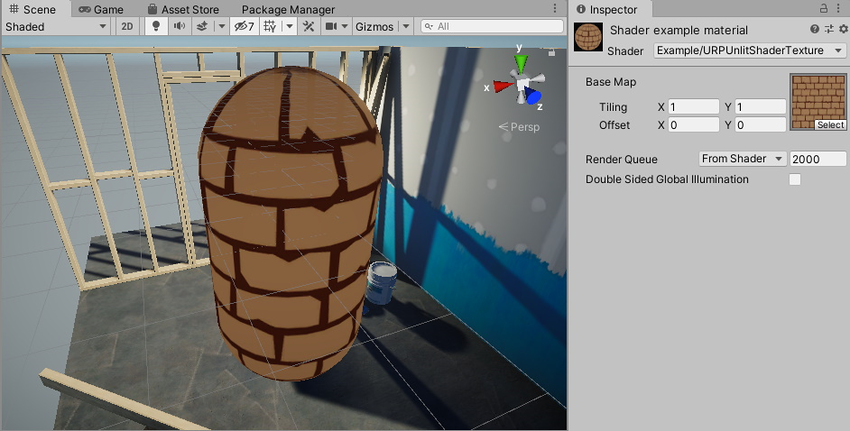
이제 인스펙터 창의 Base Map 필드에서 텍스처를 선택할 수 있습니다. 셰이더는 메시에 해당 텍스처를 그립니다.
아래는 이 예제의 완전한 ShaderLab 코드입니다.
// This shader draws a texture on the mesh.
Shader "Example/URPUnlitShaderTexture"
{
// The _BaseMap variable is visible in the Material's Inspector, as a field
// called Base Map.
Properties
{
    [MainTexture] _BaseMap("Base Map", 2D) = "white" {}
}
SubShader
{
Tags { "RenderType" = "Opaque" "RenderPipeline" = "UniversalPipeline" }
Pass
{
HLSLPROGRAM
#pragma vertex vert
#pragma fragment frag
#include "Packages/com.unity.render-pipelines.universal/ShaderLibrary/Core.hlsl"
struct Attributes
{
float4 positionOS : POSITION;
// The uv variable contains the UV coordinate on the texture for the
// given vertex.
float2 uv : TEXCOORD0;
};
struct Varyings
{
float4 positionHCS : SV_POSITION;
// The uv variable contains the UV coordinate on the texture for the
// given vertex.
float2 uv : TEXCOORD0;
};
// This macro declares _BaseMap as a Texture2D object.
TEXTURE2D(_BaseMap);
// This macro declares the sampler for the _BaseMap texture.
SAMPLER(sampler_BaseMap);
CBUFFER_START(UnityPerMaterial)
// The following line declares the _BaseMap_ST variable, so that you
// can use the _BaseMap variable in the fragment shader. The _ST
// suffix is necessary for the tiling and offset function to work.
float4 _BaseMap_ST;
CBUFFER_END
Varyings vert(Attributes IN)
{
Varyings OUT;
OUT.positionHCS = TransformObjectToHClip(IN.positionOS.xyz);
// The TRANSFORM_TEX macro performs the tiling and offset
// transformation.
OUT.uv = TRANSFORM_TEX(IN.uv, _BaseMap);
return OUT;
}
half4 frag(Varyings IN) : SV_Target
{
// The SAMPLE_TEXTURE2D marco samples the texture with the given
// sampler.
half4 color = SAMPLE_TEXTURE2D(_BaseMap, sampler_BaseMap, IN.uv);
return color;
}
ENDHLSL
}
}
}
노멀 벡터 시각화 섹션에서는 메시의 노멀 벡터를 시각화하는 방법을 설명합니다.