用逻辑封装 UXML 文档
预制件是一种预制的游戏对象,您可以在场景中多次将其实例化。预制件可用于创建可重用的组件。UI 工具包中的视觉元素不是游戏对象,因此预制件不适用。但是,您可以创建自定义控件作为可重用的__ UI__(即用户界面,User Interface)让用户能够与您的应用程序进行交互。Unity 目前支持三种 UI 系统。更多信息
See in Glossary 组件,该组件将具有特定逻辑的元素层级结构封装起来。由于 UI 工具包鼓励将 UI 与游戏或应用程序代码分开,因此可以使用 UXML 来定义结构,使用 USS 来定义外观,并使用 C# 来定义自定义控件的逻辑。
创建可重用的 UI 组件
例如,假设您要创建纸牌游戏。您想要显示具有不同统计信息(例如生命和攻击)的卡片。
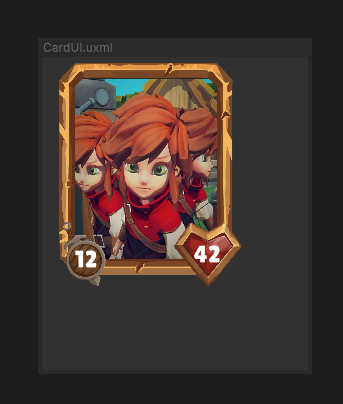
您可以创建一个名为 CardElement 的自定义控件来显示角色的图像、生命和攻击统计信息,然后为游戏中的每张卡重复使用此自定义控件。
以下是实现此目的的一般步骤:
在 C# 中,声明一个名为 CardElement 的自定义元素类型。
-
在 UXML 中,定义自定义控件的层级视图。有两种方法可以使用。两种方法都支持在 C# 和父级 UXML 中实例化
CardElement。 找到对自定义控件子元素的引用。
公开属性和方法,并像处理任何 C# 类一样在自定义控件中封装逻辑。
将自定义控件与游戏或应用程序代码连接。还可以注册事件回调来实现用户交互。
UXML 优先方法
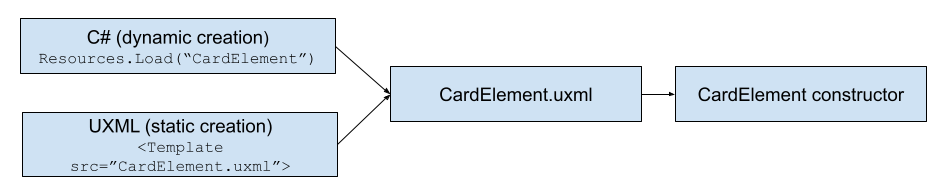
使用此方法时,可将自定义元素 CardElement 包含在层级视图 UXML 文档中,并在下方直接声明其子元素,同时将层级视图 UXML 文档用作模板。此方法提供了一种更简单的解决方案,即在层级视图 UXML 文档中使用固定的 UI 结构。
以下 C# 和 UXML 示例演示了如何使用 UXML 优先方法来创建可重用的 UI。
创建自定义控件类
创建一个 C# 脚本来定义 CardElement 自定义控件。自定义控件类为 CardElement 分配图像和标示值。
using UnityEngine;
using UnityEngine.UIElements;

// Define the custom control type.
[UxmlElement]
public partial class CardElement : VisualElement
{

    private VisualElement portraitImage => this.Q("image");
    private Label attackBadge => this.Q<Label>("attack-badge");
    private Label healthBadge => this.Q<Label>("health-badge");

    // Use the Init() approach instead of a constructor because
    // we don't have children yet.
    public void Init(Texture2D image, int health, int attack)
    {
        portraitImage.style.backgroundImage = image;
        attackBadge.text = health;
        healthBadge.text = attack;
    }

    // Custom controls need a default constructor.
    public CardElement() {}
}
定义自定义控件的层级视图
创建定义 CardElement 层级视图的 UXML 文档 (CardElement.uxml)。此示例将 CardElement 样式设置为 USS 文件。
<ui:UXML xmlns:ui="UnityEngine.UIElements" xmlns:uie="UnityEditor.UIElements" editor-extension-mode="False">
    <Style src="CardElementUI.uss" />
    <CardElement>
        <ui:VisualElement name="image" />
        <ui:VisualElement name="stats">
            <ui:Label name="attack-badge" class="badge" />
            <ui:Label name="health-badge" class="badge" />
        </ui:VisualElement>
    </CardElement>
</ui:UXML>
将自定义控件连接到游戏
您可以通过以下方式将自定义控件连接到游戏:
- 实例化父级 UXML 文档中的
CardElement.uxml。您可以在 UI Builder 中的层级视图 UXML 和此 UXML 文档之间来回导航。 - 实例化
CardElement.uxml,其中包含 MonoBehaviour C# 脚本中的CardElement。必须先使用 UQuery 查找 CardElement,然后才能将其添加到场景中。
在将自定义控件添加到场景中后调用 Init()。
还可以添加与游戏相关的操作,例如点击事件与元素交互。
在父级 UXML 中实例化
以下显示了 UXML 中的实例化示例:
<ui:UXML xmlns:ui="UnityEngine.UIElements" xmlns:uie="UnityEditor.UIElements" editor-extension-mode="False">
    <ui:Template name="CardElement" src="CardElement.uxml"/>
    <ui:Instance template="CardElement"/>
    <ui:Instance template="CardElement"/>
    <ui:Instance template="CardElement"/>
</ui:UXML>
有关如何在游戏中渲染 UXML 文档的信息,请参阅在游戏视图中渲染 UI。
直接在 C# 中实例化
注意:为便于学习,本页面上的示例代码使用 Resources 文件夹方法来加载 UXML 文件,非常方便。但是,此方法无法很好地扩展。建议使用其他方法加载生产项目的引用。
以下显示了 C# 中的实例化示例:
using UnityEngine;
using UnityEngine.UIElements;

public class UIManager : MonoBehaviour
{
    public void Start()
    {
        UIDocument document = GetComponent<UIDocument>();

        // Load the UXML document that defines the hierarchy of CardElement.
        // It assumes the UXML file is placed at the "Resources" folder.
        VisualTreeAsset template = Resources.Load<VisualTreeAsset>("CardElement");

        // Create a loop to modify properties and perform interactions
        // for each card.  It assumes that you have created a function
        // called `GetCards()` to get all the cards in your game.
        foreach(Card card in GetCards())
        {
            // Instantiate a template container.
            var templateContainer = template.Instantiate();

            // Find the custom element inside the template container.
            var cardElement = templateContainer.Q<CardElement>();

            // Add the custom element into the scene.
            document.rootVisualElement.Add(cardElement);

            // Initialize the card.
            cardElement.Init(card.image, card.health, card.attack);

            // Register an event callback for additional interaction.
            cardElement.RegisterCallback<ClickEvent>(SomeInteraction);
        }
    }

    private void SomeInteraction(ClickEvent evt)
    {
        // Interact with the elements here.
    }
}
元素优先方法
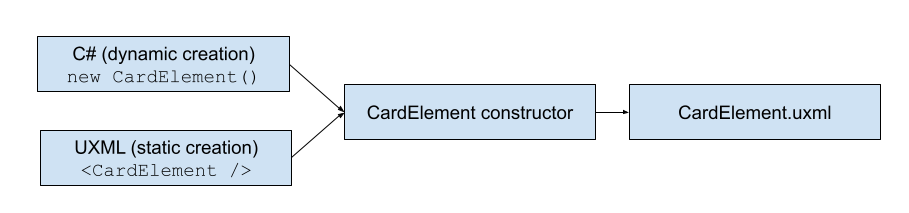
使用此方法时,仅将子元素包含在层级视图 UXML 文档中,并使用 C# 加载层级视图 UXML 文档到 CardElement 类定义中。此方法为自定义控件提供了灵活的 UI 结构。例如,可以根据特定条件加载不同的层级视图 UXML 文档。
以下 C# 和 UXML 示例演示了如何使用元素优先方法来创建可重用的 UI。
创建自定义控件类
创建一个 C# 脚本来定义 CardElement 自定义控件。除了定义一个构造函数为 CardElement 分配图像和标示值之外,自定义控件还会在其类定义中加载层级视图 UXML 文档。
using UnityEngine;
using UnityEngine.UIElements;

// Define the custom control type.
[UxmlElement]
public partial class CardElement : VisualElement
{
    private VisualElement portraitImage => this.Q("image");
    private Label attackBadge => this.Q<Label>("attack-badge");
    private Label healthBadge => this.Q<Label>("health-badge");

    // Custom controls need a default constructor. This default constructor
    // calls the other constructor in this class.
    public CardElement() {}

    // Define a constructor that loads the UXML document that defines
    // the hierarchy of CardElement and assigns an image and badge values.
    public CardElement(Texture2D image, int health, int attack)
    {
        // It assumes the UXML file is called "CardElement.uxml" and
        // is placed at the "Resources" folder.
        var asset = Resources.Load<VisualTreeAsset>("CardElement");
        asset.CloneTree(this);

        portraitImage.style.backgroundImage = image;
        attackBadge.text = health.ToString();
        healthBadge.text = attack.ToString();
    }
}
注意:如果有性能问题,请使用滞后初始化来保留字段以缓存引用,并避免过于频繁地重新评估查询。
定义自定义控件的层级视图
创建一个 UXML 文档 (CardElement.uxml),用于定义 CardElement 子元素的层级视图。示例使用 USS 文件对 CardElement 进行样式设置。
<ui:UXML xmlns:ui="UnityEngine.UIElements" xmlns:uie="UnityEditor.UIElements" editor-extension-mode="False">
    <Style src="CardElementUI.uss" />
    <ui:VisualElement name="image" />
    <ui:VisualElement name="stats">
        <ui:Label name="attack-badge" class="badge" />
        <ui:Label name="health-badge" class="badge" />
    </ui:VisualElement>
</ui:UXML>
将自定义控件连接到游戏
您可以通过执行以下操作将自定义控件连接到游戏:
- 实例化父级 UXML 文档中的
CardElement.uxml。在 UI Builder 中,无法在层级视图 UXML 和此 UXML 文档之间来回导航,因为子元素是从 C# 加载的。 - 实例化
CardElement.uxml,其中包含 MonoBehaviour C# 脚本中的CardElement。
在将自定义控件添加到场景之前,应调用构造函数。
还可以添加与游戏相关的操作,例如点击事件与元素交互。
在父级 UXML 中实例化
以下显示了 UXML 中的实例化示例:
<ui:UXML xmlns:ui="UnityEngine.UIElements" xmlns:uie="UnityEditor.UIElements" editor-extension-mode="False">
   <CardElement />
   <CardElement />
   <CardElement />
</ui:UXML>
有关如何在游戏中渲染 UXML 文档的信息,请参阅在游戏视图中渲染 UI。
直接在 C# 中实例化
以下显示了 C# 中的实例化示例:
using UnityEngine;
using UnityEngine.UIElements;

public class UIManager : MonoBehaviour
{
    public void Start()
    {
        UIDocument document = GetComponent<UIDocument>();

        // Create a loop to modify properties and perform interactions
        // for each card. It assumes that you have created a function
        // called `GetCards()` to get all the cards in your game.
        foreach(Card card in GetCards())
        {
            var cardElement = new CardElement(card.image, card.health, card.attack);

            // Register an event callback for additional interaction.
            cardElement.RegisterCallback<ClickEvent>(SomeInteraction);

            // Add the custom element into the scene.
            document.rootVisualElement.Add(cardElement);
        }
    }

    private void SomeInteraction(ClickEvent evt)
    {
        // Interact with the elements here.
    }
}
构建更复杂的元素
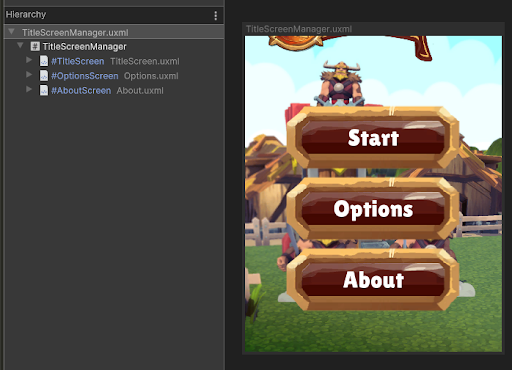
随着项目的 UI 变得越来越复杂,最好将逻辑隔离到更高级别的组件中。这使得为游戏或应用程序的其余部分编排 UI 变得更加容易。
您可以应用此页面上的概念,逐步构建由更小、更通用的组件组成的专用组件。例如,要构建一个主标题界面供用户访问 Options 菜单和 About 部分,可以创建一个包含三个不同子 UXML 文档的 TitleScreenManager 元素。每个元素定义自己的元素:Title、Options 和 About。