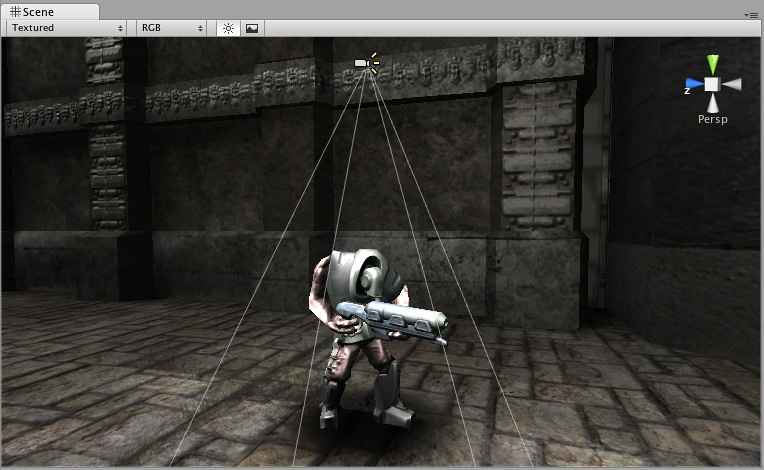
Projector
Switch to ScriptingA Projector allows you to project a MaterialAn asset that defines how a surface should be rendered, by including references to the Textures it uses, tiling information, Color tints and more. The available options for a Material depend on which Shader the Material is using. More info
See in Glossary onto all objects that intersect its frustum. The Material must use the Projector/Light or Projector/Multiply shadersA small script that contains the mathematical calculations and algorithms for calculating the Color of each pixel rendered, based on the lighting input and the Material configuration. More info
See in Glossary, available in Unity’s Standard Assets.
You can use a Projector to create:
- Blob shadows
- Bullet holes, or similar effects
- The effect of a real-world projector, using another CameraA component which creates an image of a particular viewpoint in your scene. The output is either drawn to the screen or captured as a texture. More info
See in Glossary that is renderingThe process of drawing graphics to the screen (or to a render texture). By default, the main camera in Unity renders its view to the screen. More info
See in Glossary to a Render TextureA special type of Texture that is created and updated at runtime. To use them, first create a new Render Texture and designate one of your Cameras to render into it. Then you can use the Render Texture in a Material just like a regular Texture. More info
See in Glossary - Stylized lighting effects
The Projector and render pipelines
The Projector component is only compatible with the Built-in Render Pipeline and the availability of a alternative solution depends on which render pipeline you are using.
| Render pipeline | Post-processingA process that improves product visuals by applying filters and effects before the image appears on screen. You can use post-processing effects to simulate physical camera and film properties, for example Bloom and Depth of Field. More info post processing, postprocessing, postprocess See in Glossary support |
|---|---|
| Built-in Render Pipeline | The Built-in Render Pipeline is compatible with the Projector component. |
| Universal Render Pipeline (URP) | URP is not compatible with the Projector component. URP does not currently include an alternative solution. |
| High Definition Render Pipeline (HDRP) | HDRP is not compatible with the Projector component. However, HDRP includes the Decal Projector component which you can use to project Materials into your SceneA Scene contains the environments and menus of your game. Think of each unique Scene file as a unique level. In each Scene, you place your environments, obstacles, and decorations, essentially designing and building your game in pieces. More info See in Glossary. |
Using the Projector component
Standard Assets contains example PrefabsAn asset type that allows you to store a GameObject complete with components and properties. The prefab acts as a template from which you can create new object instances in the scene. More info
See in Glossary that demonstrate the use of Projector components.
To use the Prefabs:
- Download Standard Assets
- Import StandardAssets > Effects > Projectors into your Project
- In the Project window, navigate to StandardAssets > Effects > Projectors > Prefabs
- Drag the one of the Prefabs into your Scene
You can use the Prefab as is in your Project, modify it, or examine it to see how it is configured.
Component properties
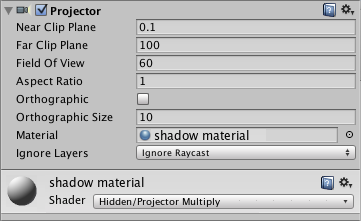
| Property: | Function: |
|---|---|
| Near Clip Plane | Objects in front of the near clip plane will not be projected upon. |
| Far Clip Plane | Objects beyond this distance will not be projected upon. |
| Field Of View | The field of view in degrees. This is only used if the Projector is not Orthographic. |
| Aspect RatioThe relationship of an image’s proportional dimensions, such as its width and height. See in Glossary |
This allows you to tune the height and width of the Projector. |
| Orthographic | If enabled, the Projector will be Orthographic instead of perspective. |
| Orthographic Size | The Orthographic size of the Projection. This is only used if Orthographic is enabled. |
| Material | The Material that will be projected. |
| Ignore Layers | Objects in Layers that you specify here will not be projected upon. The default value is None. |
Material configuration
When configuring a Material to use with the Projector/Light and Projector/Multiply shaders, be aware of the following:
Cookie texture:
- Make sure texture wrap mode is set to “Clamp”
- Turn on “Border Mipmaps” option in import settings
- Use uncompressed texture format
- Projector/Shadow also requires alpha channel to be present (typically Alpha from Grayscale option is ok)
Falloff texture (if present):
- Data needs to be in alpha channel, so typically Alpha8 texture format
- Make sure texture wrap mode is set to “Clamp”
- Make sure leftmost pixelThe smallest unit in a computer image. Pixel size depends on your screen resolution. Pixel lighting is calculated at every screen pixel. More info
See in Glossary column is black; and “Border mipmaps” import setting is on.