종횡비 커스텀 컨트롤 생성
종횡비는 디스플레이의 너비와 높이 사이의 비율입니다. 종횡비는 디스플레이의 비율을 유지하는 데 사용됩니다. 예를 들어 종횡비가 4:3인 경우 디스플레이의 높이 3픽셀당 너비는 4픽셀입니다. 종횡비가 16:9인 경우 디스플레이의 높이 9픽셀당 너비는 16픽셀입니다.
개요 예시
이 예시에서는 자식 요소의 특정 종횡비를 유지하는 커스텀 컨트롤을 생성합니다. 데모 목적으로 커스텀 컨트롤은 디스플레이 비율이 더 넓은 경우 왼쪽과 오른쪽에 패딩을 추가하여(디스플레이 비율이 더 높은 경우 위쪽과 아래쪽에 패딩 추가) ‘central’ 항목을 종횡비에 맞게 밀어 넣습니다.
이 예제에서 완성된 파일은 이 GitHub 저장소에서 찾을 수 있습니다.
선행 조건
이 가이드는 Unity 에디터, UI 툴킷, C# 스크립팅에 익숙한 개발자를 위한 가이드입니다. 시작하기 전에 먼저 다음을 숙지하십시오.
커스텀 컨트롤 클래스 생성
VisualElement에서 width 및 height, 두 개의 속성을 상속하는 C# 클래스를 생성합니다. width 및 height 속성은 종횡비를 계산하는 데 사용됩니다.
임의의 템플릿을 사용하여 Unity 프로젝트를 생성합니다.
-
다음 내용을 포함하는
AspectRatio.cs라는 이름의 C# 스크립트를 생성합니다.using UnityEngine; using UnityEngine.UIElements; // Custom element that lays out its contents following a specific aspect ratio. [UxmlElement] public partial class AspectRatioElement : VisualElement { // The ratio of width. [UxmlAttribute("width")] public int RatioWidth { get => _ratioWidth; set { _ratioWidth = value; UpdateAspect(); } } // The ratio of height. [UxmlAttribute("height")] public int RatioHeight { get => _ratioHeight; set { _ratioHeight = value; UpdateAspect(); } } // Padding elements to keep the aspect ratio. private int _ratioWidth = 16; private int _ratioHeight = 9; public AspectRatioElement() { // Update the padding elements when the geometry changes. RegisterCallback<GeometryChangedEvent>(UpdateAspectAfterEvent); // Update the padding elements when the element is attached to a panel. RegisterCallback<AttachToPanelEvent>(UpdateAspectAfterEvent); } static void UpdateAspectAfterEvent(EventBase evt) { var element = evt.target as AspectRatioElement; element?.UpdateAspect(); } private void ClearPadding() { style.paddingLeft = 0; style.paddingRight = 0; style.paddingBottom = 0; style.paddingTop = 0; } // Update the padding. private void UpdateAspect() { var designRatio = (float)RatioWidth / RatioHeight; var currRatio = resolvedStyle.width / resolvedStyle.height; var diff = currRatio - designRatio; if (RatioWidth <= 0.0f || RatioHeight <= 0.0f) { ClearPadding(); Debug.LogError($"[AspectRatio] Invalid width:{RatioWidth} or height:{RatioHeight}"); return; } if (float.IsNaN(resolvedStyle.width) || float.IsNaN(resolvedStyle.height)) { return; } if (diff > 0.01f) { var w = (resolvedStyle.width - (resolvedStyle.height * designRatio)) * 0.5f; style.paddingLeft = w; style.paddingRight = w; style.paddingTop = 0; style.paddingBottom = 0; } else if (diff < -0.01f) { var h = (resolvedStyle.height - (resolvedStyle.width * (1/designRatio))) * 0.5f; style.paddingLeft= 0; style.paddingRight = 0; style.paddingTop = h; style.paddingBottom = h; } else { ClearPadding(); } } }
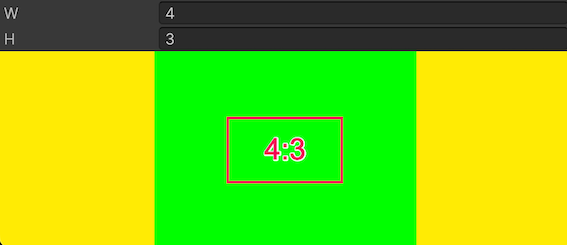
커스텀 컨트롤 사용
커스텀 컨트롤을 사용하는 커스텀 에디터 창을 생성합니다. 커스텀 컨트롤을 테스트하고 종횡비를 변경할 때 어떻게 작동하는지 확인하십시오.
-
다음 내용을 포함하는
AspectRatioDemo.cs라는 이름의 C# 스크립트를 생성합니다.using UnityEditor; using UnityEngine; using UnityEngine.UIElements; public class AspectRatioDemo : EditorWindow { [MenuItem("Test/AspectRatioDemo")] public static void ShowExample() { AspectRatioDemo wnd = GetWindow<AspectRatioDemo>(); wnd.titleContent = new GUIContent("AspectRatioDemo"); } public void CreateGUI() { // Each editor window contains a root VisualElement object. VisualElement root = rootVisualElement; var aspectRatio = new AspectRatioElement(); aspectRatio.style.flexGrow = 1; var widthField = new IntegerField() { value = aspectRatio.RatioWidth, label = "W"}; var heightField = new IntegerField() { value = aspectRatio.RatioHeight, label = "H" }; root.Add(widthField); root.Add(heightField); root.Add(aspectRatio); var contents = new VisualElement(); aspectRatio.Add(contents); aspectRatio.style.backgroundColor = Color.black; contents.style.backgroundColor = Color.green; widthField.RegisterValueChangedCallback((evt) =>aspectRatio.RatioWidth = evt.newValue); heightField.RegisterValueChangedCallback((evt) => aspectRatio.RatioHeight = evt.newValue); contents.style.width = new Length(100, LengthUnit.Percent); contents.style.height = new Length(100, LengthUnit.Percent); contents.RegisterCallback<GeometryChangedEvent>((evt) => { Debug.Log($"Content ratio: {evt.newRect.width} x {evt.newRect.height} : {evt.newRect.width/evt.newRect.height}"); }); } } 메뉴에서 Test > Aspect Ratio Demo를 선택합니다.
종횡비를 다른 값으로 변경합니다. 커스텀 컨트롤은 에디터 창 크기에 따라 왼쪽과 오른쪽이나 위쪽과 아래쪽에 패딩을 추가합니다.