アスペクト比のカスタムコントロールの作成
アスペクト比は、画面の幅と高さの割合です。アスペクト比は画面の縦横比を維持するために使用します。例えば、アスペクト比が 4:3 の場合、画面は高さ 3 ピクセルごとに幅 4 ピクセルになります。アスペクト比が 16:9 の場合、画面は高さ 16 ピクセルごとに幅 9 ピクセルになります。
例の概要
この例では、子要素に対して指定したアスペクト比を維持するカスタムコントロールを作成します。このデモのカスタムコントロールは、画面比率のほうが横に長い場合は左右に、縦に長い場合は上下にパディングを追加して、“中央” のアイテムをアスペクト比に合わせます。
この例で作成する完成したファイルは、この GitHub リポジトリ にあります。
必要な要件
このガイドは、Unity エディター、UI Toolkit、および C# スクリプトに精通している開発者を対象としています。始める前に、以下の点を理解しておいてください。
カスタムコントロールクラスの作成
width と height の 2 つの属性を持つ VisualElement を継承する C# クラスを作成します。width 属性と height 属性はアスペクト比の計算に使用されます。
任意のテンプレートで Unity プロジェクトを作成します。
-
以下の内容の
AspectRatio.csという名前の C# スクリプトを作成します。using UnityEngine; using UnityEngine.UIElements; // Custom element that lays out its contents following a specific aspect ratio. [UxmlElement] public partial class AspectRatioElement : VisualElement { // The ratio of width. [UxmlAttribute("width")] public int RatioWidth { get => _ratioWidth; set { _ratioWidth = value; UpdateAspect(); } } // The ratio of height. [UxmlAttribute("height")] public int RatioHeight { get => _ratioHeight; set { _ratioHeight = value; UpdateAspect(); } } // Padding elements to keep the aspect ratio. private int _ratioWidth = 16; private int _ratioHeight = 9; public AspectRatioElement() { // Update the padding elements when the geometry changes. RegisterCallback<GeometryChangedEvent>(UpdateAspectAfterEvent); // Update the padding elements when the element is attached to a panel. RegisterCallback<AttachToPanelEvent>(UpdateAspectAfterEvent); } static void UpdateAspectAfterEvent(EventBase evt) { var element = evt.target as AspectRatioElement; element?.UpdateAspect(); } private void ClearPadding() { style.paddingLeft = 0; style.paddingRight = 0; style.paddingBottom = 0; style.paddingTop = 0; } // Update the padding. private void UpdateAspect() { var designRatio = (float)RatioWidth / RatioHeight; var currRatio = resolvedStyle.width / resolvedStyle.height; var diff = currRatio - designRatio; if (RatioWidth <= 0.0f || RatioHeight <= 0.0f) { ClearPadding(); Debug.LogError($"[AspectRatio] Invalid width:{RatioWidth} or height:{RatioHeight}"); return; } if (float.IsNaN(resolvedStyle.width) || float.IsNaN(resolvedStyle.height)) { return; } if (diff > 0.01f) { var w = (resolvedStyle.width - (resolvedStyle.height * designRatio)) * 0.5f; style.paddingLeft = w; style.paddingRight = w; style.paddingTop = 0; style.paddingBottom = 0; } else if (diff < -0.01f) { var h = (resolvedStyle.height - (resolvedStyle.width * (1/designRatio))) * 0.5f; style.paddingLeft= 0; style.paddingRight = 0; style.paddingTop = h; style.paddingBottom = h; } else { ClearPadding(); } } }
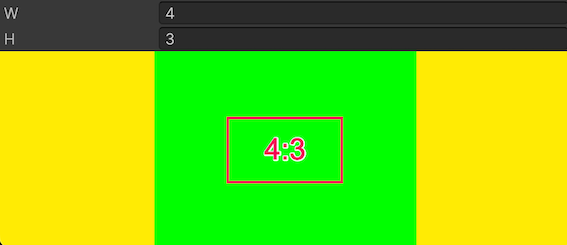
カスタムコントロールの使用
カスタムコントロールを使用するカスタムエディターウィンドウを作成します。カスタムコントロールをテストして、アスペクト比を変更したときの動作を確認します。
-
以下の内容の
AspectRatioDemo.csという名前の C# スクリプトを作成します。using UnityEditor; using UnityEngine; using UnityEngine.UIElements; public class AspectRatioDemo : EditorWindow { [MenuItem("Test/AspectRatioDemo")] public static void ShowExample() { AspectRatioDemo wnd = GetWindow<AspectRatioDemo>(); wnd.titleContent = new GUIContent("AspectRatioDemo"); } public void CreateGUI() { // Each editor window contains a root VisualElement object. VisualElement root = rootVisualElement; var aspectRatio = new AspectRatioElement(); aspectRatio.style.flexGrow = 1; var widthField = new IntegerField() { value = aspectRatio.RatioWidth, label = "W"}; var heightField = new IntegerField() { value = aspectRatio.RatioHeight, label = "H" }; root.Add(widthField); root.Add(heightField); root.Add(aspectRatio); var contents = new VisualElement(); aspectRatio.Add(contents); aspectRatio.style.backgroundColor = Color.black; contents.style.backgroundColor = Color.green; widthField.RegisterValueChangedCallback((evt) =>aspectRatio.RatioWidth = evt.newValue); heightField.RegisterValueChangedCallback((evt) => aspectRatio.RatioHeight = evt.newValue); contents.style.width = new Length(100, LengthUnit.Percent); contents.style.height = new Length(100, LengthUnit.Percent); contents.RegisterCallback<GeometryChangedEvent>((evt) => { Debug.Log($"Content ratio: {evt.newRect.width} x {evt.newRect.height} : {evt.newRect.width/evt.newRect.height}"); }); } } メニューから、Test > Aspect Ratio Demo を選択します。
アスペクト比を別の値に変更します。カスタムコントロールは、エディターウィンドウのサイズに応じて、左右または上下にパディングを追加します。