public static function PerlinNoise(x:
float,
y: float):
float;
public static float PerlinNoise(float x,
float y);
パラメーター
| x | サンプル点の X 座標 |
| y | サンプル点の Y 座標 |
戻り値
float 0.0 と 1.0 の間の値
説明
2D のパーリンノイズを生成します
パーリンノイズは 2D 平面で生成される浮動小数点値の擬似ランダムパターンです
( 3D 以上では一般的なテクニックですが Unity には実装されていません)。
ノイズは各点で完全にランダムな値を含んでいませんが、
むしろ値が徐々に増加し、パターンの間で減少する "波"で構成されています。ノイズは
テクスチャエフェクトのための基礎として使用できますが、アニメーションやテラインハイトマップや
その他多くのものを生成するためのものでもあります。
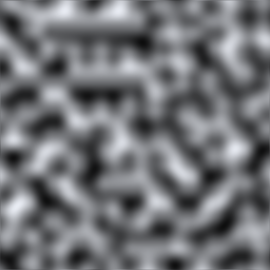
" 0 から 10 の範囲でサンプリングされるパーリンノイズ (グレースケールの値は 0 から 1 の値で表されます) ”
平面上に任意の点をサンプリングするために適切な X と Y 座標を渡します。
同じ座標には常に同じサンプリング値を返しますが、平面は
本質的に無限ですので、サンプルのエリアをランダムに選択することによって、簡単に繰り返しを避けられます。
// Create a texture and fill it with Perlin noise.
// Try varying the xOrg, yOrg and scale values in the inspector
// while in Play mode to see the effect they have on the noise.

// Width and height of the texture in pixels.
var pixWidth: int;
var pixHeight: int;

// The origin of the sampled area in the plane.
var xOrg: float;
var yOrg: float;

// The number of cycles of the basic noise pattern that are repeated
// over the width and height of the texture.
var scale = 1.0;


private var noiseTex: Texture2D;
private var pix: Color[];
private var rend: Renderer;


function Start () {
	rend = GetComponent.<Renderer>();

	// Set up the texture and a Color array to hold pixels during processing.
	noiseTex = new Texture2D(pixWidth, pixHeight);
	pix = new Color[noiseTex.width * noiseTex.height];
	rend.material.mainTexture = noiseTex;
}


function CalcNoise() {
	// For each pixel in the texture...
	for (var y = 0.0; y < noiseTex.height; y++) {
		for (var x = 0.0; x < noiseTex.width; x++) {
			// Get a sample from the corresponding position in the noise plane
			// and create a greyscale pixel from it.
			var xCoord = xOrg + x / noiseTex.width * scale;
			var yCoord = yOrg + y / noiseTex.height * scale;
			var sample = Mathf.PerlinNoise(xCoord, yCoord);
			pix[y * noiseTex.width + x] = new Color(sample, sample, sample);
		}
	}

	// Copy the pixel data to the texture and load it into the GPU.
	noiseTex.SetPixels(pix);
	noiseTex.Apply();
}


function Update () {
	CalcNoise();
}
using UnityEngine;
using System.Collections;

public class ExampleClass : MonoBehaviour {
    public int pixWidth;
    public int pixHeight;
    public float xOrg;
    public float yOrg;
    public float scale = 1.0F;
    private Texture2D noiseTex;
    private Color[] pix;
    private Renderer rend;
    void Start() {
        rend = GetComponent<Renderer>();
        noiseTex = new Texture2D(pixWidth, pixHeight);
        pix = new Color[noiseTex.width * noiseTex.height];
        rend.material.mainTexture = noiseTex;
    }
    void CalcNoise() {
        float y = 0.0F;
        while (y < noiseTex.height) {
            float x = 0.0F;
            while (x < noiseTex.width) {
                float xCoord = xOrg + x / noiseTex.width * scale;
                float yCoord = yOrg + y / noiseTex.height * scale;
                float sample = Mathf.PerlinNoise(xCoord, yCoord);
                pix[y * noiseTex.width + x] = new Color(sample, sample, sample);
                x++;
            }
            y++;
        }
        noiseTex.SetPixels(pix);
        noiseTex.Apply();
    }
    void Update() {
        CalcNoise();
    }
}
ノイズ面は 2D ですが、アニメーション効果のパターンを通してひとつの 1 次元の線を使うことは簡単です。
	// "Bobbing" animation from 1D Perlin noise.

	// Range over which height varies.
	var heightScale = 1.0;

	// Distance covered per second along X axis of Perlin plane.
	var xScale = 1.0;


	function Update () {
		var height = heightScale * Mathf.PerlinNoise(Time.time * xScale, 0.0);
		var pos = transform.position;
		pos.y = height;
		transform.position = pos;
	}
using UnityEngine;
using System.Collections;

public class ExampleClass : MonoBehaviour {
    public float heightScale = 1.0F;
    public float xScale = 1.0F;
    void Update() {
        float height = heightScale * Mathf.PerlinNoise(Time.time * xScale, 0.0F);
        Vector3 pos = transform.position;
        pos.y = height;
        transform.position = pos;
    }
}
注意: 戻り値が少しだけ 1.0f を超えることもできます。 0.0 から 1.0 の範囲が重要な場合、戻り値を固定する必要があります。