Handles.BeginGUI(Rect)
Description
Begin a 2D GUI block inside the 3D handle GUI.
Begin a 2D GUI block on top of the current handle camera.
See Also: Handles.EndGUI.
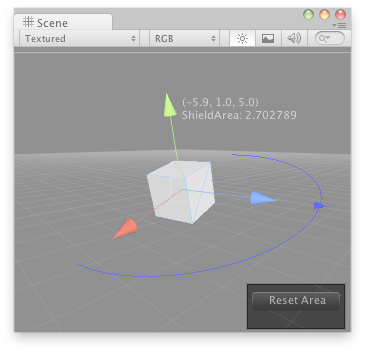
GUI in the Scene View.
	// Create a 180 degrees wire arc with a ScaleValueHandle attached to the disc
	// that lets you modify the "shieldArea" var in the WireArcExample.js, also
	// lets you visualize some info of the transform and finally lets you
	// reset the shield area value to 5 by clicking on a button

	@CustomEditor (DummyButtonScript)
	class GUIButtonHandle extends Editor {
	    function OnSceneGUI () {
	    	Handles.color = Color.blue;
	 		Handles.Label(target.transform.position + Vector3.up*2,
	 				target.transform.position.ToString() + "\nShieldArea: " +
	 				target.shieldArea.ToString());
	 		Handles.BeginGUI(Rect(Screen.width - 100, Screen.height - 80, 90,50));
	 		if(GUILayout.Button("Reset Area"))
	 			target.shieldArea = 5;
	 		Handles.EndGUI();

	        Handles.DrawWireArc(target.transform.position,
	        		target.transform.up,
	        		-target.transform.right,
	        		180,
	        		target.shieldArea);
	        target.shieldArea =
			Handles.ScaleValueHandle(target.shieldArea,
        					target.transform.position + target.transform.forward*target.shieldArea,
	        				target.transform.rotation,
	        				1,
	        				Handles.ConeCap,
	        				1);
	    }
	}
And the script attached to this Handle:
	// DummyButtonScript.js

	var shieldArea : float = 5;