使用 PIX 调试着色器
PIX 是 Microsoft 为 Windows 开发人员提供的性能调优和调试工具。此工具提供了一系列用于分析应用程序性能的模式,并包括从应用程序中捕获 DirectX 项目的帧以进行调试的功能。
使用 PIX 可调查 Windows 64位 (x86_64) 独立平台或通用 Windows 平台应用程序中的问题。
要安装 PIX,请下载并运行 Microsoft PIX 安装程序,按照说明进行操作。
有关 PIX 的更多信息,请参阅 Microsoft 的 PIX 简介和 PIX 文档。
使用 PIX 来调试 DirectX 着色器
应使用已构建的 Unity 应用程序版本来捕获帧,而不是使用 Unity 编辑器中运行的版本。这是因为需要从 PIX 中启动目标应用程序来才能捕获 GPU 帧。
使用开发版可为 PIX 添加额外的信息,从而使得场景捕获操作更加容易。
使用支持调试的着色器来创建项目
要在 PIX 中使用源代码调试着色器,必须将以下 pragma 插入到着色器代码中:#pragma enable_d3d11_debug_symbols
示例
以下演练程序使用一个基本示例演示整个操作过程。
创建一个基本项目:
创建一个新的 Unity 项目(请参阅有关 Projects(项目)的 Hub 文档)。
在顶部菜单中,转到__资源__ (Assets) > 创建 (Create) > 着色器 (Shader) > 标准表面着色器 (Standard Surface Shader)。这样就会在__项目__ (Project) 文件夹中创建一个新的着色器文件。
选择着色器文件,然后在检视器 (Inspector) 窗口中单击__打开__ (Open)。这样就会在脚本编辑器中打开着色器文件。将
#pragma enable_d3d11_debug_symbols插入到着色器代码中,位于其他#pragma行下方。创建新材质(菜单:__资源__ (Assets) > 创建 (Create) > 材质 (Material)。
在 Material Inspector 窗口中,选择__着色器__ (Shader) 下拉选单,选择__自定义__ (Custom),然后选择刚创建的着色器。
创建 3D 立方体游戏对象(菜单:__游戏对象__ (GameObject) > 3D 对象 (3D Object) > 立方体 (Cube))。
将新材质分配给新游戏对象。为此,请将材质从__项目__ (Project) 窗口拖动到 3D 立方体。
从 Windows 独立平台应用程序中捕获帧:
-
转到__文件__ (File) > 构建设置 (Build Settings),然后在__平台__ (Platform) 下选择 Windows、Mac、Linux (Windows, Mac, Linux)。将__目标平台__ (Target Platform) 设置为 Windows__,将__架构 (Architecture) 设置为 Intel 64 位 (Intel 64-bit),然后单击 开发构建 (Development Build) 复选框。

单击__构建__ (Build)。
启动 PIX。
单击__主页__ (Home),然后单击__连接__ (Connect)
选择 Computer localhost __ 以使用您的 PC 进行捕获,然后单击__连接 (Connect)。
在__选择目标进程__ (Select Target Process) 框中,选择__启动 Win32__ (Launch Win32) 选项卡,然后使用__浏览__ (Browse) 按钮选择应用程序的可执行文件。请注意,此处的“Win32”表示非 UWP 应用程序;应用程序文件必须是 64 位二进制文件。
-
启用 Launch for GPU Capture__,然后使用__启动 (Launch) 按钮启动应用程序。

-
像往常一样使用应用程序,直到准备好捕获帧。要捕获帧,请按键盘上的__Print Screen__ 键,或单击 GPU Capture Panel 上的摄像机图标。捕获的缩略图将显示在面板中。要打开捕获,请单击缩略图。

-
要开始分析捕获结果,请单击突出显示的文本或菜单栏上的小型__游戏__ (Play) 图标。

-
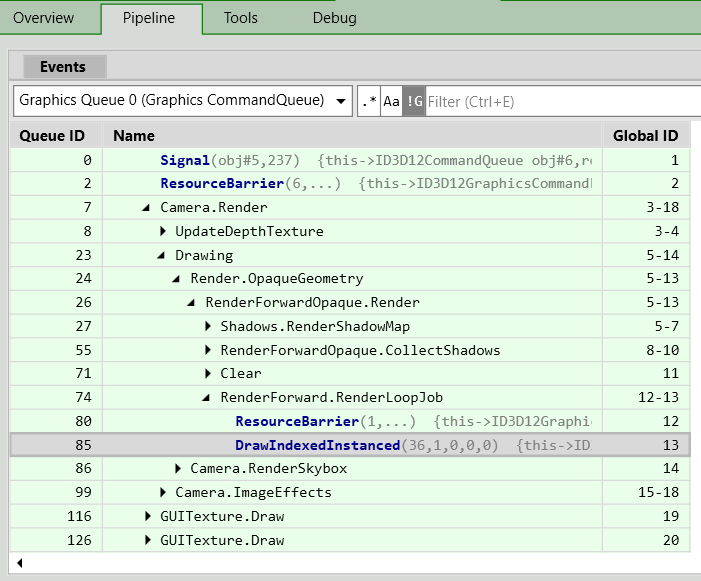
选择__管线__ (Pipeline) 选项卡,然后使用__事件 (Events) __窗口导航到您感兴趣的绘图调用。
在__管线__ (Pipeline) 选项卡的下半部分,从__输出合并器__ (OM) 列表中选择一个渲染目标以查看绘制调用的输出。选择要调试的对象上的像素。请注意,可以右键单击某个像素来查看绘制调用历史记录,从而查找想要的绘制调用。
-
在__像素详情__ (Pixel Details) 面板上选择__调试像素__ (Debug Pixel)。

-
在调试面板上,使用着色器选项 (Shader Options) 选择要调试的着色器阶段。

-
使用工具栏或键盘快捷键逐步执行代码。

有关使用 PIX 调试着色器的更多信息,请参阅 Microsoft 的视频系列 PIX on Windows,特别是 第 5 部分 - 调试选项卡。
有关 PIX 中的 GPU 捕获的更多信息,请参阅 Microsoft 有关 GPU 捕获的文档。
- 2018–09–17