スクリプタブルタイルを作成する
このページのコード例は、独自のスクリプタブルタイルの作成方法と、プロジェクトでの使用方法を示しています。PipelineExampleTile スクリプタブルタイルはタイルの一例で、これを使用して、タイルマップ上に線分をレイアウトし、ペイント時に自動的に結合させることが可能です。これは、道路やパイプになる予定のタイルを設計するのに非常に便利です。
プロジェクトのスクリプタブルタイルを作成するには、次の手順に従います。
前提条件
タスクに進む前に、2D Tilemap Editor パッケージがインストールされている必要があります。このパッケージは 2D 機能セットの一部であり、新しいプロジェクトの作成時にいずれかの 2D テンプレートを選択すると自動的にインストールされます。Unity の Package Manager を使用して、このパッケージを手動でインストールすることもできます。
スクリプトを使用してスクリプタブルタイルを作成する
PipelineExampleTile スクリプタブルタイルを作成し、Unity エディターの Asset メニューで使用可能なオプションにするには、以下の手順を実行します。
- Assets > Create > MonoBehaviour Script の順に移動して、空の MonoBehaviour スクリプトを作成します。
- ファイル名を
PipelineExampleTile.csにします。 - このファイルをテキストエディターで開きます。
- 既存のコードを以下のように置き換えて、ファイルを保存します。
using System;

#if UNITY_EDITOR
using UnityEditor;
#endif


namespace UnityEngine.Tilemaps
{
   /// <summary>
   /// Pipeline Tiles are tiles which take into consideration its orthogonal neighboring tiles and displays a sprite depending on whether the neighboring tile is the same tile.
   /// </summary>
   [Serializable]
   public class PipelineExampleTile : TileBase
   {
       /// <summary>
       /// The Sprites used for defining the Pipeline.
       /// </summary>
       [SerializeField]
       public Sprite[] m_Sprites;


       /// <summary>
       /// This method is called when the tile is refreshed. The PipelineExampleTile will refresh all neighboring tiles to update their rendering data if they are the same tile.
       /// </summary>
       /// <param name="position">Position of the tile on the Tilemap.</param>
       /// <param name="tilemap">The Tilemap the tile is present on.</param>
       public override void RefreshTile(Vector3Int position, ITilemap tilemap)
       {
           for (int yd = -1; yd <= 1; yd++)
               for (int xd = -1; xd <= 1; xd++)
               {
                   Vector3Int pos = new Vector3Int(position.x + xd, position.y + yd, position.z);
                   if (TileValue(tilemap, pos))
                       tilemap.RefreshTile(pos);
               }
       }


       /// <summary>
       /// Retrieves any tile rendering data from the scripted tile.
       /// </summary>
       /// <param name="position">Position of the tile on the Tilemap.</param>
       /// <param name="tilemap">The Tilemap the tile is present on.</param>
       /// <param name="tileData">Data to render the tile.</param>
       public override void GetTileData(Vector3Int position, ITilemap tilemap, ref TileData tileData)
       {
           UpdateTile(position, tilemap, ref tileData);
       }


       /// <summary>
       /// Checks the orthogonal neighbouring positions of the tile and generates a mask based on whether the neighboring tiles are the same. The mask will determine the according Sprite and transform to be rendered at the given position. The Sprite and Transform is then filled into TileData for the Tilemap to use. The Flags lock the color and transform to the data provided by the tile. The ColliderType is set to the shape of the Sprite used.
       /// </summary>
       private void UpdateTile(Vector3Int position, ITilemap tilemap, ref TileData tileData)
       {
           tileData.transform = Matrix4x4.identity;
           tileData.color = Color.white;


           int mask = TileValue(tilemap, position + new Vector3Int(0, 1, 0)) ? 1 : 0;
           mask += TileValue(tilemap, position + new Vector3Int(1, 0, 0)) ? 2 : 0;
           mask += TileValue(tilemap, position + new Vector3Int(0, -1, 0)) ? 4 : 0;
           mask += TileValue(tilemap, position + new Vector3Int(-1, 0, 0)) ? 8 : 0;


           int index = GetIndex((byte)mask);
           if (index >= 0 && index < m_Sprites.Length && TileValue(tilemap, position))
           {
               tileData.sprite = m_Sprites[index];
               tileData.transform = GetTransform((byte)mask);
               tileData.flags = TileFlags.LockTransform | TileFlags.LockColor;
               tileData.colliderType = Tile.ColliderType.Sprite;
           }
       }


       /// <summary>
       /// Determines if the tile at the given position is the same tile as this.
       /// </summary>
       private bool TileValue(ITilemap tileMap, Vector3Int position)
       {
           TileBase tile = tileMap.GetTile(position);
           return (tile != null && tile == this);
       }


       /// <summary>
       /// Determines the index of the Sprite to be used based on the neighbour mask.
       /// </summary>
       private int GetIndex(byte mask)
       {
           switch (mask)
           {
               case 0: return 0;
               case 3:
               case 6:
               case 9:
               case 12: return 1;
               case 1:
               case 2:
               case 4:
               case 5:
               case 10:
               case 8: return 2;
               case 7:
               case 11:
               case 13:
               case 14: return 3;
               case 15: return 4;
           }
           return -1;
       }


       /// <summary>
       /// Determines the Transform to be used based on the neighbour mask.
       /// </summary>
       private Matrix4x4 GetTransform(byte mask)
       {
           switch (mask)
           {
               case 9:
               case 10:
               case 7:
               case 2:
               case 8:
                   return Matrix4x4.TRS(Vector3.zero, Quaternion.Euler(0f, 0f, -90f), Vector3.one);
               case 3:
               case 14:
                   return Matrix4x4.TRS(Vector3.zero, Quaternion.Euler(0f, 0f, -180f), Vector3.one);
               case 6:
               case 13:
                   return Matrix4x4.TRS(Vector3.zero, Quaternion.Euler(0f, 0f, -270f), Vector3.one);
           }
           return Matrix4x4.identity;
       }
   }

#if UNITY_EDITOR
   /// <summary>
   /// Custom Editor for a PipelineExampleTile. This is shown in the Inspector window when a PipelineExampleTile asset is selected.
   /// </summary>
   [CustomEditor(typeof(PipelineExampleTile))]
   public class PipelineExampleTileEditor : Editor
   {
       private PipelineExampleTile tile { get { return (target as PipelineExampleTile); } }


       public void OnEnable()
       {
           if (tile.m_Sprites == null || tile.m_Sprites.Length != 5)
               tile.m_Sprites = new Sprite[5];
       }


       /// <summary>
       /// Draws an Inspector for the PipelineExampleTile.
       /// </summary>
       public override void OnInspectorGUI()
       {
           EditorGUILayout.LabelField("Place sprites shown based on the number of tiles bordering it.");
           EditorGUILayout.Space();

           EditorGUI.BeginChangeCheck();
           tile.m_Sprites[0] = (Sprite) EditorGUILayout.ObjectField("None", tile.m_Sprites[0], typeof(Sprite), false, null);
           tile.m_Sprites[2] = (Sprite) EditorGUILayout.ObjectField("One", tile.m_Sprites[2], typeof(Sprite), false, null);
           tile.m_Sprites[1] = (Sprite) EditorGUILayout.ObjectField("Two", tile.m_Sprites[1], typeof(Sprite), false, null);
           tile.m_Sprites[3] = (Sprite) EditorGUILayout.ObjectField("Three", tile.m_Sprites[3], typeof(Sprite), false, null);
           tile.m_Sprites[4] = (Sprite) EditorGUILayout.ObjectField("Four", tile.m_Sprites[4], typeof(Sprite), false, null);
           if (EditorGUI.EndChangeCheck())
               EditorUtility.SetDirty(tile);
       }


       /// <summary>
       /// The following is a helper that adds a menu item to create a PipelineExampleTile Asset in the project.
       /// </summary>
       [MenuItem("Assets/Create/PipelineExampleTile")]
       public static void CreatePipelineExampleTile()
       {
           string path = EditorUtility.SaveFilePanelInProject("Save Pipeline Example Tile", "New Pipeline Example Tile", "Asset", "Save Pipeline Example Tile", "Assets");
           if (path == "")
               return;
           AssetDatabase.CreateAsset(ScriptableObject.CreateInstance<PipelineExampleTile>(), path);
        }
   }
#endif
}
これで、スクリプタブルタイルを使用する必要がある場合はいつでも、ScriptableObject.CreateInstance<YOUR_TILE_CLASS>() を使用して新しいクラスのインスタンスを作成できます。AssetDatabase.CreateAsset() を呼び出すと、エディター上でこの新しいインスタンスをアセットに変換でき、繰り返し 使用できるようになります。
スクリプタブルタイルでペイントする
PipelineExampleTile.cs スクリプトをプロジェクトにインポートまたは保存すると、PipelineExampleTile タイルアセットを作成することができます。
PipelineExampleTile タイルでペイントするには、次の手順に従います。
PipelineExampleTile タイルアセットを作成します (メニューで Assets > Create > PipelineExampleTile を選択します)。
作成したタイルアセットを選択し、Inspector ウィンドウに移動します。
-
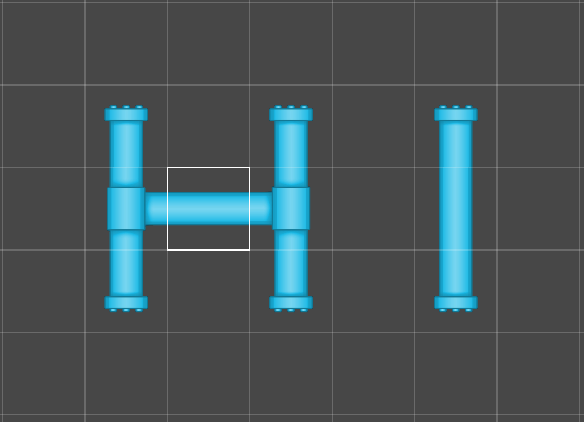
囲んでいるタイルの数に応じて、
PipelineExampleTileをスプライトで塗りつぶします。例えば、1 のスプライトには 1 つの開口部があり、3 のスプライトにはスプライトの端に沿って 3 つの開口部があります。ノート:独自のスプライトを使用する場合は、以下の例に示すように位置と向きを一致させることをお勧めします。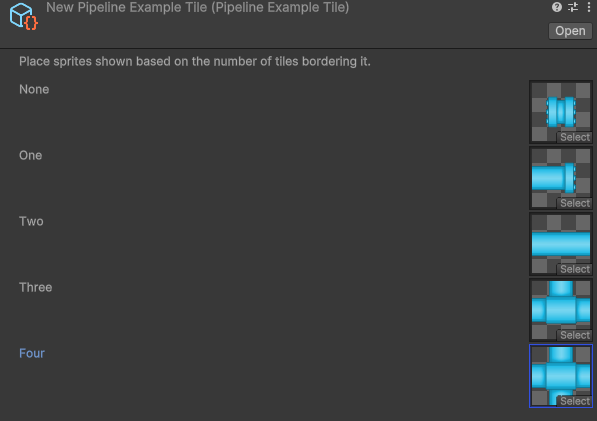
プロジェクトを保存して、タイルに加えた変更を保存します。
タイルパレットにタイルを追加するには、Project ウィンドウからタイルアセットを Tile Palette エディターウィンドウのタイルパレットにドラッグします。