相対位置と絶対位置
以下の例は、相対位置と絶対位置の違いを示すものです。C# と UXML/USS を使用して、UI コントロールを追加してスタイルを設定する方法も示しています。
例の概要
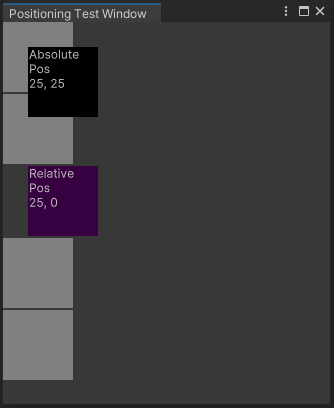
この例では、自動レイアウトシステムを使用して、エディターとランタイム UI にボックスを追加します。25 px の相対的なオフセットを示すボックスと、25 px, 25 px の絶対的な位置を示すボックスがあります。
この例では、エディター UI を C# スクリプトで構築し、ランタイム UI を UXML と CSS で構築しています。
この例で完成したファイルは、この GitHub リポジトリ にあります。
必要な要件
このガイドは、Unity エディター、UI Toolkit、および C# スクリプトに精通している開発者を対象としています。始める前に、以下の点を理解しておいてください。
エディター UI の例を作成する
カスタムエディターウィンドウを作成し、比較用のグレー背景ボックス 4 つ、絶対位置配置を使用した黒背景設定のボックス 1 つ、相対位置配置を使用した紫背景設定のボックス 1 つをすべて C# スクリプトで追加します。
任意のテンプレートで Unity プロジェクトを作成します。
Project ウィンドウで右クリックし、Create > UI Toolkit > Editor Window を選択します。
UI Toolkit Editor Window Creator ウィンドウの C# ボックスに、
PositioningTestWindowと入力します。UXML チェックボックスと USS チェックボックスをオフにします。
Confirm を選択します。これにより、
PositioningTestWindow.csという名前の C# ファイルが作成されます。-
PositioningTestWindow.csを次のように置き換えます。using UnityEditor; using UnityEngine; using UnityEngine.UIElements; public class PositioningTestWindow : EditorWindow { [MenuItem("Window/UI Toolkit/Positioning Test Window")] public static void ShowExample() { var wnd = GetWindow<PositioningTestWindow>(); wnd.titleContent = new GUIContent("Positioning Test Window"); } public void CreateGUI() { for (int i = 0; i < 2; i++) { var temp = new VisualElement(); temp.style.width = 70; temp.style.height = 70; temp.style.marginBottom = 2; temp.style.backgroundColor = Color.gray; this.rootVisualElement.Add(temp); } // Relative positioning var relative = new Label("Relative\nPos\n25, 0"); relative.style.width = 70; relative.style.height = 70; relative.style.left = 25; relative.style.marginBottom = 2; relative.style.backgroundColor = new Color(0.2165094f, 0, 0.254717f); this.rootVisualElement.Add(relative); for (int i = 0; i < 2; i++) { var temp = new VisualElement(); temp.style.width = 70; temp.style.height = 70; temp.style.marginBottom = 2; temp.style.backgroundColor = Color.gray; this.rootVisualElement.Add(temp); } // Absolute positioning var absolutePositionElement = new Label("Absolute\nPos\n25, 25"); absolutePositionElement.style.position = Position.Absolute; absolutePositionElement.style.top = 25; absolutePositionElement.style.left = 25; absolutePositionElement.style.width = 70; absolutePositionElement.style.height = 70; absolutePositionElement.style.backgroundColor = Color.black; this.rootVisualElement.Add(absolutePositionElement); } } 例を確認するには、メニューから Window > UI Toolkit > Positioning Test Window を選択します。
ランタイム UI の例を作成する
-
以下のコンテンツの USS ファイルを
PositioningTest.ussという名前で作成します。.box { height: 70px; width: 70px; margin-bottom: 2px; background-color: gray; } #relative{ width: 70px; height: 70px; background-color: purple; left: 25px; margin-bottom: 2px; position:relative; } #absolutePositionElement{ left: 25px; top: 25px; width: 70px; height: 70px; background-color: black; position: absolute; } -
以下のコンテンツの UXML ドキュメントを
PositioningTest.uxmlという名前で作成します。<ui:UXML xmlns:ui="UnityEngine.UIElements" xmlns:uie="UnityEditor.UIElements" xsi="http://www.w3.org/2001/XMLSchema-instance" engine="UnityEngine.UIElements" editor="UnityEditor.UIElements" noNamespaceSchemaLocation="../UIElementsSchema/UIElements.xsd" editor-extension-mode="False"> <Style src="PositioningTest.uss"/> <ui:VisualElement class="box"/> <ui:VisualElement class="box"/> <ui:Label text="Relative\nPos\n25, 0" name="relative" /> <ui:VisualElement class="box"/> <ui:VisualElement class="box"/> <ui:Label text="Absolute\nPos\n25, 25" name="absolutePositionElement" /> </ui:UXML> -
以下のコンテンツの C# スクリプトを
PositioningTestRuntime.csという名前で作成します。using UnityEngine; using UnityEngine.UIElements; public class PostionTestRuntime : MonoBehaviour { void OnEnable() { GetComponent<UIDocument>(); } } Hierarchy ウィンドウを右クリックし、UI Toolkit > UI Document を選択します。
UI Document の Inspector ウィンドウで、UI Document > Source Asset > PositioningTest を選択します。
UI Document の Inspector ウィンドウで、Add Component > Positioning Test Runtime を選択します。
再生モードに入り、必要に応じて解像度を調整して結果を確認します。