型コンバーターによるランタイムバインディングの作成
バージョン: 6000.0+
この例では、データソースと UI 間でデータ型を変換する 型コンバーター の作成方法を示します。
例の概要
この例では、UI Builder でデータソースアセットにバインドする Label コントロールを作成します。データソースアセットには、dangerLevel という名前の float プロパティが含まれます。ラベルは dangerLevel を文字列として表示し、dangerLevel の値に基づいて背景色を変更します。
この例で作成する完成したファイルは、この GitHub リポジトリにあります。
必要な要件
このガイドは、Unity エディター、UI Toolkit、および C# スクリプトに精通している開発者を対象としています。始める前に、以下の点を理解しておいてください。
データソースアセットの作成
バインドするプロパティーを含むデータソースアセットを作成します。この例では、float を Color と string に変換するローカルコンバーターを含む、ExampleConverterObject という名前の ScriptableObject アセットを作成します。
- Unity で任意のテンプレートでプロジェクトを作成します。
-
Assetsフォルダーに、以下の内容の C# スクリプトを作成しExampleConverterObject.csと命名します。
using Unity.Properties;
using UnityEngine;
using UnityEngine.UIElements;

#if UNITY_EDITOR
using UnityEditor;
#endif

[CreateAssetMenu]
public class ExampleConverterObject : ScriptableObject
{
#if UNITY_EDITOR
    [InitializeOnLoadMethod]
#else
    [RuntimeInitializeOnLoadMethod(RuntimeInitializeLoadType.SubsystemRegistration)]
#endif
    public static void RegisterConverters()
    {

        // Create local Converters.
        var group = new ConverterGroup("Value To Progress");

        // Converter groups can have multiple converters. This example converts a float to both a color and a string.
        group.AddConverter((ref float v) => new StyleColor(Color.Lerp(Color.red, Color.green, v)));
        group.AddConverter((ref float value) =>
        {
            return value switch
            {
                >= 0 and < 1.0f/3.0f => "Danger",
                >= 1.0f/3.0f and < 2.0f/3.0f => "Neutral",
                _ => "Good"
            };
        });

        // Register the converter group in InitializeOnLoadMethod to make it accessible from the UI Builder.
        ConverterGroups.RegisterConverterGroup(group);
    }

    [Header("Binding using a converter group")]
    [Range(0, 1)] public float dangerLevel;
}
オブジェクトアセットの例の作成
-
Assets > Create > Example Object の順に選択します。プロジェクトの
Assetsフォルダーにデータソースアセットが作成されます。 - アセットの名前を
ExampleConverterObject.assetに変更します。
UI の作成
前のステップで作成したデータソースアセットにバインドする UI を作成します。この例では、Label コントロールを含む UXML ファイルを作成します。
- プロジェクトの
Assetsフォルダーに、ExampleConverterObject.uxmlという名前の UXML ファイルを作成します。 -
ExampleConverterObject.uxmlファイルをダブルクリックして、UI Builder で開きます。 - Hierarchyパネルで、Label を追加します。
ラベルをデータソースにバインドする
Label のプロパティーをデータソースアセットのプロパティーにバインドし、Label の型コンバータを適用します。
Hierarchyで Label を選択します。
Inspector パネルのBindings > Data Source > Object リストから、ExampleConverterObject を選択します。
Data Source Path のリストから、dangerLevel を選択します。
Inspector パネルで、Text フィールドを右クリックし、Add binding を選択します。
-
Add Binding ウィンドウで、以下を行います。
- Binding Mode リストから、To Target を選択します。これにより、データソースが変更されると UI が更新されます。
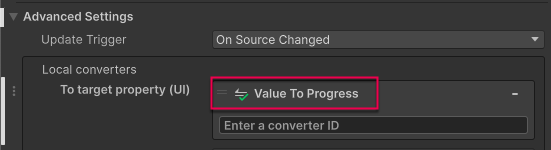
-
Advanced Settings > Local converters > To target property (UI) リストから、Value To Progress を選択します。これにより、float が文字列に変換されます。
Add binding を選択して変更を適用します。
Inspector パネルで、Background フィールドを展開します。
Color プロパティを右クリックし、Add binding を選択します。
-
Add Binding ウィンドウで、以下を行います。
- Binding Mode リストから、To Target を選択します。これにより、データソースが変更されると UI が更新されます。
- Advanced Settings > Local Converters > To target property (UI)リストから、Value To Progress を選択します。これにより、Float が色に変換されます。
Add binding を選択して変更を適用します。
-
UI Builder を保存して終了します。
ExampleConverterObject.uxmlファイルは以下のようになります。<ui:UXML xmlns:ui="UnityEngine.UIElements" xmlns:uie="UnityEditor.UIElements" xsi="http://www.w3.org/2001/XMLSchema-instance" engine="UnityEngine.UIElements" editor="UnityEditor.UIElements" noNamespaceSchemaLocation="../UIElementsSchema/UIElements.xsd" editor-extension-mode="False"> <ui:Label text="Label" data-source="ExampleConverterObject.asset" data-source-path="dangerLevel"> <Bindings> <ui:DataBinding property="style.backgroundColor" binding-mode="ToTarget" source-to-ui-converters="Value To Progress" /> <ui:DataBinding property="text" binding-mode="ToTarget" source-to-ui-converters="Value To Progress" /> </Bindings> </ui:Label> </ui:UXML>
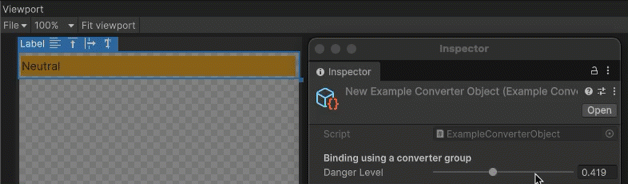
バインディングのテスト
ExampleObject.asset の Inspector ウィンドウで、Danger Level スライダーを移動します。UI Builder のビューポートの Label のテキストと背景色は、Danger Level の値に応じて変化します。