以前の入力システムからの移行
このガイドでは、UnityEngine.Input の API (および UnityEngine のその他の関連 API) のリストと、新しい Input System でそれらに対応する API を示します。ただし、まだ、すべての API に新しいバージョンの API が存在するわけではありません。
ノート: 新しい API はすべて
UnityEngine.InputSystem名前空間にあります。ここでは、簡潔にするために名前空間を省略しています。あいまいさを避けるため、UnityEngine.InputSystemは完全名で参照されます。
条件付きコンパイルを使用すると、以前の入力システムと新しい入力システムのコードを混在させることができます。プレイヤーの環境設定で新しい入力システムが有効になっている場合は (こちら を参照)、ENABLE_INPUT_SYSTEM プリプロセッサーディレクティブが使用可能になります。
# if ENABLE_INPUT_SYSTEM
    // 新しい Input System バックエンドが有効になっています。
# endif

# if ENABLE_LEGACY_INPUT_MANAGER
    // 以前の入力バックエンドが有効になっています。
# endif

    // ノート:  "Active Input Handling" では "Both" を選択できるため、両方が
    //         true になることがあります。
UnityEngine.Input
UnityEngine.Input.acceleration
Accelerometer.current.acceleration.ReadValue() を使用します。
UnityEngine.Input.accelerationEventCount
UnityEngine.Input.accelerationEvents を参照してください。
UnityEngine.Input.accelerationEvents
加速度イベントを、他の入力イベントから切り離して使用することはできません。以下のコードは、Accelerometer.current デバイスのすべての入力イベントを追跡します。
    private InputEventTrace trace;

        void StartTrace()
        {
            InputSystem.EnableDevice(Accelerometer.current);

            trace = new InputEventTrace(Accelerometer.current);
            trace.Enable();
        }

        void Update()
        {
            foreach (var e in trace)
            {
                //...
            }
            trace.Clear();
        }
UnityEngine.Input.anyKey
InputSystem.onAnyButtonPress を使用します。
InputSystem.onAnyButtonPress
    .CallOnce(ctrl => Debug.Log($"Button {ctrl} pressed!"));
UnityEngine.Input.anyKeyDown
Keyboard.current.anyKey.wasUpdatedThisFrame を使用します。
UnityEngine.Input.backButtonLeavesApp
対応する API はまだありません。
UnityEngine.Input.compass
対応する API はまだありません。
UnityEngine.Input.compensateSensors
InputSystem.settings.compensateForScreenOrientation を使用します。
UnityEngine.Input.compositionCursorPos
Keyboard.current.SetIMECursorPosition(myPosition) を使用します。
UnityEngine.Input.compositionString
Keyboard.onIMECompositionChange イベントにサブスクライブします。
    var compositionString = "";
        Keyboard.current.onIMECompositionChange += composition =>
        {
            compositionString = composition.ToString();
        };
UnityEngine.Input.deviceOrientation
対応する API はまだありません。
UnityEngine.Input.gyro
新しい Input System では、UnityEngine.Gyroscope クラスが複数の別個のセンサー Device に置き換えられています。
Gyroscopeは、角速度を測定します。GravitySensorは、重力の方向を測定します。AttitudeSensorは、デバイスの向きを測定します。Accelerometerは、デバイスに適用される加速度の合計値を測定します。LinearAccelerationSensorは、デバイスに適用される加速度を、重力の影響を除いて測定します。
UnityEngine.Input.gyro.attitude
AttitudeSensor.current.orientation.ReadValue() を使用します。
UnityEngine.Input.gyro.enabled
// 取得:
Gyroscope.current.enabled

// 設定:
InputSystem.EnableDevice(Gyroscope.current);
InputSystem.DisableDevice(Gyroscope.current);
ノート: 新しい Input System では、
UnityEngine.Gyroscopeが複数の別個のセンサーデバイスに置き換えられています。必要に応じて、サンプル内のGyroscopeを他のセンサーに置き換えてください。詳細については、UnityEngine.Input.gyroセクションを参照してください。
UnityEngine.Input.gyro.gravity
GravitySensor.current.gravity.ReadValue() を使用します。
UnityEngine.Input.gyro.rotationRate
Gyroscope.current.angularVelocity.ReadValue() を使用します。
UnityEngine.Input.gyro.rotationRateUnbiased
対応する API はまだありません。
UnityEngine.Input.gyro.updateInterval
Sensor.samplingFrequency を使用します。
Gyroscope.current.samplingFrequency = 1.0f / updateInterval;
ノート:
- 秒単位の
updateIntervalとは異なり、samplingFrequencyは Hz 単位で表されるため、1 を値で割る必要があります。- 新しい Input System では、
UnityEngine.Gyroscopeが複数の別個のセンサーデバイスに置き換えられています。必要に応じて、サンプル内のGyroscopeを他のセンサーに置き換えてください。詳細については、UnityEngine.Input.gyroを参照してください。
UnityEngine.Input.gyro.userAcceleration
LinearAccelerationSensor.current.acceleration.acceleration.ReadValue() を使用します。
UnityEngine.Input.imeCompositionMode
対応する API はまだありません。
UnityEngine.Input.imeIsSelected
// 取得:
Keyboard.current.imeSelected

// 設定:
Keyboard.current.SetIMEEnabled(true);
UnityEngine.Input.inputString
Keyboard.onTextInput イベントにサブスクライブします。
Keyboard.current.onTextInput +=
    character => /* ... */;
UnityEngine.Input.location
対応する API はまだありません。
UnityEngine.Input.mousePosition
Mouse.current.position.ReadValue() を使用します。
ノート: タッチからのマウスのシミュレーションはまだ実装されていません。
UnityEngine.Input.mousePresent
Mouse.current != null を使用します。
UnityEngine.Input.multiTouchEnabled
対応する API はまだありません。
UnityEngine.Input.simulateMouseWithTouches
対応する API はまだありません。
UnityEngine.Input.stylusTouchSupported
対応する API はまだありません。
UnityEngine.Input.touchCount
InputSystem.EnhancedTouch.Touch.activeTouches.Count を使用します。
ノート: 最初に
InputSystem.EnhancedTouchSupport.Enable()を呼び出して拡張タッチサポートを有効にしてください。
UnityEngine.Input.touches
InputSystem.EnhancedTouch.Touch.activeTouches を使用します。
ノート: 最初に
InputSystem.EnhancedTouch.Enable()を呼び出して拡張タッチサポートを有効にしてください。
UnityEngine.Input.touchPressureSupported
対応する API はまだありません。
UnityEngine.Input.touchSupported
Touchscreen.current != null を使用します。
UnityEngine.Input.GetAccelerationEvent
UnityEngine.Input.accelerationEvents を参照してください。
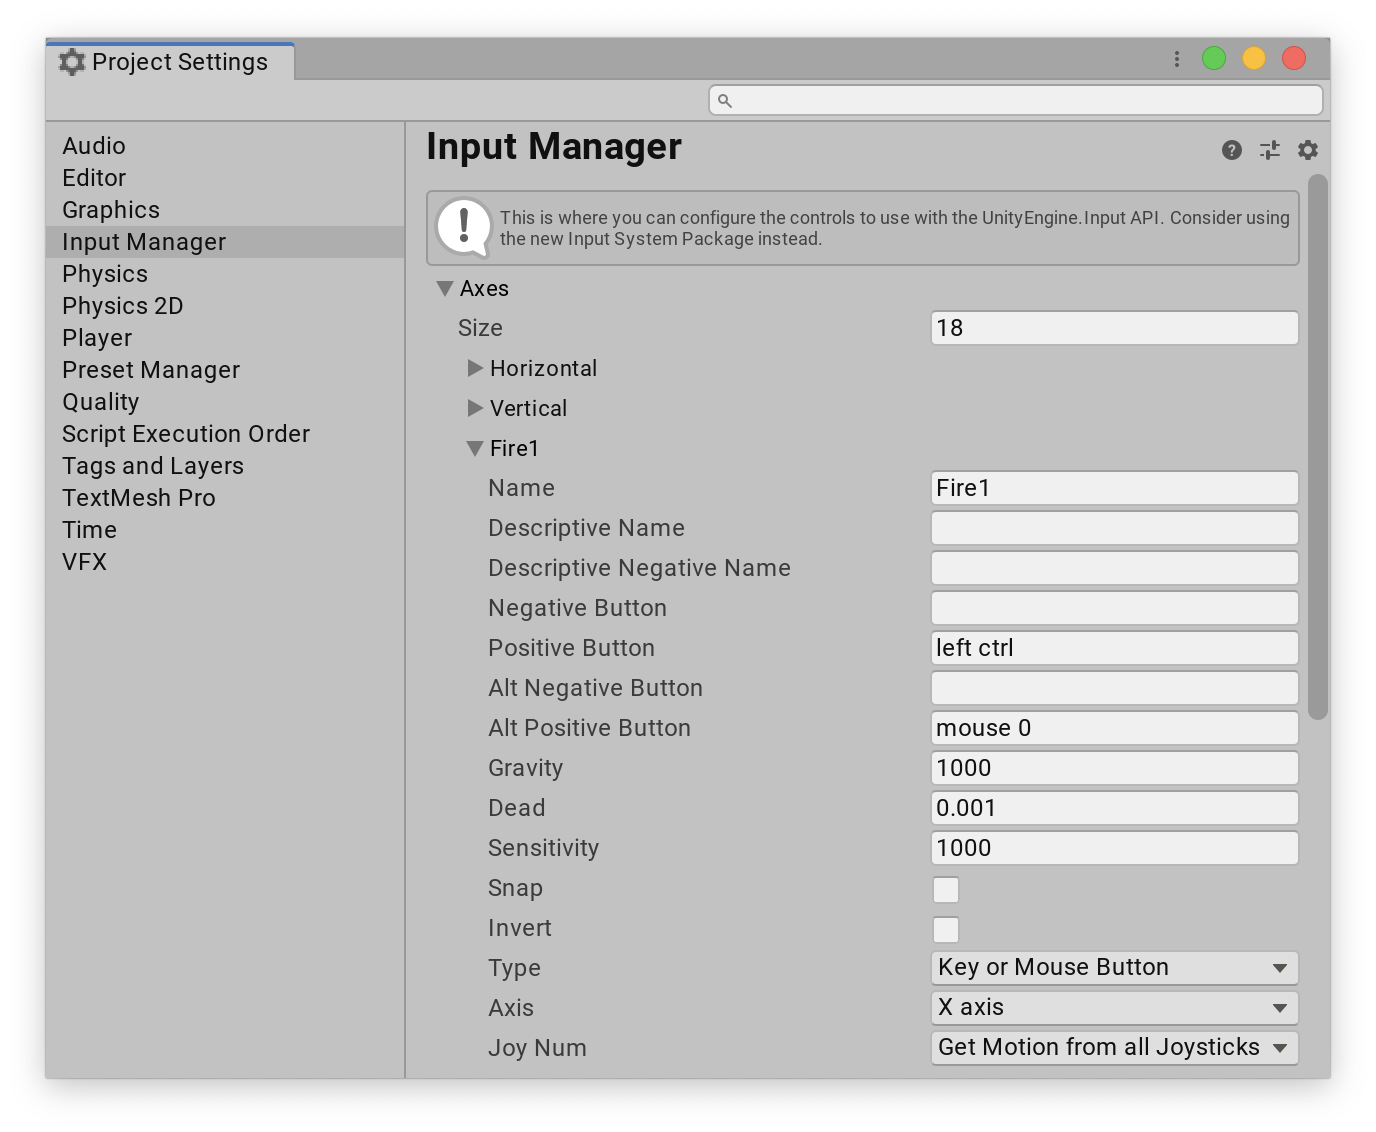
UnityEngine.Input.GetAxis
以前の Input Manager 設定における仮想軸の設定に厳密に対応するグローバル設定はありません。代わりに、一連の Input Action を独立したアセットとして作成するか、C# コンポーネントに直接加えることができます。
例えば、以下の軸設定を作成し直す必要があるとします。
オプション A: コンポーネントに Input Action を加える
1 つ以上の
InputAction型のフィールドを宣言します。public class MyComponent : MonoBehaviour { public InputAction fireAction;Action の応答を設定します。
        void Awake()
                {
                    fireAction.performed += ctx => Fire();
                }

                void Fire()
                {
                    //...
                }
コンポーネントを
GameObjectに配置します。これで、インスペクターウィンドウで Binding を設定できるようになります。Binding を加えるには、Binding リストのプラス記号をクリックします。Binding をダブルクリックすると、バインド先の Control を選択できます。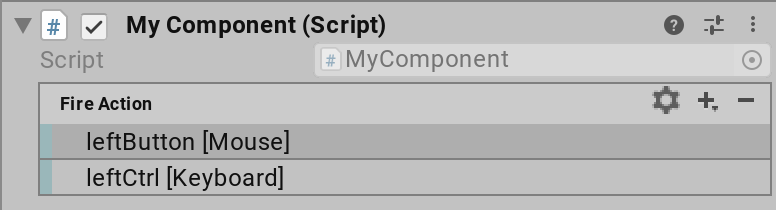
必要に応じて Action の有効化と無効化を行います。
        void OnEnable()
                {
                    fireAction.Enable();
                }

                void OnDisable()
                {
                    fireAction.Disable();
                }
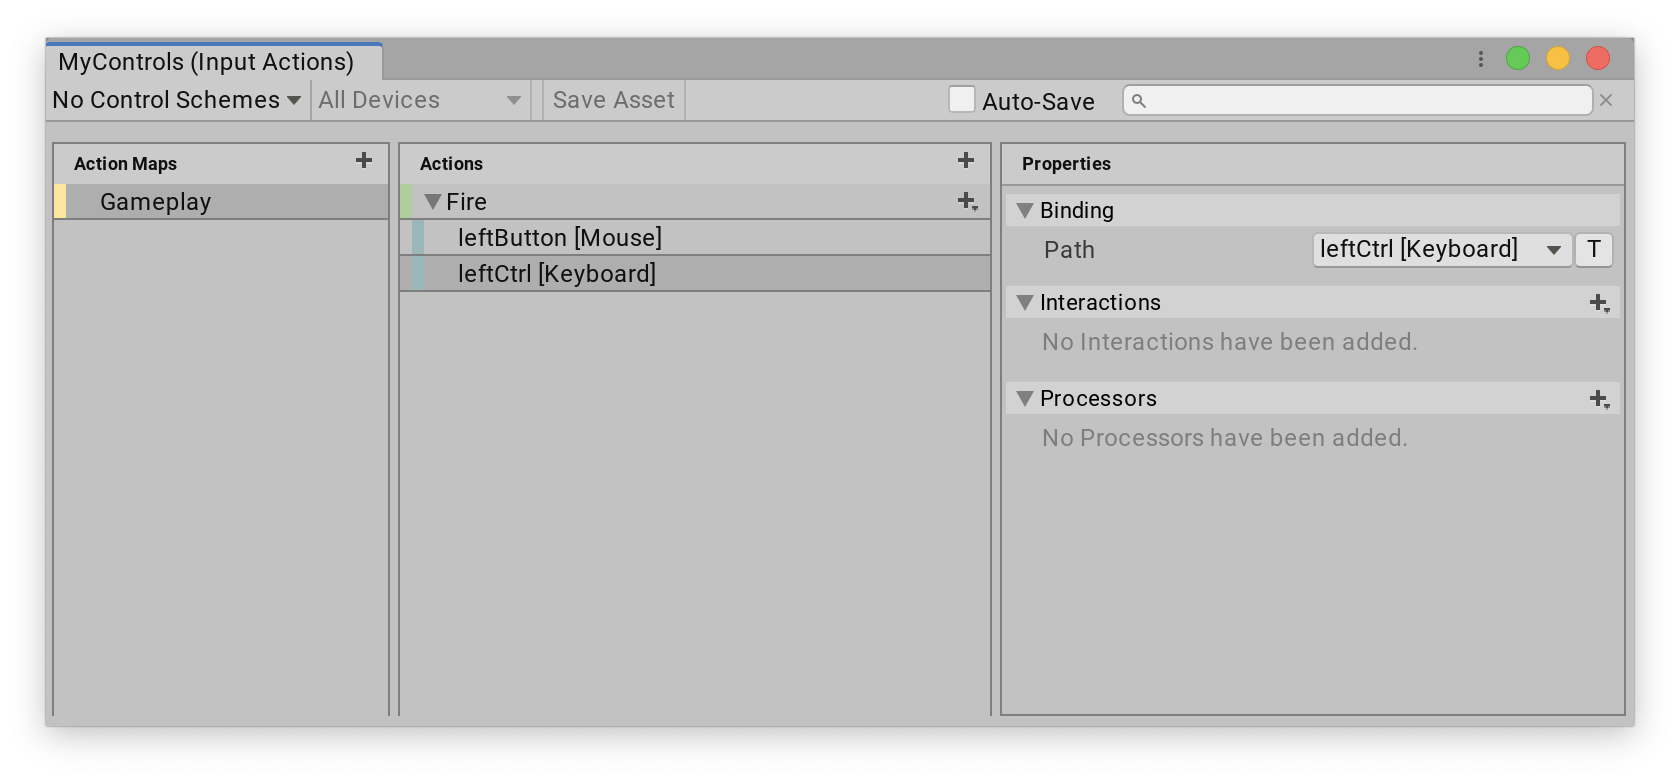
オプション B: Input Action アセットを作成する
- Input Action を作成します (プロジェクトブラウザーで右クリックし、Create > Input Actions を選択します)。アセットに名前を付けます。
- アセットをダブルクリックして、Input Actions エディターウィンドウを開きます。
- Action Maps 列で、プラス記号をクリックして新しい Action Map を加えます。
- New Action Map という名前をダブルクリックして、セットの名前を変更します。gameplay など、わかりやすい名前を使用してください。
- Actions 列で、プラス記号をクリックして新しい Action を加えます。
- Action をダブルクリックして名前を付けます。
- Action に Binding を加えます。そのためには、Action のプラス記号をクリックし、リストから Binding タイプを選択します。
- Binding を選択し、右側の列で Path ボタンをクリックして、バインド先の Control を選択します。
Save Asset をクリックします。この時点で、Input Action エディターは以下のようになります。
アセットのインスペクターウィンドウで、Generate C# Wrapper Class チェックボックスをオンにし、Apply をクリックします。インスペクターは以下のようになります。
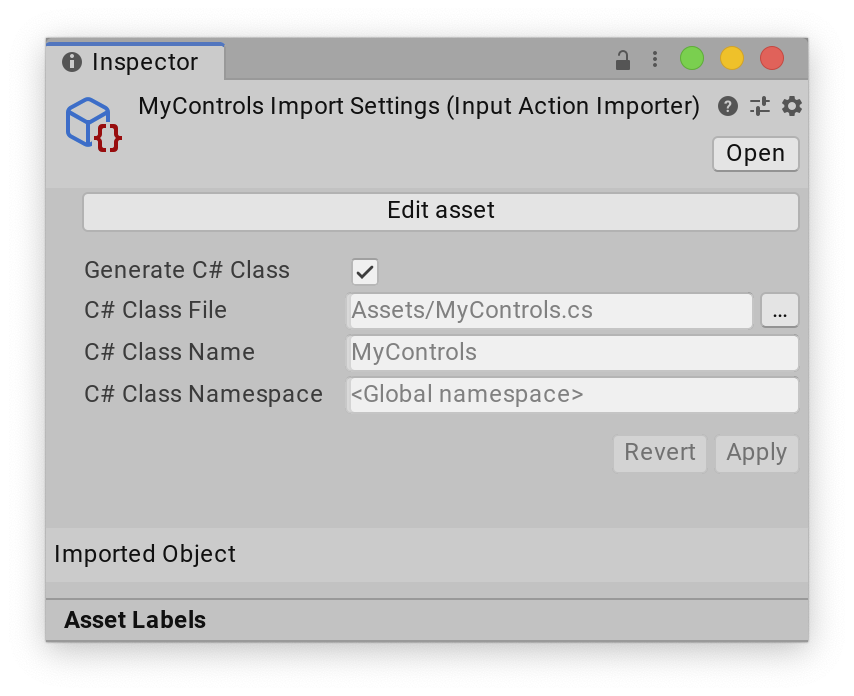
生成された C#ラッパークラスのインスタンスをコンポーネントに加えます。
public class MyComponent : MonoBehaviour
{
   MyControls controls;
インスタンスを作成し、Fire Action への応答を登録します。
   public void Awake()
       {
           controls = new MyControls();
           controls.gameplay.fire.performed += ctx => Fire();
       }
必要に応じて Action の有効化と無効化を行います。
   public void OnEnable()
       {
           controls.Enable();
       }

       public void OnDisable()
       {
           controls.Disable();
       }
ヒント
- Binding で参照されているコントロールを強制的にボタンのように動作させるには、press Interaction を加えます。
コールバックから、Action をトリガーした Control にアクセスできます。これを使用して、Control の現在の状態を照会することもできます。
fireAction.performed +=
    ctx =>
    {
        var control = ctx.control; // コントロールを取得します。
        var value = ctx.GetValue<float>(); // コントロールから値を読み取ります。

        // コントロール固有の確認処理を実行できます。
        var button = control as ButtonControl;
        if (button != null && button.wasPressedThisFrame)
            /* ... */;
    }
UnityEngine.Input.GetAxisRaw
直接適用できる方法はありません。InputControl<>.ReadUnprocessedValue() を使用すると、任意のコントロールから未処理の値を読み取ることができます。
UnityEngine.Input.GetButton
InputAction.IsPressed を使用します。
if (playerInput.actions["fire"].IsPressed() && Time.time - m_LastFireTime >= kFireRate)
    Fire();
UnityEngine.input.GetButtonDown
InputAction.WasPressedThisFrame を使用します。
if (playerInput.actions["fire"].WasPressedThisFrame())
    Fire();
UnityEngine.input.GetButtonUp
InputAction.WasReleasedThisFrame を使用します。
if (playerInput.actions["fire"].WasReleasedThisFrame())
    StopFiring();
UnityEngine.Input.GetJoystickNames
これに厳密に対応する API はありません。
接続されている Device を検出するには、いくつかの方法があります。以下に例を示します。
// 接続されているすべての Device のリストを照会します (割り当ては行われません。読み取り専用アクセスです)。
InputSystem.devices

// Device が追加されるか、削除されたときに通知を受け取ります。
InputSystem.onDeviceChange +=
    (device, change) =>
    {
        if (change == InputDeviceChange.Added || change == InputDeviceChange.Removed)
        {
            Debug.Log($"Device '{device}' was {change}");
        }
    }

// すべてのゲームパッドとジョイスティックを検出します。
var devices = InputSystem.devices;
for (var i = 0; i < devices.Count; ++i)
{
    var device = devices[i];
    if (device is Joystick || device is Gamepad)
    {
        Debug.Log("Found " + device);
    }
}
UnityEngine.Input.GetKey
対応するキーの ButtonControl.isPressed を使用します。
// KeyControl のプロパティを直接使用する場合。
Keyboard.current.spaceKey.isPressed
Keyboard.current.aKey.isPressed // その他同様。

// Key enum を使用する場合。
Keyboard.current[Key.Space].isPressed

// キー名を使用する場合。
((KeyControl)Keyboard.current["space"]).isPressed
ノート: Input System は、キーボードの現在の言語マッピングに従うのではなく、物理レイアウトによってキーを識別します。言語マッピングに従ってキーの名前を照会するには、
KeyControl.displayNameを使用します。
UnityEngine.Input.GetKeyDown
対応するキーの ButtonControl.wasPressedThisFrame を使用します。
// KeyControl のプロパティを直接使用する場合。
Keyboard.current.spaceKey.wasPressedThisFrame
Keyboard.current.aKey.wasPressedThisFrame // その他同様。

// Key enum を使用する場合。
Keyboard.current[Key.Space].wasPressedThisFrame

// キー名を使用する場合。
((KeyControl)Keyboard.current["space"]).wasPressedThisFrame
ノート: Input System は、キーボードの現在の言語マッピングに従うのではなく、物理レイアウトによってキーを識別します。言語マッピングに従ってキーの名前を照会するには、
KeyControl.displayNameを使用します。
UnityEngine.Input.GetKeyUp
対応するキーの ButtonControl.wasReleasedThisFrame を使用します。
// KeyControl のプロパティを直接使用する場合。
Keyboard.current.spaceKey.wasReleasedThisFrame
Keyboard.current.aKey.wasReleasedThisFrame // その他同様。

// Key enum を使用する場合。
Keyboard.current[Key.Space].wasReleasedThisFrame

// キー名を使用する場合。
((KeyControl)Keyboard.current["space"]).wasReleasedThisFrame
ノート: Input System は、キーボードの現在の言語マッピングに従うのではなく、物理レイアウトによってキーを識別します。言語マッピングに従ってキーの名前を照会するには、
KeyControl.displayNameを使用します。
UnityEngine.Input.GetMouseButton
対応するマウスボタンの ButtonControl.isPressed を使用します。
Mouse.current.leftButton.isPressed
Mouse.current.rightButton.isPressed
Mouse.current.middleButton.isPressed

// マウスのすべてのボタンを調べることもできます (割り当ては行われません)。
var controls = Mouse.current.allControls;
for (var i = 0; i < controls.Count; ++i)
{
    var button = controls[i] as ButtonControl;
    if (button != null && button.isPressed)
        /* ... */;
}

// または、名前でコントロールを参照します。
((ButtonControl)Mouse.current["leftButton"]).isPressed
UnityEngine.Input.GetMouseButtonDown
対応するマウスボタンの ButtonControl.wasPressedThisFrame を使用します。
Mouse.current.leftButton.wasPressedThisFrame
Mouse.current.rightButton.wasPressedThisFrame
Mouse.current.middleButton.wasPressedThisFrame
UnityEngine.Input.GetMouseButtonUp
対応するマウスボタンの ButtonControl.wasReleasedThisFrame を使用します。
Mouse.current.leftButton.wasReleasedThisFrame
Mouse.current.rightButton.wasReleasedThisFrame
Mouse.current.middleButton.wasReleasedThisFrame
UnityEngine.Input.GetTouch
InputSystem.EnhancedTouch.Touch.activeTouches[i] を使用します。
ノート: 最初に
InputSystem.EnhancedTouch.Enable()を呼び出して拡張タッチサポートを有効にしてください。
UnityEngine.Input.IsJoystickPreconfigured
必要ありません。Gamepad から派生する Device では、軸とボタンのマッピングが常に適切に実装され、Gamepad クラスの対応する InputControl メンバーにマップされます。
UnityEngine.Input.ResetInputAxes
直接適用できる方法はありません。
UnityEngine.TouchScreenKeyboard
対応する API はまだありません。当面は TouchScreenKeyboard を使用してください。