IMGUI 布局模式
固定布局与自动布局
使用 IMGUI 系统时,可使用两种不同的模式来排列和组织__ UI__(即用户界面,User Interface)让用户能够与您的应用程序进行交互。Unity 目前支持三种 UI 系统。更多信息
See in Glossary:固定布局模式和自动布局模式。到目前为止,本指南中提供的每个 IMGUI 示例都使用了固定布局。要使用自动布局,应在调用控件函数时写入 GUILayout 而不是 GUI。不必使用一种布局模式来替代另一种布局模式,可在同一 OnGUI() 函数中同时使用这两种模式。
当有预先设计好的界面可供使用时,采用固定布局比较合理。如果预先不知道需要多少元素,或者不想费心进行每个控件的手动定位,则采用自动布局比较合适。例如,如果要基于保存游戏文件创建大量不同的按钮,但无法准确知道要绘制多少按钮,这种情况下采用自动布局可能会更加合理。具体实际上取决于游戏设计以及所需的界面呈现方式。
使用自动布局时有两个主要的不同之处:
- 使用 GUILayout 而不是 GUI
- 自动布局控件不需要 Rect() 函数
/* Two key differences when using Automatic Layout */


// JavaScript
function OnGUI () {
    // Fixed Layout
    GUI.Button (Rect (25,25,100,30), "I am a Fixed Layout Button");

    // Automatic Layout
    GUILayout.Button ("I am an Automatic Layout Button");
}


// C#
using UnityEngine;
using System.Collections;

public class GUITest : MonoBehaviour {

    void OnGUI () {
        // Fixed Layout
        GUI.Button (new Rect (25,25,100,30), "I am a Fixed Layout Button");

        // Automatic Layout
        GUILayout.Button ("I am an Automatic Layout Button");
    }

}
排列控件
根据使用的布局模式,可通过不同的挂钩来控制控件的位置以及控件如何组合在一起。在固定布局中,可将不同的控件放入__组__中。在自动布局中,可将不同的控件放入__区域、水平组__和__垂直组__中
固定布局 - 组
组是固定布局模式中的布局规则。使用组可以定义包含多个控件的屏幕区域。为定义组中包含的控件,需要使用 GUI.BeginGroup() 和 GUI.EndGroup() 函数。组内的所有控件将根据组的左上角而不是屏幕的左上角进行定位。因此,如果在运行时重新定位组,则将保持组中所有控件的相对位置。
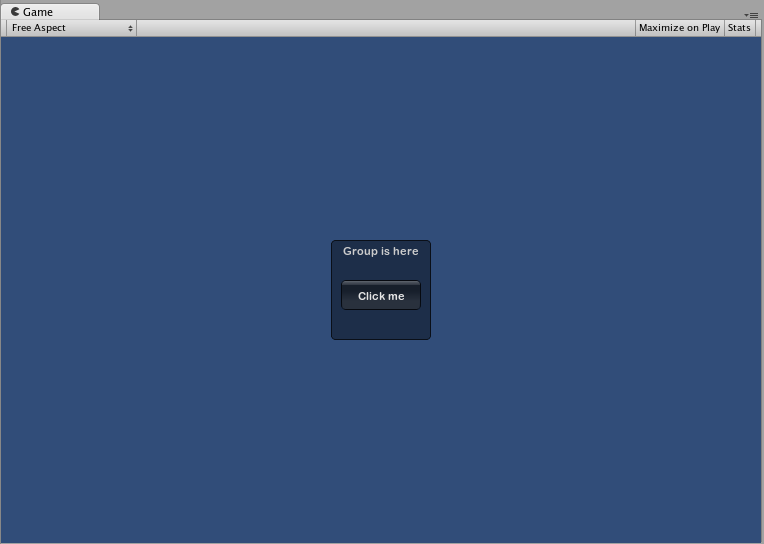
例如,在屏幕上使多个控件居中非常容易。
/* Center multiple Controls on the screen using Groups */


// JavaScript
function OnGUI () {
    // Make a group on the center of the screen
    GUI.BeginGroup (Rect (Screen.width / 2 - 50, Screen.height / 2 - 50, 100, 100));
    // All rectangles are now adjusted to the group. (0,0) is the topleft corner of the group.

    // We'll make a box so you can see where the group is on-screen.
    GUI.Box (Rect (0,0,100,100), "Group is here");
    GUI.Button (Rect (10,40,80,30), "Click me");

    // End the group we started above. This is very important to remember!
    GUI.EndGroup ();
}


// C#
using UnityEngine;
using System.Collections;

public class GUITest : MonoBehaviour {

    void OnGUI () {
        // Make a group on the center of the screen
        GUI.BeginGroup (new Rect (Screen.width / 2 - 50, Screen.height / 2 - 50, 100, 100));
        // All rectangles are now adjusted to the group. (0,0) is the topleft corner of the group.

        // We'll make a box so you can see where the group is on-screen.
        GUI.Box (new Rect (0,0,100,100), "Group is here");
        GUI.Button (new Rect (10,40,80,30), "Click me");

        // End the group we started above. This is very important to remember!
        GUI.EndGroup ();
    }

}
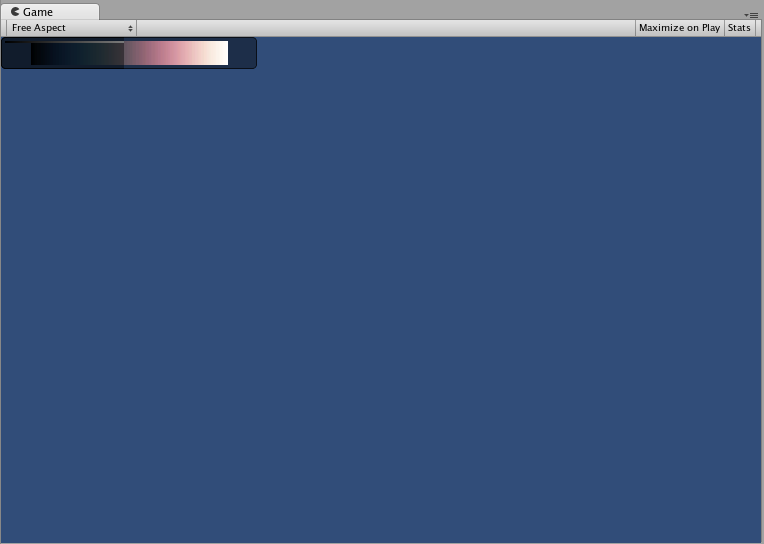
还可以将多个组嵌套在一起。这样做时,每个组的内容都会裁剪到其父项空间。
/* Using multiple Groups to clip the displayed Contents */


// JavaScript
var bgImage : Texture2D; // background image that is 256 x 32
var fgImage : Texture2D; // foreground image that is 256 x 32
var playerEnergy = 1.0; // a float between 0.0 and 1.0

function OnGUI () {
    // Create one Group to contain both images
    // Adjust the first 2 coordinates to place it somewhere else on-screen
    GUI.BeginGroup (Rect (0,0,256,32));

    // Draw the background image
    GUI.Box (Rect (0,0,256,32), bgImage);

    // Create a second Group which will be clipped
    // We want to clip the image and not scale it, which is why we need the second Group
    GUI.BeginGroup (Rect (0,0,playerEnergy * 256, 32));

    // Draw the foreground image
    GUI.Box (Rect (0,0,256,32), fgImage);

    // End both Groups
    GUI.EndGroup ();
    GUI.EndGroup ();
}


// C#
using UnityEngine;
using System.Collections;

public class GUITest : MonoBehaviour {

    // background image that is 256 x 32
    public Texture2D bgImage;

    // foreground image that is 256 x 32
    public Texture2D fgImage;

    // a float between 0.0 and 1.0
    public float playerEnergy = 1.0f;

    void OnGUI () {
        // Create one Group to contain both images
        // Adjust the first 2 coordinates to place it somewhere else on-screen
        GUI.BeginGroup (new Rect (0,0,256,32));

        // Draw the background image
        GUI.Box (new Rect (0,0,256,32), bgImage);

            // Create a second Group which will be clipped
            // We want to clip the image and not scale it, which is why we need the second Group
            GUI.BeginGroup (new Rect (0,0,playerEnergy * 256, 32));

            // Draw the foreground image
            GUI.Box (new Rect (0,0,256,32), fgImage);

            // End both Groups
            GUI.EndGroup ();

        GUI.EndGroup ();
    }

}
自动布局 - 区域
区域仅用于自动布局模式。区域定义了有限的屏幕区域来包含 GUILayout 控件,因此在功能上类似于固定布局组。由于自动布局的性质,几乎始终要用到区域。
在自动布局模式下,不需要在控制级别定义绘制控件的屏幕区域。控件将自动放置在包含该控件的区域的最左上角。此区域可能是指屏幕。此外也可以创建手动定位的区域。一个区域内的 GUILayout 控件将放置在该区域的最左上角。
/* A button placed in no area, and a button placed in an area halfway across the screen. */


// JavaScript
function OnGUI () {
    GUILayout.Button ("I am not inside an Area");
    GUILayout.BeginArea (Rect (Screen.width/2, Screen.height/2, 300, 300));
    GUILayout.Button ("I am completely inside an Area");
    GUILayout.EndArea ();
}


// C#
using UnityEngine;
using System.Collections;

public class GUITest : MonoBehaviour {

    void OnGUI () {
        GUILayout.Button ("I am not inside an Area");
        GUILayout.BeginArea (new Rect (Screen.width/2, Screen.height/2, 300, 300));
        GUILayout.Button ("I am completely inside an Area");
        GUILayout.EndArea ();
    }

}
请注意,在一个区域内,具有可见元素(如按钮和框形)的控件会将宽度拉伸到该区域的整个长度。
自动布局 - 水平和垂直组
使用自动布局时,默认情况下控件将从上到下依次出现。在很多情况下,需要更精确控制控件的放置位置以及排列方式。如果使用自动布局模式,则可以选择水平和垂直组。
与其他布局控件一样,可以调用单独的函数来开始或结束这些组。这些函数为 GUILayout.BeginHorizontal()、 GUILayout.EndHorizontal()、GUILayout.BeginVertical() 和 GUILayout.EndVertical()。
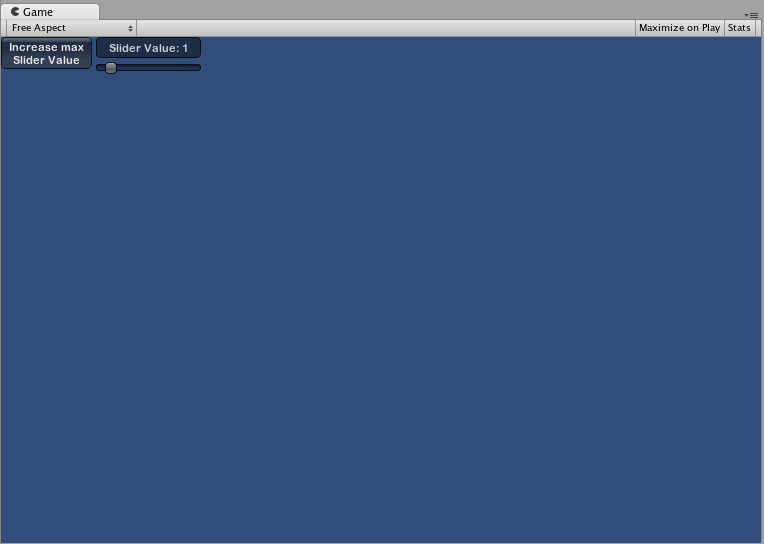
水平组内的所有控件都将始终采用水平布局方式。垂直组内的所有控件都将始终采用垂直布局方式。这听起来很简单,但若要将组嵌套在彼此内部,就不那么简单了。通过嵌套的方式可在任何能够想象的配置中排列任意数量的控件。
/* Using nested Horizontal and Vertical Groups */


// JavaScript
var sliderValue = 1.0;
var maxSliderValue = 10.0;

function OnGUI()
{
    // Wrap everything in the designated GUI Area
    GUILayout.BeginArea (Rect (0,0,200,60));

    // Begin the singular Horizontal Group
    GUILayout.BeginHorizontal();

    // Place a Button normally
    if (GUILayout.RepeatButton ("Increase max\nSlider Value"))
    {
        maxSliderValue += 3.0 * Time.deltaTime;
    }

    // Arrange two more Controls vertically beside the Button
    GUILayout.BeginVertical();
    GUILayout.Box("Slider Value: " + Mathf.Round(sliderValue));
    sliderValue = GUILayout.HorizontalSlider (sliderValue, 0.0, maxSliderValue);

    // End the Groups and Area
    GUILayout.EndVertical();
    GUILayout.EndHorizontal();
    GUILayout.EndArea();
}


// C#
using UnityEngine;
using System.Collections;

public class GUITest : MonoBehaviour {

    private float sliderValue = 1.0f;
    private float maxSliderValue = 10.0f;

    void OnGUI()
    {
        // Wrap everything in the designated GUI Area
        GUILayout.BeginArea (new Rect (0,0,200,60));

        // Begin the singular Horizontal Group
        GUILayout.BeginHorizontal();

        // Place a Button normally
        if (GUILayout.RepeatButton ("Increase max\nSlider Value"))
        {
            maxSliderValue += 3.0f * Time.deltaTime;
        }

        // Arrange two more Controls vertically beside the Button
        GUILayout.BeginVertical();
        GUILayout.Box("Slider Value: " + Mathf.Round(sliderValue));
        sliderValue = GUILayout.HorizontalSlider (sliderValue, 0.0f, maxSliderValue);

        // End the Groups and Area
        GUILayout.EndVertical();
        GUILayout.EndHorizontal();
        GUILayout.EndArea();
    }

}
使用 GUILayoutOption 定义一些控件
可使用 GUILayoutOption 覆盖某些自动布局参数。要执行此操作,可提供相应的选项作为 GUILayout 控件的最终参数。
在上面的区域示例中,是否还记得按钮的宽度扩展到区域宽度的 100%?如果愿意,我们可以覆盖这种行为。
/* Using GUILayoutOptions to override Automatic Layout Control properties */


//JavaScript
function OnGUI () {
    GUILayout.BeginArea (Rect (100, 50, Screen.width-200, Screen.height-100));
    GUILayout.Button ("I am a regular Automatic Layout Button");
    GUILayout.Button ("My width has been overridden", GUILayout.Width (95));
    GUILayout.EndArea ();
}


// C#
using UnityEngine;
using System.Collections;

public class GUITest : MonoBehaviour {

    void OnGUI () {
        GUILayout.BeginArea (new Rect (100, 50, Screen.width-200, Screen.height-100));
        GUILayout.Button ("I am a regular Automatic Layout Button");
        GUILayout.Button ("My width has been overridden", GUILayout.Width (95));
        GUILayout.EndArea ();
    }

}
有关可能的 GUILayoutOption 的完整列表,请阅读 GUILayoutOption 脚本参考页面。