在着色器中对 3D 纹理进行采样
要在自定义着色器中使用 3D 纹理,可以使用以下方法:
- 用于添加 3D 纹理属性的
3D材质属性声明。例如:_MainTex ("Example 3D texture", 3D) = "white" {}; - 将 3D 纹理用作着色器输入的
sampler3D采样器状态。例如:sampler3D _MainTex; - 对 3D 纹理进行采样的
tex3DHLSL 方法。例如:float4 color = tex3D(_MainTex, float3(0.5f, 0.5f, 0.5f));
示例
以下是一个着色器示例,它使用光线追踪对 3D 纹理进行采样,并将其渲染为半透明体积。
要使用示例,请遵循以下步骤:
- 在项目 (Project) 窗口中,使用添加 (Add) > 着色器 (Shader) > 无光照着色器 (Unlit Shader) 创建新的基本着色器。
- 将着色器代码替换为示例代码。
- 在项目 (Project) 窗口中右键单击并选择创建 (Create) > 材质 (Material) 来从着色器创建新的材质。
- 导入或创建 3D 纹理。例如,使用在脚本中创建 3D 纹理页面中的示例代码。
- 将 3D 纹理资源从项目 (Project) 窗口拖动到材质的纹理 3D (Texture 3D) 属性。
- 将材质附加到游戏对象。
Shader "Unlit/VolumeShader"
{
    Properties
    {
        _MainTex ("Texture", 3D) = "white" {}
        _Alpha ("Alpha", float) = 0.02
        _StepSize ("Step Size", float) = 0.01
    }
    SubShader
    {
        Tags { "Queue" = "Transparent" "RenderType" = "Transparent" }
        Blend One OneMinusSrcAlpha
        LOD 100

        Pass
        {
            CGPROGRAM
            #pragma vertex vert
            #pragma fragment frag

            #include "UnityCG.cginc"

            // Maximum number of raymarching samples
            #define MAX_STEP_COUNT 128

            // Allowed floating point inaccuracy
            #define EPSILON 0.00001f

            struct appdata
            {
                float4 vertex : POSITION;
            };

            struct v2f
            {
                float4 vertex : SV_POSITION;
                float3 objectVertex : TEXCOORD0;
                float3 vectorToSurface : TEXCOORD1;
            };

            sampler3D _MainTex;
            float4 _MainTex_ST;
            float _Alpha;
            float _StepSize;

            v2f vert (appdata v)
            {
                v2f o;

                // Vertex in object space. This is the starting point for the raymarching.
                o.objectVertex = v.vertex;

                // Calculate vector from camera to vertex in world space
                float3 worldVertex = mul(unity_ObjectToWorld, v.vertex).xyz;
                o.vectorToSurface = worldVertex - _WorldSpaceCameraPos;

                o.vertex = UnityObjectToClipPos(v.vertex);
                return o;
            }

            float4 BlendUnder(float4 color, float4 newColor)
            {
                color.rgb += (1.0 - color.a) * newColor.a * newColor.rgb;
                color.a += (1.0 - color.a) * newColor.a;
                return color;
            }

            fixed4 frag(v2f i) : SV_Target
            {
                // Start raymarching at the front surface of the object
                float3 rayOrigin = i.objectVertex;

                // Use vector from camera to object surface to get ray direction
                float3 rayDirection = mul(unity_WorldToObject, float4(normalize(i.vectorToSurface), 1));

                float4 color = float4(0, 0, 0, 0);
                float3 samplePosition = rayOrigin;

                // Raymarch through object space
                for (int i = 0; i < MAX_STEP_COUNT; i++)
                {
                    // Accumulate color only within unit cube bounds
                    if(max(abs(samplePosition.x), max(abs(samplePosition.y), abs(samplePosition.z))) < 0.5f + EPSILON)
                    {
                        float4 sampledColor = tex3D(_MainTex, samplePosition + float3(0.5f, 0.5f, 0.5f));
                        sampledColor.a *= _Alpha;
                        color = BlendUnder(color, sampledColor);
                        samplePosition += rayDirection * _StepSize;
                    }
                }

                return color;
            }
            ENDCG
        }
    }
}
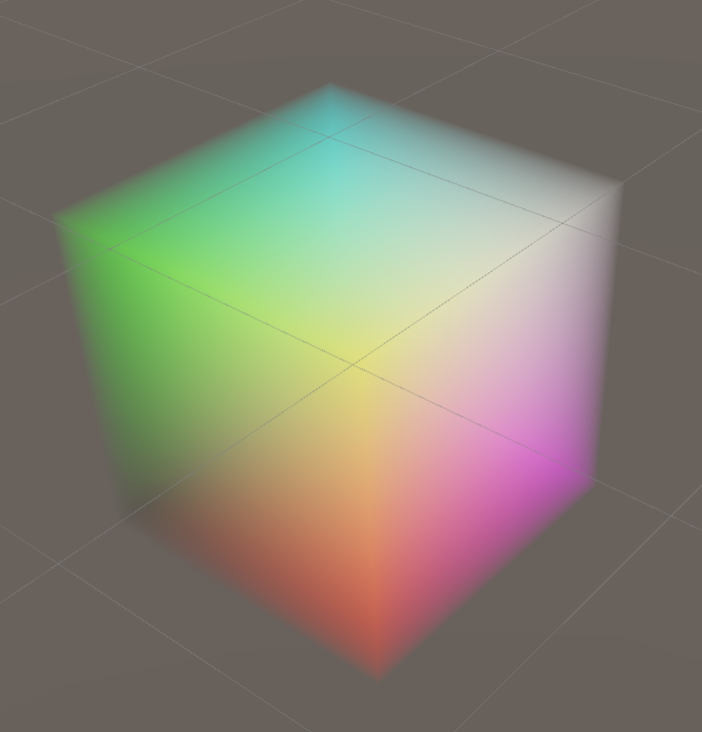
如果将示例着色器与在脚本中创建 3D 纹理页面中的 3D 纹理一起使用,Unity 将渲染的体积。