Make the camera perspective oblique
By default, the view frustum is arranged symmetrically around the camera’s center line, but it doesn’t necessarily need to be. You can make the frustum oblique, which means that one side is at a smaller angle to the centre line than the opposite side.
This makes the perspective on one side of the image seem more condensed, giving the impression that the viewer is very close to the object visible at that edge. An example of how this can be used is a car racing game; if the frustum is flattened at its bottom edge, it appears to the viewer that they are closer to the road, accentuating the feeling of speed.
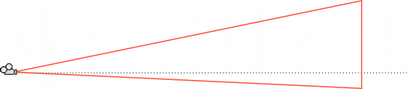
Setting frustum obliqueness
Important: The Built-In Render Pipeline is deprecated and will be made obsolete in a future release.
It remains supported, including bug fixes and maintenance, through the full Unity 6.7 LTS lifecycle.
For more information on migration, refer to Migrating from the Built-In Render Pipeline to the Universal Render Pipeline and Render pipeline feature comparison.
Although the Camera component does not have functions specifically for setting the obliqueness of the frustum, you can do it by either enabling the camera’s Physical Camera properties and applying a Lens Shift, or by adding a script to alter the camera’s projection matrix.
Note: In the Built-in Render Pipeline, a Camera that uses an oblique frustum can only use the Forward rendering pathThe technique that a render pipeline uses to render graphics. Choosing a different rendering path affects how lighting and shading are calculated. Some rendering paths are more suited to different platforms and hardware than others. More info
See in Glossary. If your Camera is set to use the Deferred Shading rendering path and you make its frustum oblique, Unity forces that Camera to use the Forward rendering path.
Setting frustum obliqueness with Lens Shift
Enable a camera’s Physical Camera properties to expose the Lens Shift options. You can use these to offset the camera’s focal center along the X and Y axes in a way that minimizes distortion of the rendered image.
Shifting the lens reduces the frustum angle on the side opposite the direction of the shift. For example, as you shift the lens up, the angle between the bottom of the frustum and the camera’s center line gets smaller.
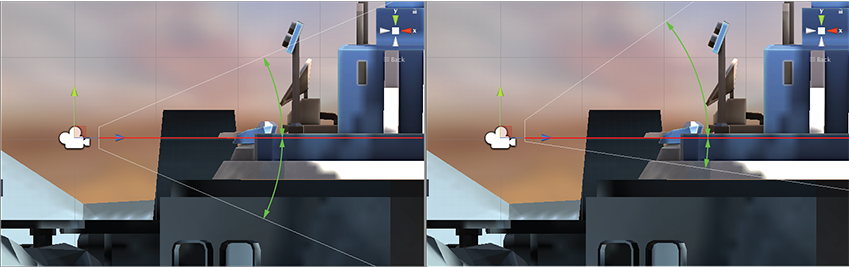
For further information about the Physical Camera options, see documentation on Physical Cameras.
Setting frustum obliqueness using a script
The following script example shows how to quickly achieve an oblique frustum by altering the camera’s projection matrix. Note that you can only see the effect of the script while the game is running Play mode.
using UnityEngine;
using System.Collections;

public class ExampleScript : MonoBehaviour {
    void SetObliqueness(float horizObl, float vertObl) {
        Matrix4x4 mat  = Camera.main.projectionMatrix;
        mat[0, 2] = horizObl;
        mat[1, 2] = vertObl;
        Camera.main.projectionMatrix = mat;
    }
}
C# script example
It is not necessary to understand how the projection matrix works to make use of this. The horizObl and vertObl values set the amount of horizontal and vertical obliqueness, respectively. A value of zero indicates no obliqueness. A positive value shifts the frustum rightwards or upwards, thereby flattening the left or bottom side. A negative value shifts leftwards or downwards and consequently flattens the right or top side of the frustum. The effect can be seen directly if this script is added to a camera and the game is switched to the scene view while the game runs; the wireframe depiction of the camera’s frustum will change as you vary the values of horizObl and vertObl in the inspector. A value of 1 or –1 in either variable indicates that one side of the frustum is completely flat against the centreline. It is possible although seldom necessary to use values outside this range.