Build Settings
You can use the Build Settings window to choose your target platform, adjust settings for your build, and start the build process. To access the Build Settings window, go to File > Build Settings. Once you specify your build settings, you can click Build to create your build, or click Build And Run to create and run your build on the platform you have specified.
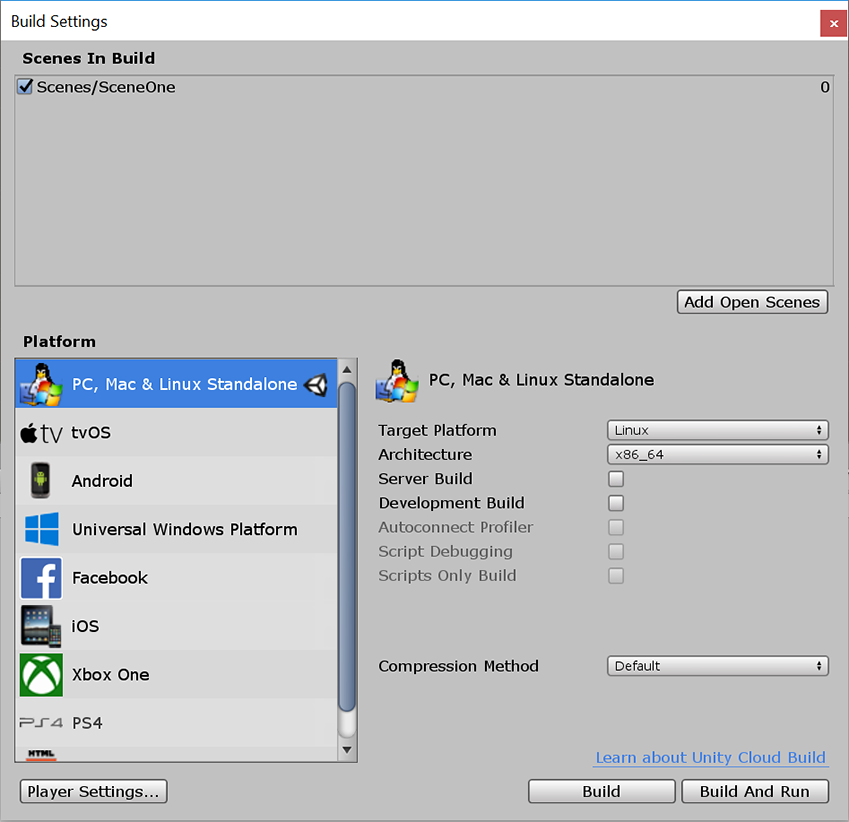
Scenes in Build
This part of the window shows the Scenes from your Project that will be included in your build. If you can’t see any Scenes in this area, use the Add Open Scenes button to add the current Scene to the build, or you can drag Scene assets into this window from your Project window. You can also untick Scenes in this list to exclude them from the build without removing it from the list. If you never need a Scene in the build you can remove it from the list of Scenes by pressing the Delete key on your keyboard.
Scenes that are you tick and add to the Scenes in Build list are included in the build. Unity uses the list of Scenes to control the order the Scenes are loaded. To adjust the order of the Scenes, drag them up or down the list.
Platform list
The Platform area beneath the Scenes in Build area lists all the platforms which are available to your Unity version. Some platforms might be greyed out to indicate they are not part of your version. To control which platform will be built, select one of the platforms in the list. If you change the target platform, you need to press the Switch Platform button to apply your change. This might take some, because your assets might need to be re-imported in formats that match your target platform. The platform you have selected is indicated with a Unity icon to the right of the platform name.
The platform you select shows a list of options that you can adjust for the build. Each platform might have different options. These options are listed below. Options that are common across many platforms are listed at the very bottom of this section under the Generic items across builds details.
PC, Mac & Linux Standalone
| Option | Purpose | |
|---|---|---|
| Target Platform | ||
| Windows | Build for Windows | |
| Mac OS X | Build for Mac | |
| Linux | Build for Linux | |
| Architecture | ||
| x86 | 32-bit CPU | |
| x86_64 | 64-bit CPU | |
| Universal | All CPU devices | |
| x86 + x86_64 (Universal) | All CPU devices for Linux | |
| Server Build | Enable this checkbox to build the Player for server use and with no visual elements (headless) without the need for any command line options. When you enable this option, Unity builds managed scriptsA piece of code that allows you to create your own Components, trigger game events, modify Component properties over time and respond to user input in any way you like. More info See in Glossary with the UNITY_SERVER define, which means you can write server-specific code for your applications. You can also build to the Windows version as a console app so that stdin and stdout are accessible. Unity logs go to stdout by default. |
|
| Copy PDB files (Windows only) | Enable this checkbox to include Microsoft program database (PDB) files in the built Standalone Player. PDB files contain application debugging information that is useful for debugging, but might increase the size of your Player. This setting is disabled by default. | |
| Create Visual Studio Solution (Windows only) | Enable this checkbox to generate Visual Studio Solution files for your Project, so you can build your final executable in Visual Studio. | |
| Headless Mode (Linux only) | Enable this checkbox to build your application for server use and with no visual elements. | |
iOS
| Option | Purpose | |
|---|---|---|
| Run in Xcode | Select the version of Xcode to use in the build. If you select the Latest version, the build uses the most recent version of Xcode on your machine. | |
| Run in Xcode as | ||
| Release | Shipping version | |
| Debug | Testing version | |
| Symlink Unity libraries | Reference the Unity libraries instead of copying them into the XCode project. This option reduces the XCode project size. | |
Android
For information on Android build settings, see Building apps for Android.
WebGL
Build Settings for WebGLA JavaScript API that renders 2D and 3D graphics in a web browser. The Unity WebGL build option allows Unity to publish content as JavaScript programs which use HTML5 technologies and the WebGL rendering API to run Unity content in a web browser. More info
See in Glossary use the generic settings shown later on this page.
Samsung TV
Build Settings for Samsung TV use the generic settings shown later on this page.
Xiaomi
For information about building projects for Xiaomi Game Center, see Unity Xiaomi documentation.
Other platforms
Console platforms and devices which require a Unity license will be documented in the Platform Specific section of the User Guide.
Generic items across builds
| Option | Purpose | |
|---|---|---|
| Development BuildA development build includes debug symbols and enables the Profiler. More info See in Glossary |
Enable this option to include debug symbols and the ProfilerA window that helps you to optimize your game. It shows how much time is spent in the various areas of your game. For example, it can report the percentage of time spent rendering, animating or in your game logic. More info See in Glossary in your build. You should use this option when you want to test your application |
|
| Autoconnect Profiler | You can use this option when you enable the Development Build setting. When you enable this option, the Unity Profiler automatically connects to your build. | |
| Script Debugging | When the Development Build option is selected, and this option is enabled it allows your script code to be debugged. Not available on WebGL. | |
| Scripts Only Build | Run a build to test script changes. You need to build the whole Project once before you can use this option. | |
| Compression Method | Compress the data in your Project when you build the Player. This includes AssetsAny media or data that can be used in your game or Project. An asset may come from a file created outside of Unity, such as a 3D model, an audio file or an image. You can also create some asset types in Unity, such as an Animator Controller, an Audio Mixer or a Render Texture. More info See in Glossary, ScenesA Scene contains the environments and menus of your game. Think of each unique Scene file as a unique level. In each Scene, you place your environments, obstacles, and decorations, essentially designing and building your game in pieces. More info See in Glossary, Player settings, and GI data. Choose between the following methods: |
|
| Default | On PC, Mac, Linux Standalone, and iOSApple’s mobile operating system. More info See in Glossary, there is no compressionA method of storing data that reduces the amount of storage space it requires. See Texture Compression, Animation Compression, Audio Compression, Build Compression. See in Glossary by default. On Android, the default compression is ZIP, which gives slightly better compression results than LZ4HC, but data is slower to decompress. |
|
| LZ4 | A fast compression format that is useful for development builds. For more information, see BuildOptions.CompressWithLz4. | |
| LZ4HC | A high compression variant of LZ4 that is slower to build but produces better results for release builds. For more information, see BuildOptions.CompressWithLz4HC. | |