Importing Textures
A texture is a bitmap image. You can create textures in a digital content creation application, such as Photoshop, and import them into Unity.
In a 3D Project, Unity imports image and movie files in the Assets folder as Textures. In a 2D Project, Unity imports image and movie files in the Assets folder as Sprites.
As long as the image meets the specified size requirements, Unity imports and optimizes it for game use. This extends to multi-layer Photoshop PSD or TIFF files.
To import image and movie files as Textures and Sprites in Unity:
- Select the image file in the Project window.
- In the Inspector, set the Texture Import Settings.
- Click the Apply button to save the changes.
- To use the imported Assets in your Project:
- For 3D Projects, create a Material and assign the Texture to the new Material.
- For 2D Projects, use the Sprite Editor.
Recommendations and limitations
The following topics offer recommendations and detail any limitations on importing Textures:
- HDR Textures
- Texture dimension sizes
- Mip maps
- Normal maps
- Alpha maps
- Detail maps
- Reflections (cubemaps)
- Anisotropic filtering
- Supported file formats
HDR Textures
When importing from an EXR or HDR file containing HDR information, the Texture Importer automatically chooses the right HDR format for the output Texture. This format changes automatically depending on which platform you are building for.
Texture dimension sizes
Ideally, Texture dimension sizes should be powers of two on each side (that is, 2, 4, 8, 16, 32, 64, 128, 256, 512, 1024, 2048 pixels (px), and so on). The Textures do not have to be square; the width can be different from height.
It is possible to use NPOT (non-power of two) Texture sizes with Unity. However, NPOT Texture sizes generally take slightly more memory and might be slower for the GPU to sample, so it’s better for performance to use power of two sizes whenever you can.
If the platform or GPU does not support NPOT Texture sizes, Unity scales and pads the Texture up to the next power of two size. This process uses more memory and makes loading slower (especially on older mobile devices). In general, you should only use NPOT sizes for GUI purposes.
You can scale up NPOT Texture Assets at import time using the Non Power of 2 option in the Advanced section of the Texture Importer.
Note: Specific platforms may impose maximum Texture dimension sizes. For DirectX, the maximum Texture sizes for different feature levels are as follows:
| Graphics APIs / Feature levels | Maximum 2D and Cubemap texture dimension size (px) |
|---|---|
| DX9 Shader Model 2 (PC GPUs before 2004) / OpenGL ES 2.0 | 2048 |
| DX9 Shader Model 3 (PC GPUs before 2006) / Windows Phone DX11 9.3 level / OpenGL ES 3.0 | 4096 |
| DX10 Shader Model 4 / GL3 (PC GPUs before 2007) / OpenGL ES 3.1 | 8192 |
| DX11 Shader Model 5 / GL4 (PC GPUs since 2008) | 16384 |
Notes:
- The Texture Importer only allows you to choose dimension sizes up to 8K (that is 8192 x 8192 px).
- Most Mali GPUs support Texture dimension sizes up to 4K for cubemaps.
Mip maps
Mip maps are lists of progressively smaller versions of an image. When a texture uses mip maps, Unity automatically uses a smaller version of the texture when it is far away from the Camera. This reduces the performance cost of rendering the texture, without noticeable loss of detail. Mip maps can also reduce texture aliasing and shimmering.
Enabling mipmaps uses 33% more memory, so you should use it only on textures whose distance from the Camera will change. You should not use it on textures whose distance from the Camera will not change, such as textures used for UI, skyboxes, and so on.
You can control the way that Unity loads mipmaps at runtime using Mip Map Streaming.
Normal maps
Normal maps are used by normal map Shaders to make low-polygon models look as if they contain more detail. Unity uses normal maps encoded as RGB images. You also have the option to generate a normal map from a grayscale height map image.
Alpha maps
An alpha map is a Texture that contains only alpha information. You can use an alpha map to apply varying levels of transparency to a Material.
You can create an alpha map by creating a Texture with information in the alpha channel, or by creating a grayscale Texture and converting the grayscale values to alpha in Unity.
See the documentation on the Alpha Source Texture import setting for more information.
Detail maps
If you want to make a Terrain, you normally use your main Texture to show areas of terrain such as grass, rocks and sand. If your terrain is large, it may end up very blurry. Detail Textures hide this fact by fading in small details as your main Texture gets closer.
When drawing Detail Textures, a neutral gray is invisible, white makes the main Texture twice as bright, and black makes the main Texture completely black.
See documentation on Secondary Maps (Detail Maps) for more information.
Reflections (cubemaps)
To use a Texture for reflection maps (for example, in Reflection Probes or a cubemapped Skybox, set the Texture Shape to Cube. See documentation on Cubemap Textures for more information.
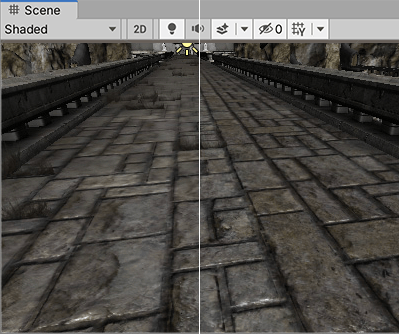
Anisotropic filtering
Anisotropic filtering increases Texture quality when viewed from a grazing angle. This rendering is resource-intensive on the graphics card. Increasing the level of anisotropy is usually a good idea for ground and floor Textures. Use Quality settings to force anisotropic filtering for all Textures or disable it completely. Although, if a texture has its Aniso level set to 0 in Texture Import Settings, forced anisotropic filtering does not appear on this texture.
Supported file formats
Unity can read the following file formats:
- BMP
- EXR
- GIF
- HDR
- IFF
- JPG
- PICT
- PNG
- PSD
- TGA
- TIFF
Unity automatically flattens multi-layer Photoshop PSD or TIFF files on import so that there is no size penalty for your game. This flattening happens to the imported data in Unity, not to the file itself, so you can continue to save and import your PSD or TIFF files without losing any of your work when using these file types natively. This allows you to have one copy of each Texture which you can use in Photoshop, your 3D modelling application, and in Unity.