IMGUI で Property Drawer を使用して Inspector をカスタマイズする
ノート: UI Toolkit を使用して Unity エディター を拡張することを強くお勧めします。UI Toolkit は IMGUI よりも新しく柔軟でスケーラブルなソリューションを実現します。
Property Drawer を利用すると、スクリプトの属性を使用したり、特定の Serializable クラスの外観を操作することによって、Inspector ウィンドウ の一部の GUI をカスタマイズできます。
Property Drawer には 2 つの使い方があります。
- Serializable クラスのすべてのインスタンスの GUI をカスタマイズします。
- カスタムの Property Attributes を持つスクリプトメンバーの GUI をカスタマイズします。
Serializable クラスの GUI をカスタマイズ
カスタムの Serializable クラスを持つ場合、Property Drawer を使用して Inspector で外観を変更できます。Serializable クラスの Ingredient クラスを考慮したスクリプトの例を以下に示します (ノート: これはエディターのスクリプトではありません。プロパティ属性クラスは、通常のスクリプトファイルに配置する必要があります)。
C# の場合 (例):
using System;
using UnityEngine;

enum IngredientUnit { Spoon, Cup, Bowl, Piece }

// Custom serializable class
[Serializable]
public class Ingredient
{
    public string name;
    public int amount = 1;
    public IngredientUnit unit;
}

public class Recipe : MonoBehaviour
{
    public Ingredient potionResult;
    public Ingredient[] potionIngredients;
}
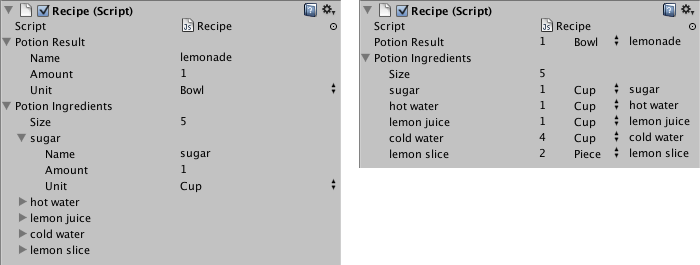
カスタムの Property Drawer を使用して、Inspector での Ingredient クラスのすべての外観を変更することができます。Inspector の Ingredient プロパティで、カスタム の Property Drawer が有る場合、または無い場合の外観を比較してみてください。
CustomPropertyDrawer 属性を使用して Serializable クラスに Property Drawer をアタッチし、ドロワーの対象となる Serializable クラスの型を渡すことができます。
C# の場合 (例):
using UnityEditor;
using UnityEngine;

// IngredientDrawer
[CustomPropertyDrawer(typeof(Ingredient))]
public class IngredientDrawer : PropertyDrawer
{
    // Draw the property inside the given rect
    public override void OnGUI(Rect position, SerializedProperty property, GUIContent label)
    {
        // Using BeginProperty / EndProperty on the parent property means that
        // prefab override logic works on the entire property.
        EditorGUI.BeginProperty(position, label, property);

        // Draw label
        position = EditorGUI.PrefixLabel(position, GUIUtility.GetControlID(FocusType.Passive), label);

        // Don't make child fields be indented
        var indent = EditorGUI.indentLevel;
        EditorGUI.indentLevel = 0;

        // Calculate rects
        var amountRect = new Rect(position.x, position.y, 30, position.height);
        var unitRect = new Rect(position.x + 35, position.y, 50, position.height);
        var nameRect = new Rect(position.x + 90, position.y, position.width - 90, position.height);

        // Draw fields - pass GUIContent.none to each so they are drawn without labels
        EditorGUI.PropertyField(amountRect, property.FindPropertyRelative("amount"), GUIContent.none);
        EditorGUI.PropertyField(unitRect, property.FindPropertyRelative("unit"), GUIContent.none);
        EditorGUI.PropertyField(nameRect, property.FindPropertyRelative("name"), GUIContent.none);

        // Set indent back to what it was
        EditorGUI.indentLevel = indent;

        EditorGUI.EndProperty();
    }
}
Property Attribute を使用したスクリプトメンバーの GUI をカスタマイズ
Property Drawer の他の使い道は、カスタムの Property Attributes を持っているスクリプト内のメンバーの外観を変更することです。例えば整数で特定の範囲内で値を設定したい場合に、Inspector にはスライダーとして表示することができます。これは RangeAttribute としてビルトインされている PropertyAttribute 機能でこのように使用します。
C# の場合 (例):
// Show this float in the Inspector as a slider between 0 and 10
[Range(0f, 10f)]
float myFloat = 0f;
PropertyAttribute を作成することもできます。RangeAttribute を実装例として参考にしてください。この属性は PropertyAttribute クラスを継承する必要があります。必要であればこの属性クラスにパラメーターや変数の値を保持しておくことができます。
C# の場合 (例):
using UnityEngine;

public class MyRangeAttribute : PropertyAttribute
{
        readonly float min;
        readonly float max;

        void MyRangeAttribute(float min, float max)
        {
            this.min = min;
            this.max = max;
        }
}
属性を作成したので、その属性を持つプロパティを描く Property Drawer を作成する必要があります。このドロワークラスは、PropertyDrawer を継承することと、CustomPropertyDrawer 属性を付ける必要があります。
Property Drawer クラスは Editor と呼ばれるフォルダー内のエディタースクリプトに置きます。
C# の場合 (例):
using UnityEditor;
using UnityEngine;

// Tell the MyRangeDrawer that it is a drawer for properties with the MyRangeAttribute.
[CustomPropertyDrawer(typeof(MyRangeAttribute))]
public class RangeDrawer : PropertyDrawer
{
    // Draw the property inside the given rect
    void OnGUI(Rect position, SerializedProperty property, GUIContent label)
    {
        // First get the attribute since it contains the range for the slider
        MyRangeAttribute range = (MyRangeAttribute)attribute;

        // Now draw the property as a Slider or an IntSlider based on whether it's a float or integer.
        if (property.propertyType == SerializedPropertyType.Float)
            EditorGUI.Slider(position, property, range.min, range.max, label);
        else if (property.propertyType == SerializedPropertyType.Integer)
            EditorGUI.IntSlider(position, property, (int) range.min, (int) range.max, label);
        else
            EditorGUI.LabelField(position, label.text, "Use MyRange with float or int.");
    }
}
パフォーマンス上の理由から、EditorGUILayout 関数を Property Drawer では使用できないことを注意してください。
デフォルトのオブジェクト参照
public Object フィールド、あるいは SerializeField でマークされた private Object フィールドを定義する場合は、これらのフィールドのデフォルト参照を設定できます。デフォルト参照フィールドは、Project ウィンドウでスクリプトアセットを選択すると、Inspector ウィンドウに表示されます。
ノート: PropertyDrawer ごとに、一致する名前でそれぞれ独自のファイルに保持することが推奨されます。これにより、デフォルトオブジェクト参照は 1 つの PropertyDrawer にしか割り当てられないため、効率的な割り当てが可能になります。同じファイルに複数のタイプが存在する場合、割り当てられるタイプはファイル名と一致するか、ファイルで定義された最初のタイプになります。