ポップアップウィンドウの作成
この例では、UnityEditor.PopupWindow を使用してポップアップウィンドウを作成する方法を説明します。
例の概要
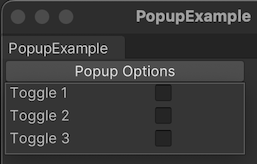
この例では、カスタムエディターウィンドウのボタンで表示されるポップアップウィンドウを作成します。ポップアップウィンドウには 3 つのトグルがあり、フォーカスがなくなると閉じます。
この例で作成する完成したファイルは、こちらの GitHub リポジトリ にあります。
必要な要件
このガイドは、Unity エディター、UI Toolkit、および C# スクリプトに精通している開発者を対象としています。始める前に、以下の点を理解しておいてください。
カスタムエディターウィンドウの作成
ボタン付きのカスタムエディターウィンドウを作成します。UI Document (UXMLファイル) でボタンを定義し、USS ファイルでスタイルを設定します。最後に C# スクリプトでボタンロジックを定義すると、ボタンをクリックするとポップアップウィンドウが表示されます。
任意のテンプレートで Unity プロジェクトを作成します。
Project ウィンドウで右クリックし、Create > UI Toolkit > Editor Window を選択します。
UI Toolkit Editor Window Creator ウィンドウの C# ボックスに、
PopupExampleと入力します。Confirm を選択します。これにより、
PopupExample.cs、PopupExample.uxml、PopupExample.ussの 3 つのファイルが作成されます。-
PopupExample.uxmlを以下の内容に置き換えます。<ui:UXML xmlns:ui="UnityEngine.UIElements" xmlns:uie="UnityEditor.UIElements" xsi="http://www.w3.org/2001/XMLSchema-instance" engine="UnityEngine.UIElements" editor="UnityEditor.UIElements" noNamespaceSchemaLocation="../../UIElementsSchema/UIElements.xsd" editor-extension-mode="True"> <Style src="PopupExample.uss" /> <ui:Button text="Popup Options" display-tooltip-when-elided="true" class="popup-button" /> </ui:UXML> -
PopupExample.csを以下の内容に置き換えます。using UnityEditor; using UnityEngine.UIElements; using PopupWindow = UnityEditor.PopupWindow; public class PopupExample : EditorWindow { //Add menu item [MenuItem("Examples/Popup Example")] static void Init() { EditorWindow window = EditorWindow.CreateInstance<PopupExample>(); window.Show(); } private void CreateGUI() { var visualTreeAsset = AssetDatabase.LoadAssetAtPath<VisualTreeAsset>("Assets/Editor/PopupExample.uxml"); visualTreeAsset.CloneTree(rootVisualElement); var button = rootVisualElement.Q<Button>(); button.clicked += () => PopupWindow.Show(button.worldBound, new PopupContentExample()); } } -
PopupExample.ussを以下の内容に置き換えます。.popup-button { width: 200px; }
ポップアップウィンドウのコンテンツの作成
ポップアップウィンドウのコンテンツを定義する UI Document (UXMLファイル) を作成します。ウィンドウサイズを設定し、ウィンドウを表示する C# クラスを作成します。
-
Editorフォルダーに、以下の内容で、PopupWindowContent.uxmlという名前の UI Document を作成します。<ui:UXML xmlns:ui="UnityEngine.UIElements" xmlns:uie="UnityEditor.UIElements" xsi="http://www.w3.org/2001/XMLSchema-instance" engine="UnityEngine.UIElements" editor="UnityEditor.UIElements" noNamespaceSchemaLocation="../../../UIElementsSchema/UIElements.xsd" editor-extension-mode="True"> <ui:Toggle label="Toggle 1" name="Toggle1"/> <ui:Toggle label="Toggle 2" /> <ui:Toggle label="Toggle 3" /> </ui:UXML> -
Editorフォルダーに、以下の内容でPopupContentExample.csという C# ファイルを作成します。using UnityEditor; using UnityEngine; using UnityEngine.UIElements; public class PopupContentExample : PopupWindowContent { public override void OnOpen() { Debug.Log("Popup opened: " + this); } public override VisualElement CreateGUI() { var visualTreeAsset = AssetDatabase.LoadAssetAtPath<VisualTreeAsset>("Assets/Editor/PopupWindowContent.uxml"); return visualTreeAsset.CloneTree(); } public override void OnClose() { Debug.Log("Popup closed: " + this); } } ポップアップウィンドウをテストするには、メニューから Example > Popup Example > Popup Options を選択します。