单通道实例化渲染和自定义着色器
URP、HDRP、ShaderGraph、表面着色器和内置着色器均已支持单通道立体实例化渲染。但是,来自__ Asset Store__由 Unity 和社区成员创建的免费和付费的资产库,其规模处于不断壮大中。提供各种资产,涵盖了从纹理、模型和动画到完整项目示例、教程和编辑器扩展等类型。更多信息
See in Glossary、其他第三方或您自行编写的着色器可能需要更新。
有关在着色器中支持实例化渲染的更多信息,请参阅 GPU 实例化。本节中的信息专门介绍立体渲染,可能未涵盖支持一般实例化渲染所需的所有更改。
更新顶点输入属性结构
将 UNITY_VERTEX_INPUT_INSTANCE_ID 宏添加到 appdata 结构。
示例:
struct appdata
{
    float4 vertex : POSITION;
    float2 uv : TEXCOORD0;

    UNITY_VERTEX_INPUT_INSTANCE_ID //Insert
};
更新顶点输出属性结构
将 UNITY_VERTEX_OUTPUT_STEREO 宏添加到 v2f 输出结构。
示例:
struct v2f
{
    float2 uv : TEXCOORD0;
    float4 vertex : SV_POSITION;

    UNITY_VERTEX_OUTPUT_STEREO //Insert
};
更新主顶点着色器函数
将以下宏添加到主 vert 方法的开头(按顺序添加):
UNITY_SETUP_INSTANCE_ID()UNITY_INITIALIZE_OUTPUT(v2f, o)UNITY_INITIALIZE_VERTEX_OUTPUT_STEREO()
UNITY_SETUP_INSTANCE_ID()根据 GPU 当前渲染的眼睛来计算内置的 unity_StereoEyeIndex 和 unity_InstanceID 着色器变量并设置为正确值。
UNITY_INITIALIZE_VERTEX_OUTPUT_STEREO 根据 unity_StereoEyeIndex 的值告诉 GPU 应该渲染到纹理数组中的哪只眼睛。此宏还从顶点着色器传输 unity_StereoEyeIndex 的值,确保仅当在片元着色器 frag 方法中调用 UNITY_SETUP_STEREO_EYE_INDEX_POST_VERTEX 时才能在片元着色器中访问该值。
UNITY_INITALIZE_OUTPUT(v2f,o) 将所有 v2f 值初始化为 0。
示例:
v2f vert (appdata v)
{
    v2f o;

    UNITY_SETUP_INSTANCE_ID(v); //Insert
    UNITY_INITIALIZE_OUTPUT(v2f, o); //Insert
    UNITY_INITIALIZE_VERTEX_OUTPUT_STEREO(o); //Insert

    o.vertex = UnityObjectToClipPos(v.vertex);

    o.uv = v.uv;

    return o;
}
后期处理着色器
如果希望后期处理着色器支持单通道立体实例化,请按照自定义着色器中的步骤以及以下步骤操作。
注意:可从 Unity 网站下载所有 Unity 基础着色器脚本。
对于要支持单通道实例化的每个后期处理着色器,请执行以下步骤:
在着色器脚本中的 frag 方法之外添加 UNITY_DECLARE_SCREENSPACE_TEXTURE(tex) 宏(请参阅下面的放置位置示例),这样当您使用特定的立体渲染方法时,GPU 会使用适当的纹理采样器。例如,如果使用多通道渲染,则 GPU 会使用 2D 纹理采样器。对于单通道实例化或多视图渲染,纹理采样器为纹理数组。
在片元着色器 frag 方法的开头添加
UNITY_SETUP_STEREO_EYE_INDEX_POST_VERTEX(i)(请参阅下面的放置位置示例)。仅当希望使用unity_StereoEyeIndex内置着色器变量来找出 GPU 正在渲染到的眼睛时,才需要添加该宏。这在测试后期处理效果时很有用。采样 2D 纹理时使用
UNITY_SAMPLE_SCREENSPACE_TEXTURE()宏(请参阅下面的示例)。标准着色器使用基于 2D 纹理的后缓冲区来对纹理进行采样。单通道立体实例化技术不使用此类型的后缓冲区,因此如果没有指定其他的 2D 纹理采样方法,着色器将无法正确渲染。为防止渲染问题,UNITY_SAMPLE_SCREENSPACE_TEXTURE()宏会检测正在使用的立体渲染路径,然后以正确的方式自动采样纹理。请参阅 Unity 文档关于 HLSLSupport.cginc 的说明,进一步了解用于深度纹理和屏幕空间阴影贴图的类似宏。
示例:
UNITY_DECLARE_SCREENSPACE_TEXTURE(_MainTex); //Insert

fixed4 frag (v2f i) : SV_Target
{
    UNITY_SETUP_STEREO_EYE_INDEX_POST_VERTEX(i); //Insert

    fixed4 col = UNITY_SAMPLE_SCREENSPACE_TEXTURE(_MainTex, i.uv); //Insert

    // just invert the colors

    col = 1 - col;

    return col;
}
完整的示例着色器代码
下面是模板图像效果着色器的一个简单示例,其中应用了所有前面提到的更改来支持单通道立体实例化。添加到着色器代码的行标记了注释://Insert。
struct appdata
{
    float4 vertex : POSITION;
    float2 uv : TEXCOORD0;

    UNITY_VERTEX_INPUT_INSTANCE_ID //Insert
};

//v2f output struct

struct v2f
{

    float2 uv : TEXCOORD0;
    float4 vertex : SV_POSITION;

    UNITY_VERTEX_OUTPUT_STEREO //Insert
};

v2f vert (appdata v)
{
    v2f o;

    UNITY_SETUP_INSTANCE_ID(v); //Insert
    UNITY_INITIALIZE_OUTPUT(v2f, o); //Insert
    UNITY_INITIALIZE_VERTEX_OUTPUT_STEREO(o); //Insert

    o.vertex = UnityObjectToClipPos(v.vertex);
    o.uv = v.uv;
    return o;
}

UNITY_DECLARE_SCREENSPACE_TEXTURE(_MainTex); //Insert

fixed4 frag (v2f i) : SV_Target
{
    UNITY_SETUP_STEREO_EYE_INDEX_POST_VERTEX(i); //Insert

    fixed4 col = UNITY_SAMPLE_SCREENSPACE_TEXTURE(_MainTex, i.uv); //Insert

    // invert the colors

    col = 1 - col;

    return col;
}
程序化几何体
使用 Graphics.DrawProceduralIndirect() 和 CommandBuffer.DrawProceduralIndirect() 方法在 GPU 上绘制完全程序化的几何体时,注意这两个方法都从计算缓冲区接收参数。这意味着在运行时很难增加实例计数。要增加实例计数,必须手动使计算缓冲区中包含的实例计数加倍。
调试着色器
以下着色器代码将游戏对象渲染为绿色(用户左眼)和红色(右眼)。此着色器对于调试立体渲染非常有用,因为它可用于验证所有立体图形是否正常工作。
Shader "XR/StereoEyeIndexColor"
{
   Properties
   {
       _LeftEyeColor("Left Eye Color", COLOR) = (0,1,0,1)
       _RightEyeColor("Right Eye Color", COLOR) = (1,0,0,1)
   }

   SubShader
   {
      Tags { "RenderType" = "Opaque" }

      Pass
      {
         CGPROGRAM

         #pragma vertex vert
         #pragma fragment frag

         float4 _LeftEyeColor;
         float4 _RightEyeColor;

         #include "UnityCG.cginc"

         struct appdata
         {
            float4 vertex : POSITION;

            UNITY_VERTEX_INPUT_INSTANCE_ID
         };

         struct v2f
         {
            float4 vertex : SV_POSITION;

            UNITY_VERTEX_INPUT_INSTANCE_ID
            UNITY_VERTEX_OUTPUT_STEREO
         };

         v2f vert (appdata v)
         {
            v2f o;

            UNITY_SETUP_INSTANCE_ID(v);
            UNITY_INITIALIZE_OUTPUT(v2f, o);
            UNITY_INITIALIZE_VERTEX_OUTPUT_STEREO(o);

            o.vertex = UnityObjectToClipPos(v.vertex);

            return o;
         }

         fixed4 frag (v2f i) : SV_Target
         {
            UNITY_SETUP_STEREO_EYE_INDEX_POST_VERTEX(i);

            return lerp(_LeftEyeColor, _RightEyeColor, unity_StereoEyeIndex);
         }
         ENDCG
      }
   }
}
ShaderGraph 调试着色器
ShaderGraph 会自动添加支持单通道立体渲染所需的宏。要在 ShaderGraph 中实现调试着色器,可以使用基于眼睛索引设置基色的自定义函数 (Custom Function) 节点。
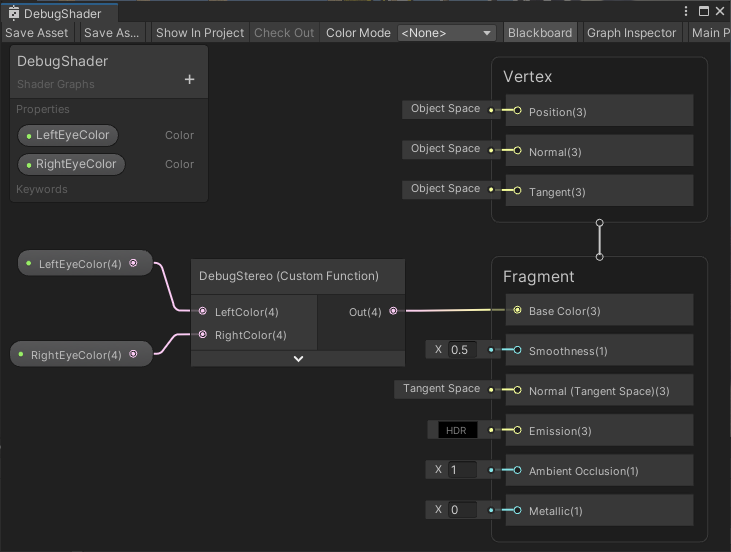
使用 unity_StereoEyeIndex 着色器属性可根据渲染的眼睛实例来确定基色。以上示例中的 Custom Function 节点包含以下代码:
Out = lerp(LeftColor, RightColor, unity_StereoEyeIndex);