Warning
Warning: Unity Simulation is deprecated as of December 2023, and is no longer available.
Control a vehicle model
Now that you have installed the authoring tools and created a vehicle model, we can now control the vehicle.
You can either use one of our ready-built controllers or build one yourself to send commands directly to the ArticulationBody drives.
Our vehicle controllers send commands to ArticulationBody components, which serve as the core interface between Unity and PhysX. You can use our controllers as long as you have a vehicle constructed with Articulation Bodies.
Unity-Provided Controllers
If you have a unique application and want to learn how you should be controlling it, reach out!
We provide the following controllers today:

How to set up a controller
This is just a brief overview of each component as we will be going into more details how to set everything up on individual controller pages. Each controller has three key pieces and follows the same setup flow.
Controller component. This is the script that transforms the input vehicle-level command into individual joint position/velocity commands.
Adapter. This is a script that provides an interface between the controller component and the outside world. We currently support ROS and keyboard interfaces out of the box, and the adapter can be sub-classed to create custom integrations if you use some other middleware.
Authoring component (optional). These scripts are created per controller and centralize all the key model physics and controller tuning parameters on both the model and controller. For example, the differential-drive controller's Authoring component exposes the control gains of individual drives as well as the friction properties on the drive wheels. You don't have to use these scripts, but we highly recommend them as they will make debugging and tuning vehicle models and their associated controllers a lot easier. Keep in mind that if you add the Authoring script first, the corresponding controller will be added automatically and you do not need to add another one.
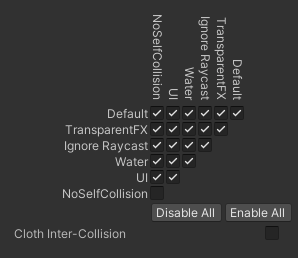
It is also recommended to create a separate layer that does not have collisions enabled for itself. This can be done in Project Settings -> Tags and Layers and Project Settings -> Physics. Then set the layer of all of the robot game objects to that No Collision layer. This is useful for when some parts of the robot are either overlapping or real close together and things like sphere colliders for the wheels may start to overlap other colliders and interfere with the simulation.