Corresponding old and new APIs
Below is a list comparing the API from the old Input Manager with the corresponding API for the new Input System package.
All of the new Input System package APIs listed below are in the UnityEngine.InputSystem namespace. The namespace is omitted here for brevity.
Action-based input
Action-based input refers to reading pre-configured named axes, buttons, or other controls. (Read more about Action-based input)
- In the old Input Manager, these are defined in the Axes list, in the Input Manager section of the Project Settings window. (Below, left)
- In the new Input System, these are defined in the Actions Editor, which can be found in the Input System Package section of the Project Settings window, or by opening an action asset. (Below, right)
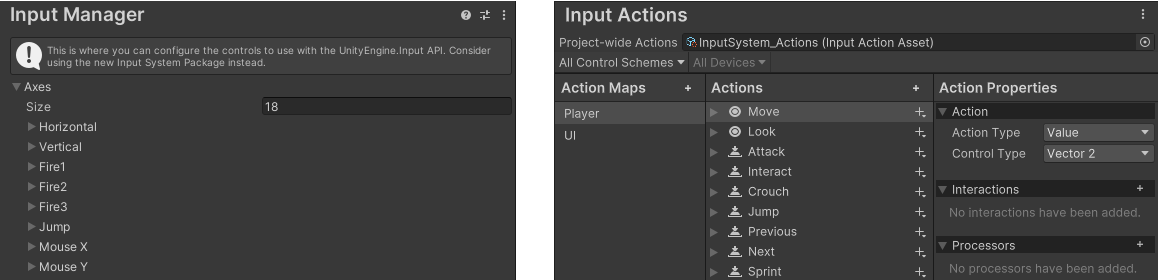
On the left, the old Input Manager Axes Configuration window, in Project settings. On the right, the new Input System's Actions Editor.
Note
In some cases for named axes and buttons, the new Input System requires slightly more code than the old Input Manager, but this results in better performance. This is because in the new Input System, the logic is separated into two parts: the first is to find and store a reference to the action (usually done once, for example in your Start method), and the second is to read the action (usually done every frame, for example in your Update method). In contrast, the old Input Manager used a string-based API to "find" and "read" the value at the same time, because it was not possible to store a reference to a button or axis. This results in worse performance, because the axis or button is looked up each time the value is read.
To find and store references to actions, which can be axes or buttons use FindAction. For example:
// A 2D axis action named "Move"
InputAction moveAction = InputSystem.actions.FindAction("Move");

// A button action named "Jump"
InputAction jumpAction = InputSystem.actions.FindAction("Jump");
Then, to read the action values, use the following:
| Input Manager (Old) | Input System (New) |
|---|---|
Input.GetAxisIn the old Input Manager System, all axes are 1D and return float values. For example, to read the horizontal and vertical axes: float h = Input.GetAxis("Horizontal");float v = Input.GetAxis("Vertical"); |
Use ReadValue on the reference to the action to read the current value of the axis. In the new Input System, axes can be 1D, 2D or other value types. You must specify the correct value type that corresponds with how the action is set up. This example shows a 2D axis:Vector2 moveVector = moveAction.ReadValue<Vector2>();.Unlike Input.GetAxis, ReadValue doesn't smooth the value, so input from keys and buttons changes to its full value immediately. For the Input System equivalents of axis properties such as Gravity and Sensitivity, refer to Input Manager axis properties. |
Input.GetButtonExample: bool jumpValue = Input.GetButton("Jump"); |
Use IsPressed on the reference to the action to read the button value.Example: bool jumpValue = jumpAction.IsPressed();. |
Input.GetButtonDownExample: bool jump = Input.GetButtonDown("Jump"); |
Use WasPressedThisFrame on the reference to the action to read if the button was pressed this frame.Example: bool jumpValue = jumpAction.WasPressedThisFrame();. |
Input.GetButtonUpExample: bool jump = Input.GetButtonUp("Jump"); |
Use WasReleasedThisFrame on the reference to the action to read whether the button was released this frame.Example: bool jumpValue = jumpAction.WasReleasedThisFrame();. |
Input.GetAxisRawFor example, to read the raw values of the horizontal and vertical axes: float h = Input.GetAxisRaw("Horizontal");float v = Input.GetAxisRaw("Vertical"); |
No direct equivalent, but if there are processors associated with the action, you can use InputControl<>.ReadUnprocessedValue() to read unprocessed values.Example: Vector2 moveVector = moveAction.ReadUnprocessedValue();Note: This returns the same value as ReadValue when there are no processors on the action. |
Input Manager axis properties
In the Input Manager, each axis has properties that change the value Input.GetAxis returns. The Input System has no axis settings. Instead, you add processors and composite bindings to actions and bindings.
| Input Manager property | Input System equivalent |
|---|---|
| Positive Button, Negative Button | Use a 1D axis composite with a positive and a negative binding. |
| Dead | Use the Axis Deadzone or Stick Deadzone processor. To change the default deadzone for all actions, use the Default Deadzone Min and Default Deadzone Max settings in Default value properties. |
| Sensitivity for analog input, such as a mouse or stick | Use the Scale processor to multiply the value. |
| Invert | Use the Invert processor. |
| Gravity, and Sensitivity for keys and buttons | No built-in equivalent. The Input System doesn't smooth values over time, so the value changes immediately when the user presses or releases a key. To smooth the value, change it gradually in your own script, for example with Mathf.MoveTowards each frame. |
| Snap | No direct equivalent. Because the Input System doesn't smooth values, the value already changes immediately when the user presses the opposite direction. To set the value when the user presses both directions at once, use the whichSideWins parameter of the 1D axis composite. By default, the value is 0. |
Directly reading Gamepad and Joystick controls
Directly reading hardware controls bypasses the new Input System's action-based workflow, which has some benefits and some drawbacks. (Read more about directly reading devices)
| Input Manager (Old) | Input System (New) |
|---|---|
Input.GetKeyExample: Input.GetKey(KeyCode.JoystickButton0) |
Use isPressed on the corresponding Gamepad button.Example: Gamepad.current.buttonNorth.isPressed. |
Input.GetKeyDownExample: Input.GetKeyDown(KeyCode.JoystickButton0) |
Use wasPressedThisFrame on the corresponding Gamepad button.Example: Gamepad.current.buttonNorth.wasPressedThisFrame. |
Input.GetKeyUpExample: Input.GetKeyUp(KeyCode.JoystickButton0) |
Use wasReleasedThisFrame on the corresponding Gamepad button.Example: Gamepad.current.buttonNorth.wasReleasedThisFrame. |
Input.GetJoystickNames |
There is no API that corresponds to this exactly, but there are examples of how to read all connected devices here. |
Input.IsJoystickPreconfigured |
Not needed. Devices which derive from Gamepad always correctly implement the mapping of axes and buttons to the corresponding InputControl members of the Gamepad class. Input.ResetInputAxes |
Keyboard
| Input Manager (Old) | Input System (New) |
|---|---|
Input.GetKeyExample: Input.GetKey(KeyCode.Space) |
Use isPressed on the corresponding key.Example: Keyboard.current.spaceKey.isPressed |
Input.GetKeyDownExample: Input.GetKeyDown(KeyCode.Space) |
Use wasPressedThisFrame on the corresponding key.Example: Keyboard.current.spaceKey.wasPressedThisFrame |
Input.GetKeyUpExample: Input.GetKeyUp(KeyCode.Space) |
Use wasReleasedThisFrame on the corresponding key.Example: Keyboard.current.spaceKey.wasReleasedThisFrame |
Input.anyKey |
Use onAnyButtonPress.This also includes controller buttons as well as keyboard keys. |
Input.anyKeyDown |
Use Keyboard.current.anyKey.wasUpdatedThisFrame |
Input.compositionCursorPos |
Use Keyboard.current.SetIMECursorPosition(myPosition)The coordinate origin is platform-dependent: upper-left on Windows and Linux, and lower-left in the macOS Player and Game view. |
Input.compositionString |
Subscribe to the Keyboard.onIMECompositionChange. |
Input.imeCompositionMode |
Use: Keyboard.current.SetIMEEnabled(true)Refer to Keyboard text input documentation. |
Input.imeIsSelected |
Use: Keyboard.current.imeSelected |
Input.inputString |
Subscribe to the Keyboard.onTextInput event:Keyboard.current.onTextInput += character => /* ... */; |
Check device capability and availability
Some Input Manager properties, such as Input.mousePresent and
Input.stylusTouchSupported, answer
two questions at once, and answer them differently depending on the platform:
- On some platforms they check only whether the platform has the device type.
- On some platforms they perform hardware detection and report on the state of the device.
The new Input System separates the two:
| Question | Property | Explanation |
|---|---|---|
| Does this platform support this kind of input at all? | Mouse.isSupported, Pen.isSupported and Touchscreen.isPressureSupported. |
These don't change while the application runs, so you only need to read them once and decide whether to offer device-specific functionality. |
| Can a device deliver input right now? | Gamepad.current != null && Gamepad.current.enabled |
Replace Gamepad with any device type you need. |
Check both current and enabled:
- A non-null
currentmeans a device object is registered. Some platforms register a device whether or not hardware is attached. enabledtells you whether a device delivers input.
Check both, because a removed device still reports enabled as true, as the following code shows:
- The Device Simulator simulates a touch device and disables the built-in mouse and pen without removing them. Therefore,
currentstays non-null whileenabledbecomes false. - Read
currenteach time rather than caching a device reference. Removing a device doesn't disable it, so a cached reference needsaddedas well. - Reading
currentat the point of use removes the need for theaddedcheck, because removing a device resetscurrenttonull.
// Cached once, for example in a field holding the pad assigned to a player.
var gamepad = Gamepad.current;

// The pad is then unplugged, so the Input System removes the device.
Debug.Log(gamepad.enabled);   // True. Removing a device does not disable it.
Debug.Log(gamepad.added);     // False. It is no longer in InputSystem.devices.

// So a cached reference needs both checks, where reading current needs only enabled.
if (gamepad.added && gamepad.enabled)
    Debug.Log(gamepad.leftStick.ReadValue());
The capability properties answer a different question from the Input Manager properties they replace, so the two can report different values. On platforms where an Input Manager property performs real hardware detection, the capability property reports what the platform supports instead, which can be true where the old property was false. The Mouse and Touch and Pen tables note where this applies.
Mouse
MonoBehaviour.OnMouse events, such as MonoBehaviour.OnMouseDown, are supported in Unity 6.4 and later.
| Input Manager (Old) | Input System (New) |
|---|---|
Input.GetMouseButtonExample: Input.GetMouseButton(0) |
Use isPressed on the corresponding mouse button.Example: Mouse.current.leftButton.isPressed |
Input.GetMouseButtonDownExample: Input.GetMouseButtonDown(0) |
Use wasPressedThisFrame on the corresponding mouse button.Example: Mouse.current.leftButton.wasPressedThisFrame |
Input.GetMouseButtonUpExample: Input.GetMouseButtonUp(0) |
Use wasReleasedThisFrame on the corresponding mouse button.Example: Mouse.current.leftButton.wasReleasedThisFrame |
Input.GetAxis with the Mouse X and Mouse Y axesExample: float x = Input.GetAxis("Mouse X"); |
Use Mouse.current.delta.ReadValue()Example: Vector2 delta = Mouse.current.delta.ReadValue();Note: The Input System reports the mouse delta without the scaling that the Input Manager applied, so the values are larger. On Windows and macOS, the Input Manager halved the platform's mouse delta, and the default Mouse X and Mouse Y axes multiplied it by their Sensitivity of 0.1. To reproduce the old values on those platforms, multiply the delta by either 0.05 or 0.5 times the value of the Sensitivity (not Delta) you set on the axis. |
Input.mousePosition |
Use Mouse.current.position.ReadValue()Example: Vector2 position = Mouse.current.position.ReadValue();Note: Mouse simulation from touch isn't implemented yet. |
Input.mousePresent |
Use Mouse.isSupported to check whether the platform supports mouse input at all.Example: if (Mouse.isSupported) ShowMouseSettings();Note: Answers a different question from the Input Manager property. Refer to Device capability and device availability. The Input System doesn't currently deliver mouse input on iOS, iPadOS or visionOS, so Mouse.isSupported is false there even though the platform itself supports indirect mice. |
Input.mouseScrollDelta |
Use Mouse.current.scroll.ReadValue()Example: Vector2 scroll = Mouse.current.scroll.ReadValue();Note: By default, the Input System converts the scroll delta of each scroll event to a range of -1 to 1 on every platform. If several scroll events arrive in one input update, ReadValue returns their sum, which can be outside that range. To keep the platform's own scroll units instead, set InputSettings.scrollDeltaBehavior to KeepPlatformSpecificInputRange. |
Touch and Pen
| Input Manager (Old) | Input System (New) |
|---|---|
Input.GetTouchFor example: Touch touch = Input.GetTouch(0);Vector2 touchPos = touch.position; |
Use EnhancedTouch.Touch.activeTouches[i]Example: Vector2 touchPos = EnhancedTouch.Touch.activeTouches[0].position;Note: Enable enhanced touch support first by calling EnhancedTouchSupport.Enable(). |
Input.multiTouchEnabled |
There is no direct equivalent, because this is a setting rather than a hardware capability. To get the same first-touch-wins behaviour, read primaryTouch instead of iterating all touches, or bind to <Touchscreen>/primaryTouch.Example: if (Touchscreen.current != null && Touchscreen.current.primaryTouch.press.isPressed)Note: Two differences from setting Input.multiTouchEnabled = false. First, primaryTouch filters only itself: touches, the <Touchscreen>/touch* bindings and EnhancedTouch still report every finger, whereas the legacy setting suppressed additional touches globally. Second, when the finger that started the primary touch lifts while other fingers are still down, the primary touch is retained rather than ended until the last finger is released, so a control bound to it stays actuated in the meantime. |
Input.simulateMouseWithTouches |
No corresponding API yet. |
Input.stylusTouchSupported |
Use Pen.isSupported to check whether the platform supports pen input at all.Example: if (Pen.isSupported) ShowPenSettings();Note: Answers a different question from the Input Manager property. Refer to Check device capability and availability. |
Input.touchCount |
EnhancedTouch.Touch.activeTouches.CountNote: Enable enhanced touch support first by calling EnhancedTouchSupport.Enable() |
Input.touches |
EnhancedTouch.Touch.activeTouchesNote: Enable enhanced touch support first by calling EnhancedTouchSupport.Enable() |
Input.touchPressureSupported |
Use Touchscreen.isPressureSupported to check whether the platform delivers a real pressure value with touch input.Example: if (Touchscreen.isPressureSupported) UsePressureForBrushWidth();Note: When this is false, don't read meaning into pressure: either the platform doesn't measure it, in which case it reports a platform-dependent constant while a finger is down, or the Input System couldn't determine whether it does. This is a platform-wide answer rather than a device-specific one. |
Input.touchSupported |
Touchscreen.current != nullNote: On the Web platform, the Input System adds a touchscreen device when your app starts, whether or not the user's device has a touchscreen, because web browsers don't reliably report touch support. On the Web, Touchscreen.current isn't null even without a touchscreen, so respond to touch input when it arrives instead. |
Input.backButtonLeavesApp |
No corresponding API yet. To detect the Android back button yourself, read the Escape key, for example Keyboard.current.escapeKey.wasPressedThisFrame. For more information, refer to Detect the Android back button. |
GetPenEventGetLastPenContactEventResetPenEventsClearLastPenContactEvent |
Use: Pen.currentSee the Pen, tablet and stylus support docs for more information. |
Note: UnityEngine.TouchScreenKeyboard is not part of the old Input Manager API, so you can continue to use it when migrating to the new Input System package.
Sensors
| Input Manager (Old) | Input System (New) |
|---|---|
Input.acceleration |
Accelerometer.current.acceleration.ReadValue(). |
Input.accelerationEventCountInput.accelerationEvents |
Acceleration events aren't made available separately from other input events. See the accelerometer code sample on the Sensors page. |
Input.compass |
Use CompassSensor. Enable it with InputSystem.EnableDevice(CompassSensor.current), then read:CompassSensor.current.magneticHeading.ReadValue() for the heading in degrees relative to magnetic north.trueHeading.ReadValue() for the heading relative to geographic north.headingAccuracy.ReadValue() for the accuracy of the heading in degrees.rawVector.ReadValue() for the raw geomagnetic field in microteslas. |
Input.compensateSensors |
InputSettings.compensateForScreenOrientation. |
Input.deviceOrientation |
DeviceOrientationSensor.current.orientation.ReadValue(). |
Input.gyro |
The UnityEngine.Gyroscope class is replaced by multiple separate sensor Devices in the new Input System:Gyroscope to measure angular velocity.GravitySensor to measure the direction of gravity.AttitudeSensor to measure the orientation of the device.Accelerometer to measure the total acceleration applied to the device.LinearAccelerationSensor to measure acceleration applied to the device, compensating for gravity. |
Input.gyro.attitude |
AttitudeSensor.current.attitude.ReadValue(). |
Input.gyro.enabled |
Get: Gyroscope.current.enabledSet: InputSystem.EnableDevice(Gyroscope.current);InputSystem.DisableDevice(Gyroscope.current);Note: The new Input System replaces UnityEngine.Gyroscope with multiple separate sensor devices. Substitute Gyroscope with other sensors in the sample as needed. Refer to the notes for Input.gyro for details. |
Input.gyro.gravity |
GravitySensor.current.gravity.ReadValue() |
Input.gyro.rotationRate |
Gyroscope.current.angularVelocity.ReadValue().Note: Some platforms remove the sensor bias from these values and some don't, so the two values don't necessarily match. Use BiasCorrectedGyroscope when you need the bias removed on every platform that provides it. |
Input.gyro.rotationRateUnbiased |
BiasCorrectedGyroscope.current.angularVelocity.ReadValue().Note: This device is present only on platforms that can supply a bias-corrected value, so check that BiasCorrectedGyroscope.current isn't null before you use it. |
Input.gyro.updateInterval |
Sensor.samplingFrequencyExample: Gyroscope.current.samplingFrequency = 1.0f / updateInterval;Notes: samplingFrequency is in Hz, not in seconds as updateInterval, so you need to divide 1 by the value.The new Input System replaces UnityEngine.Gyroscope with multiple separate sensor devices. Substitute Gyroscope with other sensors in the sample as needed. See the notes for Input.gyro above for details. |
Input.gyro.userAcceleration |
LinearAccelerationSensor.current.acceleration.ReadValue() |
Input.location |
LocationSensor.Start/Stop: InputSystem.EnableDevice(LocationSensor.current);InputSystem.DisableDevice(LocationSensor.current);Read the last fix from the controls, for example LocationSensor.current.latitude.ReadValue() (also longitude, altitude, horizontalAccuracy, verticalAccuracy, timestamp).Query lifecycle and permission with LocationSensor.current.status and LocationSensor.current.isEnabledByUser.Set the requested accuracy and update-distance with LocationSensor.current.Configure(accuracyInMeters, updateDistanceInMeters), or LocationSensor.current.ResetConfiguration() to revert to the project defaults InputSettings.locationAccuracy and InputSettings.locationDistanceThreshold.Note: on Android and iOS the location permission and usage description are auto-added to the build only when your code references LocationSensor directly. If you use LocationSensor only through an .inputactions binding, you can either reference the type in code (for example LocationSensor.current) or add the permission and usage description manually. |
Input.GetAccelerationEvent |
See notes for Input.accelerationEvents above. |