UI authoring interface
Understand the windows and panels that make up the UI authoring interface for authoring runtime UI in the scene.
UI Staging is the entry point. The UI Library, InspectorA Unity window that displays information about the currently selected GameObject, asset or project settings, allowing you to inspect and edit the values. More info
See in Glossary, Style Sheets, and UI Viewport windows support layout, styling, and preview while you edit a UXML asset in scene context.
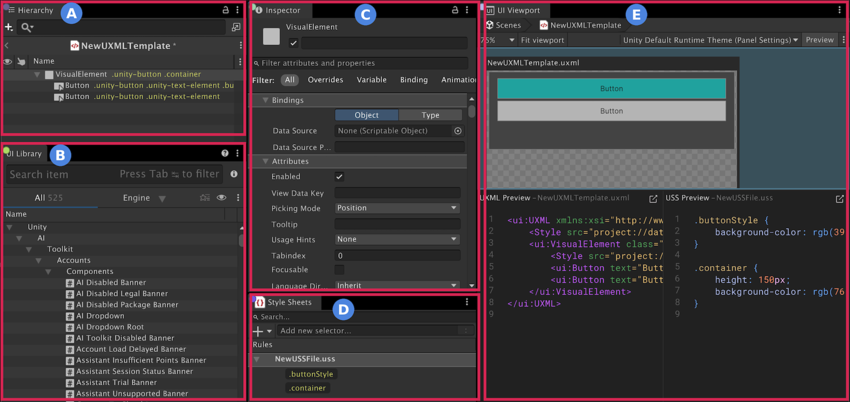
The UI authoring interface:
A: UI Staging
B: UI Library
C: Inspector
D: Style Sheets
E: UI Viewport
Note: In-scene UI authoring is for runtime UI. To create Editor UI, use UI Builder.
UI Staging
UI Staging uses the same staging mechanism as in-context prefab editing. When you enter staging mode for a UXML asset, you edit the asset in the context of your scene. Changes are written to the source .uxml file.
Important: Changes made in staging mode are written directly to the UXML asset, not to a scene instance. Edits affect all places the asset is used.
You must enable in-scene UI authoring before you can enter staging mode.
You can enter staging mode in the following ways:
- Select Open in Context in the Inspector window when the UXML is selected.
- Select the arrow (>) beside the UI element in the Hierarchy window to open it in context.
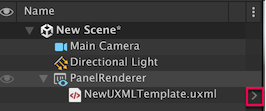
To open it in isolation instead, hold Alt (Windows) or Option (macOS) while selecting the arrow.
- Right-click a visual element and select Open Asset to open the referenced element in staging mode.
The Inspector window shows the attributes and styles of the selected visual element. The UI Library, Style Sheets, and UI Viewport windows are also available for use while in staging mode.
The Style Sheets and UI Viewport windows only function in staging mode and become inactive when you exit staging mode.
UI Library
The UI Library window (Window > UI Toolkit > UI Library) lets you browse, search, and add visual element controls and UXML files to your UI. You can dock it anywhere in the Editor layout.
The UI Library window includes:
- Standard runtime UI Toolkit controls
- UXML files
To add elements, drag them from the UI Library window into the Hierarchy window or UI Viewport window while in staging mode.
Inspector for visual elements
When in staging mode, the Inspector window displays the attributes and styles of the selected visual element. Select an element in the Hierarchy window, or select it in the Scene view (world space UI) or UI Viewport window (screen space UI).
The Inspector window supports:
- Data binding
- A search field to find style properties quickly. Press Ctrl+F (Windows) or Cmd+F (macOS) to focus the search field. Use the search filters to narrow results by category.
- Shortcuts in the header to select the parent UXML, open it in context, or open it in UI Builder.
Style Sheets
The Style Sheets window (Window > UI Toolkit > Style Sheets) manages USS style sheets and style rules for your open UXML file. It provides the same selector list as the Style Sheets pane in UI Builder, as a dockable window. Style rules can target a single selector (such as .unity-button) or multiple selectors in one rule (such as .unity-button, .unity-label).
When you select a selector, the Inspector window shows the associated style properties.
To apply a style class to a visual element, drag the selector tag from the Style Sheets window onto the element in the Hierarchy window.
UI Viewport
The UI Viewport window (Window > UI Toolkit > UI Viewport) provides the flat 2D canvas view as a dockable window. Use it to:
- Make pixel-accurate UI edits
- Preview hover effects, animations, and transitions without entering Play mode
- Author and edit screen space UI
Selection in the UI Viewport window is synchronized with the Inspector and Hierarchy windows. For World Space UI, use the Scene view and UI Viewport window side by side.
Screen Space UI and World Space UI
In-scene UI authoring supports both rendering modes. The render mode is set on the Panel Settings asset.
World Space UI exists as a surface in the 3D scene. You can click elements in the Scene view to select them. For more information, refer to World Space UI.
Screen Space UI is composited after the scene and has no presence in the 3D Scene view. Use the UI Viewport window as the primary place to view and edit screen space UI.