Place a Reflection Probe
You can add the Reflection Probe component to any object in a Scene but it’s standard to add each probe to a separate empty GameObject. The usual workflow is:
- Create a new empty GameObject (menu: GameObjectThe fundamental object in Unity scenes, which can represent characters, props, scenery, cameras, waypoints, and more. A GameObject’s functionality is defined by the Components attached to it. More info
See in Glossary > Create Empty) and then add the Reflection Probe component to it (menu: ComponentA functional part of a GameObject. A GameObject can contain any number of components. Unity has many built-in components, and you can create your own by writing scripts that inherit from MonoBehaviour. More info
See in Glossary > Rendering > Reflection ProbeA rendering component that captures a spherical view of its surroundings in all directions, rather like a camera. The captured image is then stored as a Cubemap that can be used by objects with reflective materials. More info
See in Glossary). Alternatively, if you already have a probe in the scene you will probably find it easier to duplicate that instead (menu: Edit > Duplicate). - Place the new probe in the desired location and set its Offset point and the size of its zone of effect.
- Optionally set other properties on the probe to customise its behaviour.
- Continue adding probes until all required locations have been assigned.
To see the reflections, you will also need at least one reflective object in the scene. A simple test object can be created as follows:
- Add a primitive object such as a Sphere to the scene (menu: GameObject > 3D ObjectA 3D GameObject such as a cube, terrain or ragdoll. More info
See in Glossary > Sphere). - Create a new material (menu: AssetsAny media or data that can be used in your game or project. An asset may come from a file created outside of Unity, such as a 3D Model, an audio file or an image. You can also create some asset types in Unity, such as an Animator Controller, an Audio Mixer or a Render Texture. More info
See in Glossary > Create > MaterialAn asset that defines how a surface should be rendered. More info
See in Glossary) and leave the default Standard shader in place. - Make the material reflective by setting both the Metallic and Smoothness properties to 1.0.
- Drag the newly-created material onto the sphere object to assign it.
The sphere can now show the reflections obtained from the probes. A simple arrangement with a single probe is enough to see the basic effect of the reflections.
Finally, the probes must be baked before the reflections will become visible. Press the Bake button in the Reflection Probe inspector to update the probes.
Positioning probes
The position of a probe is primarily determined by the position of its GameObject and so you can simply drag the object to the desired location. Having done this, you should set the probe’s zone of effect; this is an axis-aligned box shape whose dimensions are set by the Box Size property. You can set the size values directly or enable the size editing mode in the inspector and drag the sides of the box in the Scene view (see the Reflection Probe component page for details). The zones of the full set of probes should collectively cover all areas of the scene where a reflective object might pass.
You should place probes close to any large objects in the scene that would be reflected noticeably. Areas around the centres and corners of walls are good candidate locations for probes. Smaller objects might require probes close by if they have a strong visual effect. For example, you would probably want the flames of a campfire to be reflected even if the object itself is small and otherwise insignificant.
When you have probes in all the appropriate places, you then need to define the zone of effect for each probe, which you can do using the Box Size property as mentioned above. A wall might need just a single probe zone along most of its length (at least if it has a fairly uniform appearance) but the zone might be relatively narrow in the direction perpendicular to the wall; this would imply that the wall is only reflected by objects that are fairly close to it. An open space whose appearance varies little from place to place can often be covered by a single probe. Note that a probe’s zone is aligned to the main world axes (X, Y and Z) and can’t be rotated. This means that sometimes a group of probes might be needed along a uniform wall if it is not axis-aligned.
By default, a probe’s zone of effect is centred on its view point but this may not be the ideal position for capturing the reflection cubemap. For example, the probe zone for a very high wall might extend some distance from the wall but you might want the reflection to be captured from a point close to it rather than the zone’s centre. You can optionally add an offset to view point using the Box Offset property (ie, the offset is the position in the GameObject’s local space that the probe’s cubemap view is generated from). Using this, you can easily place the view point anywhere within the zone of effect or indeed outside the zone altogether.
Resize a Reflection Probe
There are two buttons at the top of the Reflection Probe Inspector window that are used for editing the Size and Probe Origin properties directly within the Scene. With the left button (Size) selected, the probe’s zone of effect is shown in the scene as a yellow box shape with handles to adjust the box’s size.
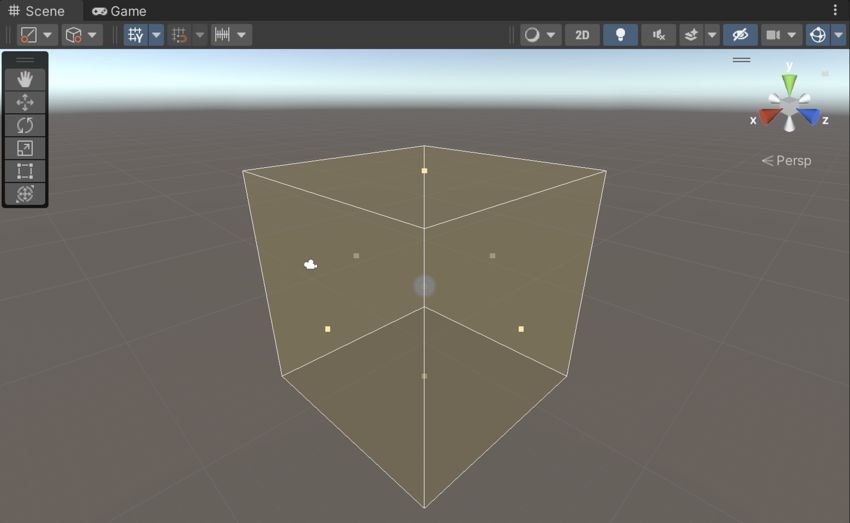
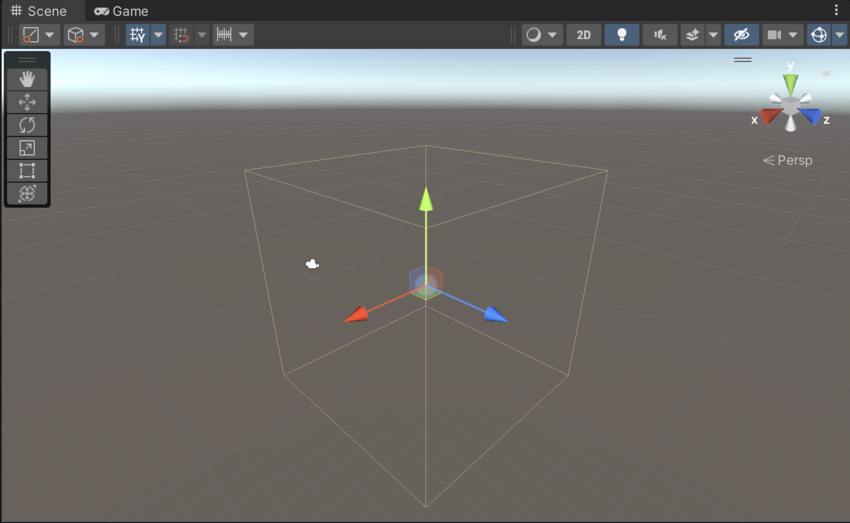
The right button (Origin) allows you to drag the probe’s origin relative to the box. Note that the origin handle resembles the Transform position handle but the two positions are not the same. Also, the rotation and scale operations are not available for the probe box.
Overlapping probe zones
It would be very difficult to position the zones of neighbouring reflection probes without them overlapping and fortunately, it is not necessary to do so. However, this leaves the issue of choosing which probe to use in the overlap areas. By default, Unity calculates the intersection between the reflective object’s bounding box and each of the overlapping probe zones; the zone which has the largest volume of intersection with the bounding box is the one that will be selected.
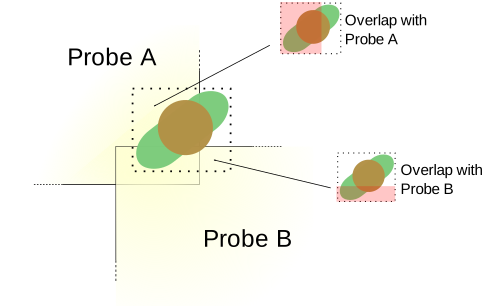
You can modify the calculation using the probes’ Importance properties. Probes with a higher importance value have priority over those of lower importance within overlap zones. This is useful, say, if you have a small probe zone that is contained completely inside a larger zone (ie, the intersection of the character’s bounding box with the enclosing zone might always be larger and so the small zone would never be used).