Create a list view runtime UI
Version: 6000.5+
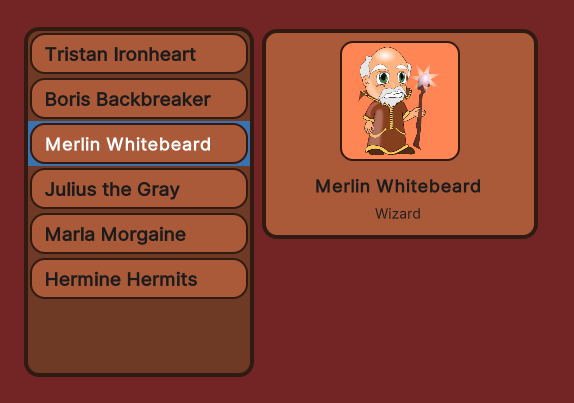
Create a character selection screen with a list with the ListView element and display the list in runtime.
This example demonstrates how to create a list view runtime UI. This example uses the UXML and USS files directly to create the structure and style of the UI. If You’re new to UI Toolkit and want to use UI Builder to create the UI, refer to Create an example UI with UI Builder.
Example overview
This example creates a simple character selection screen. When you click the name of a character from a list on the left, the detail of the character appears on the right.
You can find the completed files that this example creates in this GitHub repository.
Prerequisites
This guide is for developers familiar with the Unity Editor, UI Toolkit, and C# scripting. Before you start, get familiar with the following:
Create the main UI
Create the main view UXML and a USS file to style the visual elementsA node of a visual tree that instantiates or derives from the C# VisualElement class. You can style the look, define the behaviour, and display it on screen as part of the UI. More info
See in Glossary. Add two visual elements as containers in the UXML file: one that contains the list of character names and another that contains the selected character’s details.
To create the main UI structure:
Create a project in Unity with any template.
In the Project windowA window that shows the contents of your
Assetsfolder (Project tab) More info
See in Glossary, create a folder namedUIto store all the UXML and USS files.-
In the
UIfolder, create a UXML file namedMainView.uxmlwith the following content: In the
UIfolder, create a USS style sheet namedMainView.usswith the following content:
#background {
    flex-grow: 1;
    align-items: center;
    justify-content: center;
    background-color: rgb(115, 37, 38);
}

#main-container {
    flex-direction: row;
    height: 350px;
}

#character-list {
    width: 230px;
    border-color: rgb(49, 26, 17);
    border-width: 4px;
    background-color: rgb(110, 57, 37);
    border-radius: 15px;
    margin-right: 6px;
}

#character-name {
    -unity-font-style: bold;
    font-size: 18px;
}

#character-class {
    margin-top: 2px;
    margin-bottom: 8px;
    padding-top: 0;
    padding-bottom: 0;
}

#right-container {
    justify-content: space-between;
    align-items: flex-end;
}

#details-container {
    align-items: center;
    background-color: rgb(170, 89, 57);
    border-width: 4px;
    border-color: rgb(49, 26, 17);
    border-radius: 15px;
    width: 252px;
    justify-content: center;
    padding: 8px;
    height: 163px;
}

#details {
    border-color: rgb(49, 26, 17);
    border-width: 2px;
    height: 120px;
    width: 120px;
    border-radius: 13px;
    padding: 4px;
    background-color: rgb(255, 133, 84);
}

#character-portrait {
    flex-grow: 1;
    -unity-background-scale-mode: scale-to-fit;
}

.unity-collection-view__item {
    justify-content: center;
}

/* "Normal" background color of the item */
.unity-collection-view__item
{
    background-color: slategrey;
}

/* Background color of the item when it is being hovered */
.unity-collection-view__item:hover
{
    background-color: gray;
}

/* Background color of the item when it is selected */
.unity-collection-view__item--selected
{
    background-color: black;
}
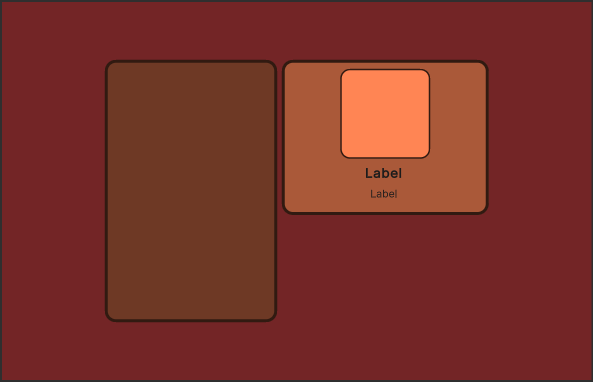
You now have the basic UI structure with containers for the character list and details.
Create a list entry UI
Create a UXML Document and a Style Sheet for the individual entries in the list. The character list entry consists of a colored background frame and the character’s name.

To create the list entry UI template:
-
In the
UIfolder, create a UI Document namedListEntry.uxmlwith the following content:<ui:UXML xmlns:ui="UnityEngine.UIElements" xmlns:uie="UnityEditor.UIElements" editor-extension-mode="False"> <Style src="ListEntry.uss" /> <ui:VisualElement name="list-entry"> <ui:Label text="Label" display-tooltip-when-elided="true" name="character-name" /> </ui:VisualElement> </ui:UXML> In the
UIfolder, create a Style Sheet file namedListEntry.usswith the following content:
#list-entry {
    height: 41px;
    align-items: flex-start;
    justify-content: center;
    padding-left: 10px;
    background-color: rgb(170, 89, 57);
    border-color: rgb(49, 26, 17);
    border-width: 2px;
    border-radius: 15px;
}

#character-name {
    -unity-font-style: bold;
    font-size: 18px;
    color: rgb(49, 26, 17);
}
The list entry template is ready to display individual character names.
Create sample data to display
Create sample data to fill the character list in the UI. For the character list, create a class that holds a character name, class, and a portrait image.
To create sample character data:
In the Asset folder, create a folder named
Scriptsto store your C# scriptsA piece of code that allows you to create your own Components, trigger game events, modify Component properties over time and respond to user input in any way you like. More info
See in Glossary.-
In the
Scriptsfolder, create a C# script namedCharacterData.cswith the following content:using UnityEngine; public enum ECharacterClass { Knight, Ranger, Wizard } [CreateAssetMenu] public class CharacterData : ScriptableObject { public string CharacterName; public ECharacterClass Class; public Sprite PortraitImage; }This creates a Character Data item in the Assets > Create menu.
In the Assets folder, create a folder named
Resources.In the
Resourcesfolder, create a folder namedCharactersto store all your sample character data.Right-click in the
Charactersfolder, select Create > Character Data to create an instance of theScriptableObject.Create more
CharacterDatainstances and fill them with placeholder data.
You now have ScriptableObject instances containing character information for the list.
Set up the scene
Create a Panel Renderer GameObjectThe fundamental object in Unity scenes, which can represent characters, props, scenery, cameras, waypoints, and more. A GameObject’s functionality is defined by the Components attached to it. More info
See in Glossary in the SampleScene and add the source asset.
To set up the Panel Renderer in the sceneA Scene contains the environments and menus of your game. Think of each unique Scene file as a unique level. In each Scene, you place your environments, obstacles, and decorations, essentially designing and building your game in pieces. More info
See in Glossary:
- In the SampleScene, select GameObject > UI Toolkit > Panel Renderer.
- Select the Panel Renderer GameObject in the Hierarchy window.
- Drag MainView.uxml from your Project window to the Source Asset field of the Panel Renderer component in the InspectorA Unity window that displays information about the currently selected GameObject, asset or project settings, allowing you to inspect and edit the values. More info
See in Glossary window. This references the source asset to the UXML file.
The Panel Renderer is now configured to display your main UI.
Create list controllers
Create two C# scripts with the following classes:
- A
CharacterListEntryControllerclass to display the data of a character instance in the UI of the list entry. It needs to access the label for the character name and set it to display the name of the given character instance. - A
CharacterListControllerclass for the character list in the main view, and aMonoBehaviourscript that instantiates and assigns it to the visual treeAn object graph, made of lightweight nodes, that holds all the elements in a window or panel. It defines every UI you build with the UI Toolkit.
See in Glossary.
Note: The CharacterListEntryController class isn’t a MonoBehaviour. Because the visual elements in UI Toolkit aren’t GameObjects, you can’t attach components to them. Instead, you attach the class to the userData property in the CharacterListController class.
To create the controller scripts:
-
In the
Scriptsfolder, create a C# script namedCharacterListEntryController.cswith the following contents:using UnityEngine.UIElements; public class CharacterListEntryController { Label m_NameLabel; // This function retrieves a reference to the // character name label inside the UI element. public void SetVisualElement(VisualElement visualElement) { m_NameLabel = visualElement.Q<Label>("character-name"); } // This function receives the character whose name this list // element is supposed to display. Since the elements list // in a `ListView` are pooled and reused, it's necessary to // have a `Set` function to change which character's data to display. public void SetCharacterData(CharacterData characterData) { m_NameLabel.text = characterData.CharacterName; } } -
In the
Scriptsfolder, create a C# script namedCharacterListController.cswith the following content:using System.Collections.Generic; using UnityEngine; using UnityEngine.UIElements; public class CharacterListController { // UXML template for list entries VisualTreeAsset m_ListEntryTemplate; // UI element references ListView m_CharacterList; Label m_CharClassLabel; Label m_CharNameLabel; VisualElement m_CharPortrait; List<CharacterData> m_AllCharacters; public void InitializeCharacterList(VisualElement root, VisualTreeAsset listElementTemplate) { EnumerateAllCharacters(); // Store a reference to the template for the list entries m_ListEntryTemplate = listElementTemplate; // Store a reference to the character list element m_CharacterList = root.Q<ListView>("character-list"); // Store references to the selected character info elements m_CharClassLabel = root.Q<Label>("character-class"); m_CharNameLabel = root.Q<Label>("character-name"); m_CharPortrait = root.Q<VisualElement>("character-portrait"); FillCharacterList(); // Register to get a callback when an item is selected m_CharacterList.selectionChanged += OnCharacterSelected; } void EnumerateAllCharacters() { m_AllCharacters = new List<CharacterData>(); m_AllCharacters.AddRange(Resources.LoadAll<CharacterData>("Characters")); } void FillCharacterList() { // Set up a make item function for a list entry m_CharacterList.makeItem = () => { // Instantiate the UXML template for the entry var newListEntry = m_ListEntryTemplate.Instantiate(); // Instantiate a controller for the data var newListEntryLogic = new CharacterListEntryController(); // Assign the controller script to the visual element newListEntry.userData = newListEntryLogic; // Initialize the controller script newListEntryLogic.SetVisualElement(newListEntry); // Return the root of the instantiated visual tree return newListEntry; }; // Set up bind function for a specific list entry m_CharacterList.bindItem = (item, index) => { (item.userData as CharacterListEntryController)?.SetCharacterData(m_AllCharacters[index]); }; // Set a fixed item height matching the height of the item provided in makeItem. // For dynamic height, see the virtualizationMethod property. m_CharacterList.fixedItemHeight = 45; // Set the actual item's source list/array m_CharacterList.itemsSource = m_AllCharacters; } void OnCharacterSelected(IEnumerable<object> selectedItems) { // Get the currently selected item directly from the ListView var selectedCharacter = m_CharacterList.selectedItem as CharacterData; // Handle none-selection (Escape to deselect everything) if (selectedCharacter == null) { // Clear m_CharClassLabel.text = ""; m_CharNameLabel.text = ""; m_CharPortrait.style.backgroundImage = null; return; } // Fill in character details m_CharClassLabel.text = selectedCharacter.Class.ToString(); m_CharNameLabel.text = selectedCharacter.CharacterName; m_CharPortrait.style.backgroundImage = new StyleBackground(selectedCharacter.PortraitImage); } }
The controller scripts are now ready to manage the UI interactions.
Attach the controller to the Panel Renderer
The CharacterListController isn’t a MonoBehaviour, so you can’t directly attach it to a GameObject. To overcome this, create a MonoBehaviour script and attach it to the same GameObject as the Panel Renderer. In this script, you don’t need to instantiate the MainView.uxml as it’s already instantiated by the Panel Renderer component. Instead, access the Panel Renderer component to get a reference of the already instantiated visual tree. Then, create an instance of the CharacterListController and pass in the root element of the visual tree and the UXML template used for the individual list elements.
Note: When the UI reloads, any registered UIReloadCallback delegates are invoked. Use RegisterUIReloadCallback to safely initialize your UI elements after the visual tree loads. For more information, refer to Lifecycle of Panel Renderer components.
-
In the
Scriptsfolder, create a C# script namedMainView.cswith the following content:using UnityEngine; using UnityEngine.UIElements; [RequireComponent(typeof(PanelRenderer))] public class MainView : MonoBehaviour { [SerializeField] VisualTreeAsset m_ListEntryTemplate; void OnEnable() { // The UXML is already instantiated by the PanelRenderer component. GetComponent<PanelRenderer>().RegisterUIReloadCallback(OnUIReload); } void OnDisable() { GetComponent<PanelRenderer>().UnregisterUIReloadCallback(OnUIReload); } void OnUIReload(PanelRenderer renderer, VisualElement rootElement) { // Initialize the character list controller. var characterListController = new CharacterListController(); characterListController.InitializeCharacterList(rootElement, m_ListEntryTemplate); } } In the SampleScene, select Panel Renderer.
Drag
MainView.csto Add Component in the Inspector window.Drag ListEntry.uxml to the ListEntry Template field.
Enter Play mode to view the list displayed in the Game view. You can click character names in the list to view their details.