Set up Adaptive Performance
Set up Adaptive Performance in your Unity project.
To use Adaptive Performance in your project, you first need to enable it and then install a provider for your target platform. You can set up Adaptive Performance globally in the Project SettingsA broad collection of settings which allow you to configure how Physics, Audio, Networking, Graphics, Input and many other areas of your project behave. More info
See in Glossary window or for specific builds from a build profileA set of customizable configuration settings to use when creating a build for your target platform. More info
See in Glossary.
Note: The recommended best practice is to install only one provider per build on each platform. Otherwise, Unity can’t guarantee which provider takes priority at runtime.
Set up Adaptive Performance for your project
To set up Adaptive Performance globally in your project:
- Open the Project Settings window (menu: Edit > Project Settings).
- Select Adaptive Performance.
- Enable Enable Adaptive Performance. Unity creates standalone assets that manage the general settings of Adaptive Performance.
- Select the checkbox next to the provider you want to install. This creates provider settings for that provider.
Disabling Adaptive Performance deactivates the feature in both runtime and Play mode. However, the related assets stay in the project, allowing you to restore your previous settings if you re-enable.
Set up Adaptive Performance for a specific build
You can override the global project settings for a specific build by enabling Adaptive Performance in a build profile.
To set up Adaptive Performance for a specific build:
Open the Build Profiles window (menu: File > Build Profiles).
Select the build profile you want to modify.
-
Select Add Settings > Adaptive Performance Settings. Unity enables Adaptive Performance and creates subassets of the build profile that manage the general settings of Adaptive Performance.
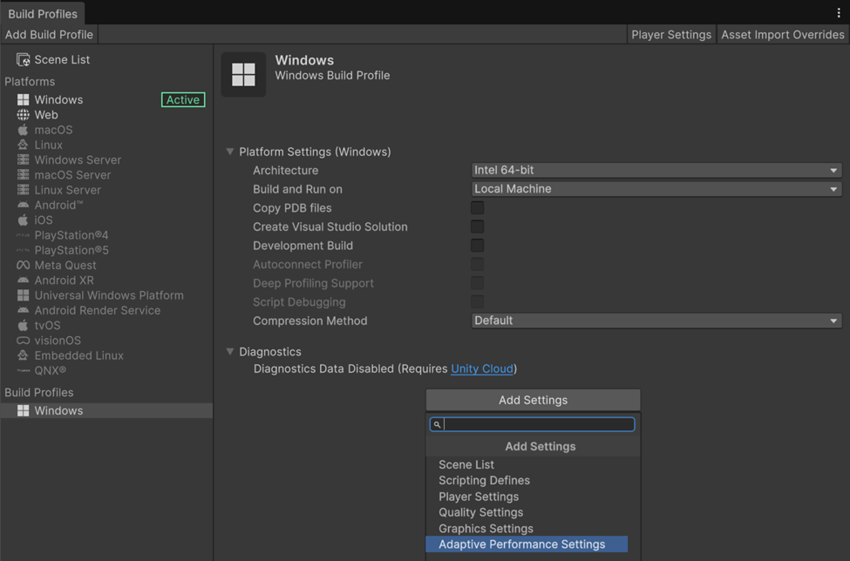
The Build Profiles window with a build profile selected and Adaptive Performance settings added via the Add Settings option. In Providers, enable the checkbox next to the provider you want to install. This creates provider settings for that provider.
These settings now apply to any build created using this build profile. Disabling the feature deactivates it and removes the subassets from the build profile.