Get started with UI Shader Graph
You can use Shader Graph to create custom shaders for UI elements. To understand how UI Shader Graph works, try the following simple example to get started. This example creates a custom shader that applies a gradient effect to a button. For a more detailed overview of UI Shader Graph, refer to Introduction to UI Shader Graph.
Note: UI Shader Graph only works with URP (Universal Render Pipeline).
Prerequisites
This guide is for developers familiar with the Unity Editor, UI Toolkit, and C# scripting. Before you start, get familiar with the following:
- Shader Graph
- MaterialsAn asset that defines how a surface should be rendered. More info
See in Glossary - UI Builder
- Button
Create a shader with a gradient effect
When you create a shader for UI elements, you typically use the Render Type Branch node to handle different render types. The following steps create a simple shader that applies a UV distortion effect to the solid color render type of a button.
Create a project with any URP template.
In your Project window, right-click in the
Assetsfolder and select Create > Shader Graph > URP > UI Shader Graph. This creates a UI Shader Graph asset configured for UI rendering.Name the new asset
MyCustomShader.Double-click
MyCustomShaderto open it in the Shader Graph editor.Select Create Node > UI > Render Type Branch.
Select Create Node > UV > UV Distortion.
Connect the UV output of the UV Distortion node to the Solid input of the Render Type Branch node.
Connect the Color output of the Render Type Branch node to the Base Color input of the Fragment node.
-
Connect the Alpha output of the Render Type Branch node to the Alpha input of the Fragment node. The With Shader in the Main Preview window shows the result of the shader applied to the background for the SDF and Bitmap text.
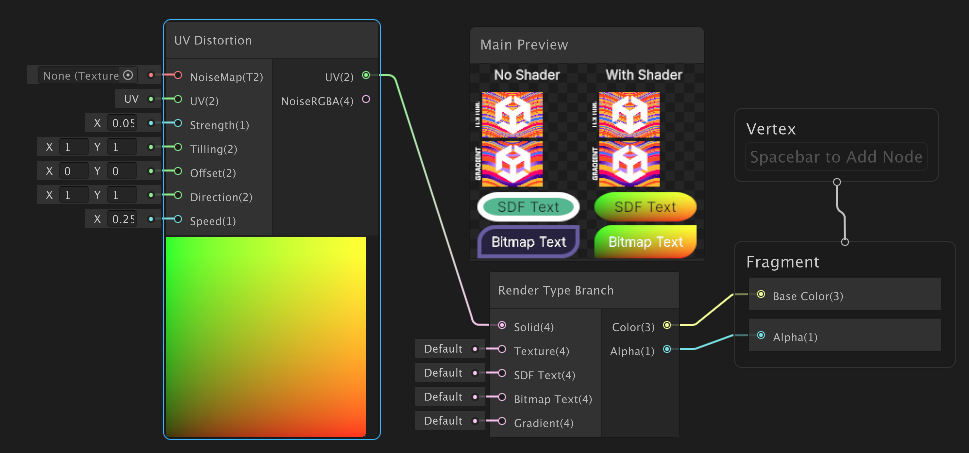
Simple shader graph example Save the shader.
Apply the shader to UI elements
To apply a custom shader to a UI element, you need to create a new material that uses your shader and then assign that material to the UI element. The following steps show how to assign the custom shader you created in the previous section to a button in UI Builder. You can also assign custom shaders with USS or C# scripts.
Right-click in the
Assetsfolder and select Create > Material.Name the new material
MyCustomMaterial.In the Inspector window of your new material, select
MyCustomShaderfrom the Shader dropdown to assign it to the material.From the menu, select Window > UI Toolkit > UI Builder to open the UI Builder window.
From the Library panel, drag a Button element into the Hierarchy panel to add a button to your UI Document.
-
In the Inspector panel for the button, from the Material dropdown list, select
MyCustomMaterialto assign the material to the button. The Viewport in the UI Builder window shows the button with the custom shader applied.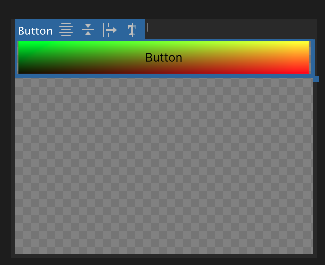
Assign custom material in UI Builder
Note: When you assign a custom shader to a UI element, the shader affects the selected element and all its child elements. Any visual effects or modifications defined in your shader are applied throughout the hierarchy, enabling consistent styling and behavior across nested UI elements.