Set background images
You can use either the Image element or the VisualElement.style.backgroundImage property to add visual content to your UI. The choice between the two depends on the specific requirements of your application. For more information, refer to Image versus VisualElement.style.backgroundImage.
Set background images with an image asset
You can use an imported or built-in image asset to set a background image. When you set the background image, you must select a supported background image type:
- TexturesAn image used when rendering a GameObject, Sprite, or UI element. Textures are often applied to the surface of a mesh to give it visual detail. More info
See in Glossary - SpritesA 2D graphic objects. If you are used to working in 3D, Sprites are essentially just standard textures but there are special techniques for combining and managing sprite textures for efficiency and convenience during development. More info
See in Glossary - Render texturesA special type of Texture that is created and updated at runtime. To use them, first create a new Render Texture and designate one of your Cameras to render into it. Then you can use the Render Texture in a Material just like a regular Texture. More info
See in Glossary - UI Toolkit vector images
When you import an image to your project, define the image import settings for the best results.
You can set the background image in UI Builder, directly in USS, or in C# files. For more information about referencing project assets, refer to AssetsAny media or data that can be used in your game or project. An asset may come from a file created outside of Unity, such as a 3D Model, an audio file or an image. You can also create some asset types in Unity, such as an Animator Controller, an Audio Mixer or a Render Texture. More info
See in Glossary.
UI Builder:
- Select the element you want to modify.
- In the Inspector panel, expand Background.
- Select the image type from the image type dropdown list.
- Click in the Image field to select an image asset from your project.

USS example:
MyElement {
    background-image: url("path/to/imageFile.png");
}
C# example:
// Use the AssetDatabase method to load the texture.
myElement1.style.backgroundImage = AssetDatabase.LoadAssetAtPath<Texture2D>("path/to/imageFile.png");

// Use the AssetDatabase method to load the sprite.
myElement2.style.backgroundImage = new StyleBackground(AssetDatabase.LoadAssetAtPath<Sprite>("path/to/spriteAssetFile.png"));

// Load the texture from the project's Resources folder.
myElement3.style.backgroundImage = Resources.Load<Texture2D>("imageFile");

// Load the sprite from the project's Resources folder.
myElement4.style.backgroundImage = new StyleBackground(Resources.Load<Sprite>("spriteAssetFile"));

// Use the Unity Editor's default resources.
myElement5.style.backgroundImage = EditorGUIUtility.FindTexture("CloudConnect");
myElement6.style.backgroundImage = Background.FromTexture2D(EditorGUIUtility.IconContent("FolderOpened Icon").image as Texture2D);
Set the scale mode for a background image
Scale mode for a background image defines how the image scales to fit the visual element.

The supported scale modes for a background image.
A: stretch-to-fill that stretches the image to fill the entire area of the visual element.
B: scale-and-crop that scales the image to fit the visual element. If the image is larger than the visual element, the image is cropped.
C: scale-to-fit that scales the image to fit the visual element. It’s similar to the stretch-to-fill mode, but the aspect ratio of the image is preserved.
You can set the scale mode in UI Builder, directly in USS, or in C# files.
USS example:
MyElement {
    -unity-background-scale-mode: scale-and-crop;
}
C# example:
// Set the scale mode to scale-and-crop.
myElement.style.backgroundPositionX = BackgroundPropertyHelper.ConvertScaleModeToBackgroundPosition(ScaleMode::ScaleAndCrop);
myElement.style.backgroundPositionY = BackgroundPropertyHelper.ConvertScaleModeToBackgroundPosition(ScaleMode::ScaleAndCrop);
myElement.style.backgroundRepeat = BackgroundPropertyHelper.ConvertScaleModeToBackgroundRepeat(ScaleMode::ScaleAndCrop);
myElement.style.backgroundSize = BackgroundPropertyHelper.ConvertScaleModeToBackgroundSize(ScaleMode::ScaleAndCrop);
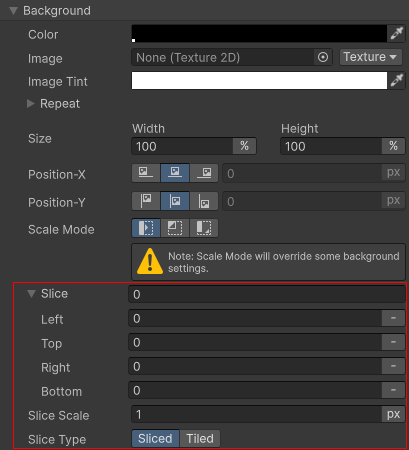
9-Slice images with UI Toolkit
Generally, you can apply the 9-slice technique to a regular 2D Sprite. However, with UI Toolkit, you can apply the 9-slice technique to Texture, Render Texture, and SVG Vector images.
To apply 9-slice, set the following:
- Slice values: The slice values are the pixel values for the left, right, top, and bottom slices of the image. The values are relative to the image’s pivot point. For example, if the pivot point is in the center of the image, the left slice value is the number of pixels from the left edge of the image to the pivot point.
-
Slice scale: The slice scale is a multiplier that’s applied to the image after the 9-slice technique is applied. Note that for sprites, Unity adjusts the
-unity-slice-scaleby the sprite’spixels-per-unitvalue in relation to the panel’sreference sprite pixels per unit value, which is by default100. For example, if the sprite’spixels-per-unitis16, the scale is adjusted by16/100 = 0.16. Therefore, if you set the scale to2px, the final scale is2px * 0.16px = 0.32px. For texture and vector images, Unity doesn’t make additional adjustments to the slice scale value you set. -
Slice Type: The slice type determines whether the center of the image is
slicedortiled. The Sliced type scales the center, while the Tiled type tiles the center and sides.
You can set the slice values and slice scale with UI Builder, or directly in USS, or in C# files. For a sprite image, you can also set the values in the Sprite Editor. For more information, refer to Sprite Editor tab reference for the Sprite Editor window.
UI Builder:
Use the Slice fields in the Background section to set the slice values, slice scale, and slice type.
USS example:
MyElement {
    -unity-slice-left: 10px;
    -unity-slice-right: 10px;
    -unity-slice-top: 10px;
    -unity-slice-bottom: 10px;
    -unity-slice-scale: 2px;
    -unity-slice-type: tiled;
}
C# example:
MyElement.style.unitySliceLeft = 10px;
MyElement.style.unitySliceRight = 10px;
MyElement.style.unitySliceTop = 10px;
MyElement.style.unitySliceBottom = 10px;
MyElement.style.unitySliceScale = 2px;
MyElement.style.unitySliceType = SliceType.Tiled;
Important:
- Slice values set with USS apply only to the image in the associated visual element. The values don’t apply to the same image used in other visual elements, in other UI documents, or in a scene.
- Unset slice value is zero. For example, if you set the Top, Bottom, and Right slice attributes but leave the Left slice empty, the Left slice is zero.
- Slice values set in USS override slice values set in the Sprite Editor.
Sliced vs Tiled
You can use -unity-slice-type to have the center and sides of the slice tiled instead of streched.

To properly support tiling, import the image as a Sprite (2D and UI) and set the Mesh Type to Full Rect.