Scene View Control Bar
The Scene View control bar lets you choose various options for viewing the scene and also control whether lighting and audio are enabled. These controls only affect the scene view during development and have no effect on the built game.

Draw Mode
The first drop-down menu selects which Draw Mode will be used to depict the scene. The available options are:
Shading Mode
- Shaded: show surfaces with their textures visible.
- Wireframe: draw meshes with a wireframe representation.
- Shaded Wireframe: show meshes textured and with wireframes overlaid.
기타
- Shadow Cascades: show directional light shadow cascades.
- Render Paths: show the rendering path for each object using a color code: Blue indicates deferred shading, Green indicates deferred lighting, yellow indicates forward rendering and red indicates vertex lit.
- Alpha Channel: render colors with alpha.
- Overdraw: render objects as transparent “silhouettes”. The transparent colors accumulate, making it easy to spot places where one object is drawn over another.
- Mipmaps: show ideal texture sizes using a color code: red indicates that the texture is larger than necessary (at the current distance and resolution); blue indicates that the texture could be larger. Naturally, ideal texture sizes depend on the resolution at which the game will run and how close the camera can get to particular surfaces.
디퍼드
These modes let you view each of the elements of the G-buffer (Albedo, Specular, Smoothness and Normal) in isolation. See the page on Deferred Shading for further details.
전역 조명(Global Illumination)
The following modes are available to help visualise aspects of the Global Illumination system: UV Charts, Systems, Albedo, Emissive, Irradiance, Directionality, Baked, Clustering and Lit Clustering. These modes are described with examples on the GI Visualisations page.
2D, Lighting and Audio Switches
To the right of the render mode menu are three buttons that switch certain scene view options on or off:
- 2D: switches between 2D and 3D view for the scene. In 2D mode the camera is oriented looking towards positive z, with the x axis pointing right and the y axis pointing up.
- Lighting: turns scene view lighting (lights, object shading, etc) on or off.
- Audio: turns scene view audio effects on or off.
Effects Button and Menu
The menu (activated by the small mountain icon to the right of the Audio button) has options to enable or disable rendering effects in the scene view.
- Skybox: a skybox texture rendered in the scene’s background
- Fog: gradual fading of the view to a flat color with distance from the camera.
- Flares: lens flares on lights.
- Animated Materials: should animated materials show the animation?
The Effects button itself acts as a switch that enables or disables all the effects at once.
Gizmos Menu
Gizmos are graphics added to the scene (either by Unity itself or from your own scripts) that help with visualisation and identification of items in the game world. For example, you can add icons to help identify your game objects and use simple wireframe graphics to show otherwise invisible paths and positioning elements. See the Script Reference page for the OnDrawGizmos function for further information about implementing custom gizmos in your scripts.
Clicking the Gizmos popup will show a menu with a number of options:
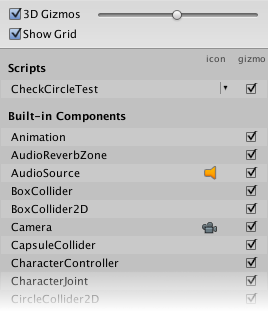
The 3D Gizmos checkbox determines whether gizmos are shown in true 3D (with correct obscuration and perspective) or as a simple overlay on top of other scene graphics. The slider to its right adjusts the scale of gizmo icons relative to other objects. The Show Grid checkbox below switches the standard scene measurement grid on and off.
Beneath these options is a table of component names with Icon and Gizmo columns to the right. The list is subdivided into user scripts and built-in components and will also maintain a section of recently changed items as you make modifications.
The Icon column lets you select the gizmo icon displayed for particular component types. For built-in components, the only options are to have no icon (as with Colliders, where only a wireframe gizmo is shown) or simply to switch the standard icon on and off (as with Cameras, Lights and Audio Sources, among others). For user scripts, clicking the icon column will bring up a menu to select the desired icon:

This lets you select from a variety of simple standard icon shapes in different colors that you can use to identify particular script types. The Other button will bring up a texture selector from which you can choose any texture you like to use as the icon for your script.
The Gizmo column in the table contains a checkbox that lets you choose whether gizmo graphics will be drawn for a particular Component type. For example, Colliders have a predefined wireframe gizmo to show their shape while user scripts can draw custom gizmos appropriate to their purpose; these gizmos can be turned on or off by clicking in this column.
Search Box
The rightmost item on the control bar is a search box that lets you filter items in the scene view by their names and/or types (you can select which with the small menu at the left of the search box). The set of items that match the search filter will also be shown in the Hierarchy view which, by default, is located to the left of the Scene view.