Android 심볼
애플리케이션 디버그를 수행할 수 있도록 Unity는 네이티브 Unity 라이브러리용 심볼 파일이 포함된 패키지를 생성할 수 있습니다. 심볼 파일에는 액티브 메모리 주소를 메서드 이름처럼 사용할 수 있는 정보로 변환하는 표가 포함되어 있습니다. 이러한 이동 프로세스를 기호화라고 합니다. 심볼 패키지를 Google Play 콘솔에 업로드하여 Android Vitals 대시보드에서 사람이 읽을 수 있는 스택 추적을 볼 수 있습니다.
다음과 같이 두 종류의 심볼 파일이 있습니다.
- 공용:심볼 표가 포함된 작은 파일입니다.자세한 내용은 공용 심볼을 참조하십시오.
- 디버그:공용 심볼 파일에 포함된 모든 내용과 보다 심층적인 디버깅에 사용할 수 있는 전체 디버깅 정보가 포함되어 있습니다.자세한 내용은 디버깅 심볼을 참조하십시오.
다음의 라이브러리용 심볼 파일을 생성할 수 있습니다.
-
libmain: 로직을 로드하는 초기 Unity 엔진을 담당합니다. -
libunity: Unity 엔진 코드입니다. -
libil2cpp: C++ 코드로 변환된 프로젝트의 C# 스크립트를 포함합니다.
Unity는 libmain과 libunity 심볼 파일을 생성하고, Gradle은 libil2cpp 심볼 파일을 생성합니다.
공용 심볼
공용 심볼 파일에는 함수 주소를 사람이 읽을 수 있는 문자열로 확인하는 정보가 포함되어 있습니다. Unity는 --strip-debug 파라미터를 사용하여 더 심층적인 디버그 정보를 제거하는 공용 심볼을 생성합니다. 디버그 정보가 들어있지 않아서 공용 심볼 파일과 공용 심볼 패키지가 디버깅 심볼 파일과 디버깅 심볼 패키지보다 더 작습니다.
디버깅 심볼
디버깅 심볼 파일에는 모든 디버깅 정보와 심볼 표가 포함되어 있습니다. 디버깅 심볼 파일을 사용하여 다음과 같은 동작을 수행할 수 있습니다.
- 스택 추적을 해결하고 소스 코드를 사용할 수 있는 애플리케이션을 디버그할 수 있습니다.
- 애플리케이션에 네이티브 디버거를 연결하여 코드를 디버그할 수 있습니다.
Unity는 --only-keep-debug 파라미터를 사용하여 디버깅 심볼을 생성합니다.자세한 내용은 Linux 사용자 매뉴얼에 있는 –only-keep-debug를 참조하십시오.
참고:디버깅 심볼을 사용할 수 없는 경우 Unity는 빌드 시점에 프로젝트에 공용 심볼 파일을 배치합니다.libmain 및 libunity 라이브러리의 경우 디버깅 심볼을 사용할 수 없으며 Unity는 항상 공용 심볼 파일을 생성합니다.
커스텀 심볼
Unity에 추가 심볼 파일을 포함하도록 지시할 수 있습니다.공유되는 라이브러리를 사용하는 경우 애플리케이션이 충돌할 때 로컬 디버거와 Google Play가 공유되는 라이브러리 스택 추적을 해결하려는 경우에 유용합니다.
Unity에 커스텀 심볼 파일을 포함하려면:
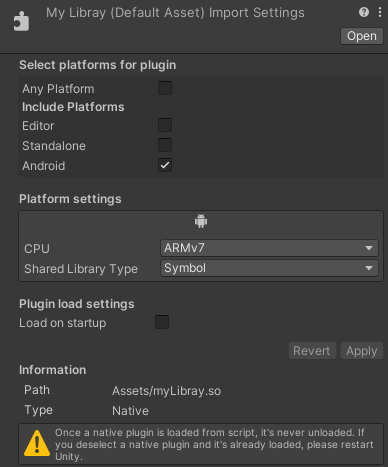
- 프로젝트 창에서 파일 확장자가 ’.so’인 플러그인을 선택합니다.
- 인스펙터에서 Platform settings 섹션을 찾습니다.
- CPU를 심볼 파일이 호환되는 CPU 아키텍처로 설정합니다.
- Shared Library Type을 Symbol로 설정합니다.
Unity는 심볼 패키지를 생성할 때마다 심볼 패키지에 추가 심볼 파일을 추가합니다.
Unity에 C# 스크립트의 커스텀 심볼 파일을 포함하려는 경우 UnityEditor.Android 네임스페이스에는 각각 CPU 및 Shared Library Type을 설정하는 다음 API가 포함되어 있습니다.
참고:심볼 파일 이름은 해당 심볼 파일이 있는 공유 라이브러리의 이름과 일치해야 합니다.예를 들어 공유되는 라이브러리가 mylibrary.so로 불리는 경우, 이 심볼 파일의 이름도 mylibrary.so여야 합니다.파일 이름 충돌을 방지하려면 심볼 파일과 공유되는 라이브러리가 별도의 디렉터리에 있어야 합니다.
중요:심볼 파일이 최신 상태이고 실행 코드가 포함된 공유되는 라이브러리와 호환되는지 확인하십시오.그렇지 않으면 로컬 디버거와 Google Play가 공유되는 라이브러리에 있는 코드의 스택 추적을 해결하지 못합니다.
심볼 패키지 생성
애플리케이션을 위한 심볼 패키지 생성을 활성화하는 데는 두 가지 방법이 있습니다.
- 빌드 설정 창을 통해.
- EditorUserBuildSettings.androidCreateSymbols API 사용.
빌드 설정 창을 통해 심볼 패키지 생성을 활성화하려면:
빌드 설정 창(메뉴: File > Build Settings)을 엽니다.
Android 플랫폼을 선택합니다.
-
다음 중 한 가지 방법으로 Create symbols.zip을 설정합니다.
심볼 패키지 생성을 활성화한 후 프로젝트 빌드가 libmain과 libunity 라이브러리용 심볼 파일이 포함된 .zip 파일을 생성합니다. 스크립팅 백엔드를 IL2CPP로 설정하면 .zip 파일에는 libil2cpp 라이브러리용 심볼 파일이 포함됩니다. Unity는 이 심볼 패키지를 출력 디렉토리 내부에 배치합니다.
Android 빌드 설정에서 Export Project를 활성화하면 Unity는 프로젝트를 빌드하지 않습니다. 대신 Unity는 Android Studio용 프로젝트를 익스포트하고 libmain과 libunity용 심볼을 생성하여 출력 디렉토리의 unityLibrary/symbols/<architecture>/ 내부에 배치합니다. Android Studio에서 익스포트된 프로젝트를 빌드할 때 Gradle은 libil2cpp 심볼 파일을 생성하여 unityLibrary/symbols/<architecture>/ 디렉토리 내부에 libmain과 libunity 심볼 파일과 함께 배치합니다.
Google Play 콘솔에서 심볼 사용
Google Play에 애플리케이션을 업로드한 후 해당 애플리케이션에 대한 공용 심볼 패키지를 업로드할 수 있습니다.자세한 방법은 Google 문서를 참조하십시오.크래시 스택 추적의 가독화 또는 심볼화.
참고: Google Play는 심볼 패키지가 업로드되기 전에 애플리케이션이 받은 크래시를 기호화하지 않습니다.