カスタムエディターウィンドウ内にドラッグアンドドロップ UI を作成する
バージョン: 2021.3 以降
ドラッグアンドドロップは、UI デザインにおける一般的な機能です。UI Toolkit を使用して、カスタムエディターウィンドウ内または Unity でビルドされたアプリケーション内に、ドラッグアンドドロップ UI を作成できます。この例では、カスタムエディターウィンドウの中にドラッグアンドドロップ UI を作成する方法について説明します。
例の概要
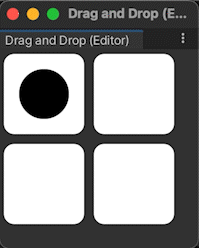
この例では、カスタムエディターウィンドウにいくつかのスロットと 1 つのオブジェクトを追加します。オブジェクトは、以下に示すように任意のスロットにドラッグできます。
この例で作成する完成したファイルは、こちらの GitHub リポジトリ にあります。
必要な要件
このガイドは、Unity エディター、UI Toolkit、および C# スクリプトに精通している開発者を対象としています。始める前に、以下の点を理解しておいてください。
カスタムエディターウィンドウの作成
まず、メニューからデフォルトのカスタムエディターウィンドウを作成します。メニュー名とウィンドウのタイトルを Drag And Drop に変更し、デフォルトラベルのコードを削除して、よりわかりやすい UI にします。
Unity で任意のテンプレートでプロジェクトを作成します。
Assetsフォルダーを右クリックし、Create > UI Toolkit > Editor Window を選択します。UI Toolkit Editor Window Creator で
DragAndDropWindowと入力します。Confirm をクリックします。これにより、
DragAndDropWindow.cs、DragAndDropWindow.uxml、DragAndDropWindow.ussの 3 つのファイルが自動的に作成されます。-
DragAndDropWindow.csの内容を以下に置き換えます。using UnityEditor; using UnityEngine; using UnityEngine.UIElements; using UnityEditor.UIElements; public class DragAndDropWindow : EditorWindow { [MenuItem("Window/UI Toolkit/Drag And Drop")] public static void ShowExample() { DragAndDropWindow wnd = GetWindow<DragAndDropWindow>(); wnd.titleContent = new GUIContent("Drag And Drop"); } public void CreateGUI() { // Each editor window contains a root VisualElement object VisualElement root = rootVisualElement; // Import UXML var visualTree = AssetDatabase.LoadAssetAtPath<VisualTreeAsset>("Assets/Editor/DragAndDropWindow.uxml"); VisualElement labelFromUXML = visualTree.Instantiate(); root.Add(labelFromUXML); // A stylesheet can be added to a VisualElement. // The style will be applied to the VisualElement and all of its children. var styleSheet = AssetDatabase.LoadAssetAtPath<StyleSheet>("Assets/Editor/DragAndDropWindow.uss"); } }
スロットとオブジェクトの作成
次に、カスタムウィンドウに以下の UI コントロールを追加します。
-
slotsという名前のコントロール (slot_row1とslot_row2という名前の 2 つの子を持っています)。各行にはslot1とslot2という名前の 2 つの子が必要です。 -
slotsと同じレベルにある、objectという名前のコントロール。objectは Hierarchy でslotsの後に配置する必要があります。
UI コントロールのスタイルを以下のようにします。
-
slot1とslot2は、80 px X 80 px の正方形で、背景色が白、角が丸いスタイルにします。スロットは 2 行として、各行に 2 つのスロットを配置します。 -
objectは、50 px X 50 px の円形スポットで、背景色が黒のスタイルにします。
ヒント: プロジェクトをより楽しくするために、オブジェクトの背景画像を使用できます。その画像 (Pouch.png) は GitHub リポジトリにあります。
-
DragAndDropWindow.uxmlの内容を以下に置き換えます。<ui:UXML xmlns:ui="UnityEngine.UIElements" xmlns:uie="UnityEditor.UIElements" xsi="http://www.w3.org/2001/XMLSchema-instance" engine="UnityEngine.UIElements" editor="UnityEditor.UIElements" noNamespaceSchemaLocation="../../../UIElementsSchema/UIElements.xsd" editor-extension-mode="False"> <Style src="DragAndDropWindow.uss" /> <ui:VisualElement name="slots"> <ui:VisualElement name="slot_row1" class="slot_row"> <ui:VisualElement name="slot1" class="slot" /> <ui:VisualElement name="slot2" class="slot" /> </ui:VisualElement> <ui:VisualElement name="slot_row2" class="slot_row"> <ui:VisualElement name="slot1" class="slot" /> <ui:VisualElement name="slot2" class="slot" /> </ui:VisualElement> </ui:VisualElement> <ui:VisualElement name="object" class="object" /> </ui:UXML> -
DragAndDropWindow.ussの内容を以下に置き換えます。.slot { width: 80px; height: 80px; margin: 5px; background-color: rgb(255, 255, 255); border-top-radius: 10px; border-top-left-radius: 10px; border-bottom-left-radius: 10px; border-top-right-radius: 10px; border-bottom-right-radius: 10px; } .slot_row { flex-direction: row; } .object { width: 50px; height: 50px; position: absolute; left: 20px; top: 20px; border-radius: 30px; background-color: rgb(0, 0, 0); }
ドラッグアンドドロップのロジックを定義する
ドラッグアンドドロップ動作を定義するには、PointerManipulator クラスを拡張してロジックを定義します。target を設定し、ビジュアルツリーのルートへの参照を格納するコンストラクターを記述します。PointerDownEvent、PointerMoveEvent、PointerUpEvent、および PointerCaptureOutEvent のコールバックとして機能する 4 つのメソッドを記述します。RegisterCallbacksOnTarget() と UnregisterCallbacksOnTarget() を実装して、これら 4 つのコールバックを target から登録および登録解除します。
Editorフォルダーに、DragAndDropManipulator.csという名前の別の C# ファイルを作成します。-
DragAndDropManipulator.csの内容を以下に置き換えます。using System.Collections; using System.Collections.Generic; using UnityEngine; using UnityEngine.UIElements; public class DragAndDropManipulator : PointerManipulator { // Write a constructor to set target and store a reference to the // root of the visual tree. public DragAndDropManipulator(VisualElement target) { this.target = target; root = target.parent; } protected override void RegisterCallbacksOnTarget() { // Register the four callbacks on target. target.RegisterCallback<PointerDownEvent>(PointerDownHandler); target.RegisterCallback<PointerMoveEvent>(PointerMoveHandler); target.RegisterCallback<PointerUpEvent>(PointerUpHandler); target.RegisterCallback<PointerCaptureOutEvent>(PointerCaptureOutHandler); } protected override void UnregisterCallbacksFromTarget() { // Un-register the four callbacks from target. target.UnregisterCallback<PointerDownEvent>(PointerDownHandler); target.UnregisterCallback<PointerMoveEvent>(PointerMoveHandler); target.UnregisterCallback<PointerUpEvent>(PointerUpHandler); target.UnregisterCallback<PointerCaptureOutEvent>(PointerCaptureOutHandler); } private Vector2 targetStartPosition { get; set; } private Vector3 pointerStartPosition { get; set; } private bool enabled { get; set; } private VisualElement root { get; } // This method stores the starting position of target and the pointer, // makes target capture the pointer, and denotes that a drag is now in progress. private void PointerDownHandler(PointerDownEvent evt) { targetStartPosition = target.transform.position; pointerStartPosition = evt.position; target.CapturePointer(evt.pointerId); enabled = true; } // This method checks whether a drag is in progress and whether target has captured the pointer. // If both are true, calculates a new position for target within the bounds of the window. private void PointerMoveHandler(PointerMoveEvent evt) { if (enabled && target.HasPointerCapture(evt.pointerId)) { Vector3 pointerDelta = evt.position - pointerStartPosition; target.transform.position = new Vector2( Mathf.Clamp(targetStartPosition.x + pointerDelta.x, 0, target.panel.visualTree.worldBound.width), Mathf.Clamp(targetStartPosition.y + pointerDelta.y, 0, target.panel.visualTree.worldBound.height)); } } // This method checks whether a drag is in progress and whether target has captured the pointer. // If both are true, makes target release the pointer. private void PointerUpHandler(PointerUpEvent evt) { if (enabled && target.HasPointerCapture(evt.pointerId)) { target.ReleasePointer(evt.pointerId); } } // This method checks whether a drag is in progress. If true, queries the root // of the visual tree to find all slots, decides which slot is the closest one // that overlaps target, and sets the position of target so that it rests on top // of that slot. Sets the position of target back to its original position // if there is no overlapping slot. private void PointerCaptureOutHandler(PointerCaptureOutEvent evt) { if (enabled) { VisualElement slotsContainer = root.Q<VisualElement>("slots"); UQueryBuilder<VisualElement> allSlots = slotsContainer.Query<VisualElement>(className: "slot"); UQueryBuilder<VisualElement> overlappingSlots = allSlots.Where(OverlapsTarget); VisualElement closestOverlappingSlot = FindClosestSlot(overlappingSlots); Vector3 closestPos = Vector3.zero; if (closestOverlappingSlot != null) { closestPos = RootSpaceOfSlot(closestOverlappingSlot); closestPos = new Vector2(closestPos.x - 5, closestPos.y - 5); } target.transform.position = closestOverlappingSlot != null ? closestPos : targetStartPosition; enabled = false; } } private bool OverlapsTarget(VisualElement slot) { return target.worldBound.Overlaps(slot.worldBound); } private VisualElement FindClosestSlot(UQueryBuilder<VisualElement> slots) { List<VisualElement> slotsList = slots.ToList(); float bestDistanceSq = float.MaxValue; VisualElement closest = null; foreach (VisualElement slot in slotsList) { Vector3 displacement = RootSpaceOfSlot(slot) - target.transform.position; float distanceSq = displacement.sqrMagnitude; if (distanceSq < bestDistanceSq) { bestDistanceSq = distanceSq; closest = slot; } } return closest; } private Vector3 RootSpaceOfSlot(VisualElement slot) { Vector2 slotWorldSpace = slot.parent.LocalToWorld(slot.layout.position); return root.WorldToLocal(slotWorldSpace); } }
ドラッグアンドドロップ動作をインスタンス化する
カスタムウィンドウでドラッグアンドドロップを有効にするには、ウィンドウが開いたときにインスタンス化します。
-
DragAndDropWindow.csで、CreateGUI()メソッドに以下を追加して、DragAndDropManipulatorクラスをインスタンス化します。DragAndDropManipulator manipulator = new(rootVisualElement.Q<VisualElement>("object")); メニューバーから Window > UI Toolkit > Drag And Drop を選択します。開いたカスタムエディターウィンドウで、オブジェクトを任意のスロットにドラッグできます。