パラメーター
| rect | レイアウトする範囲 |
| style | 項目のスタイル |
| horizontalSpacing | 連続する項目間の水平方向の間隔 |
| verticalSpacing | 列になっている項目の垂直方向の間隔 |
| items | 配置する文字列 |
戻り値
List<Rect> 渡された項目の矩形のリスト
説明
文字列リストの項目を、指定された範囲に左から右、上から下にレイアウトします。
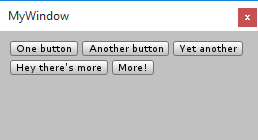
GetFlowLayoutedRects で配置したボタンの例
using UnityEngine;
using UnityEditor;
using System.Collections.Generic;

public class MyWindow : EditorWindow {
	[MenuItem ("Window/My Window")]
	static void OpenMyWindow ()
	{
		EditorWindow.GetWindow<MyWindow> (true);
	}

	void OnGUI ()
	{
		// area to layout our items in
		var rect = new Rect(10, 10, position.width-20, position.height-20);
		// items to layout
		var items = new List<string> {
			"One button", "Another button", "Yet another", "Hey there's more", "More!"
		};
		// get resulting rectangles of items
		var style = EditorStyles.miniButton;
		var boxes = EditorGUIUtility.GetFlowLayoutedRects (rect, style, 4, 4, items);
		// do actual UI for them
		for (var i = 0; i < boxes.Count; ++i)
		{
			GUI.Button (boxes[i], items[i], style);
		}
	}
}