Tutorial del WheelCollider
El nuevo WheelCollider está en funcionamiento por el PhysX3 Vehicles SDK el cual es básicamente una librería nueva de simulación de vehículos cuando es comparada a PhysX2.
Vayamos a través del proceso de crear un carro básico funcionando en Unity 5.0.
Comience seleccionado el GameObject -> 3D Object -> Plane. Este es el suelo dónde el carro va a andar. Asegúrese de que el suelo tenga un transform de cero (Transform -> Reset) para simplicidad. Reduzca la escala colocando algo como 100 en los componentes scale del Transform.
Cree un esqueleto básico del carro:
Primero, agregue un GameObject como el objeto raíz del carro: GameObject -> Create Empty. Cambie el nombre a
car_root.Agregue un componente Physics 3D Rigidbody a
car_root. La masa predeterminada de 1 kg es muy liviana para las configuraciones por defecto de suspensión. Cámbielo a 1500 kg.Ahora cree el collider del cuerpo del carro: GameObject -> 3D Object -> Cube. Apadrine la caja debajo de
car_root. Reset el transform para hacerlo encajar perfectamente alineado en el espacio local. Debido a que nuestro carro va a estar orientado a lo largo del eje Z, escale la caja a lo largo del eje Z al configurar Z en escala a 3.Agregue una raíz de ruedas. Seleccione
car_rooty GameObject -> Create Empty Child. Cambie el nombre awheels. Reset el transform él. Este nodo no es obligatorio, pero es para una conveniencia de de sintonización más adelante.Cree la primera rueda: seleccione el objeto
wheels, GameObject -> Create Empty Child, y nombre lofrontLeft. Reset el transform en él. Configure la posición a (–1, 0, 1). Agregue el componente de Física component -> wheel collider a la rueda.Duplique el objeto
frontLeft(Cmd-D or Control-D). Cambie la posición X a 1. Cambie el nombre afrontRight.Select ambos objetos
frontLeftyfrontRight. Duplique los. Cambie la posición z de ambos objetos a -1. Cambie el nombre arearLeftyrearRight` respectivamente.Finalmente, seleccione el objeto
car_rooty utilizando los manipuladores del transform, aumente lo ligeramente encima del suelo.-
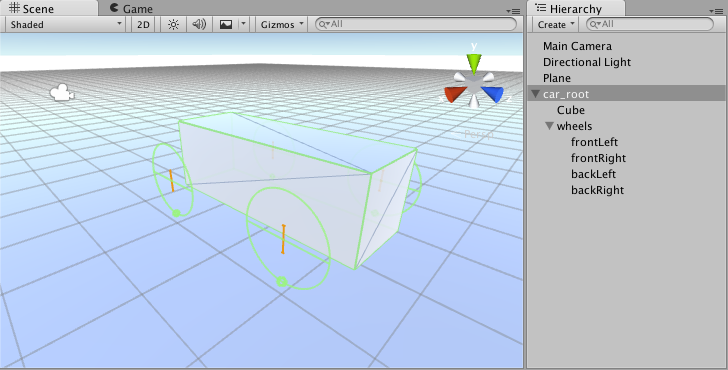
Ahora usted debería ser capaz de ver algo como esto:

Para hacer este carro de verdad manejable nosotros necesitamos escribir un controlador para esto. Entremos en algo de scripting:
using UnityEngine;
using System.Collections;
using System.Collections.Generic;

public class SimpleCarController : MonoBehaviour {
    public List<AxleInfo> axleInfos; // the information about each individual axle
    public float maxMotorTorque; // maximum torque the motor can apply to wheel
    public float maxSteeringAngle; // maximum steer angle the wheel can have

    public void FixedUpdate()
    {
        float motor = maxMotorTorque * Input.GetAxis("Vertical");
        float steering = maxSteeringAngle * Input.GetAxis("Horizontal");

        foreach (AxleInfo axleInfo in axleInfos) {
            if (axleInfo.steering) {
                axleInfo.leftWheel.steerAngle = steering;
                axleInfo.rightWheel.steerAngle = steering;
            }
            if (axleInfo.motor) {
                axleInfo.leftWheel.motorTorque = motor;
                axleInfo.rightWheel.motorTorque = motor;
            }
        }
    }
}

[System.Serializable]
public class AxleInfo {
    public WheelCollider leftWheel;
    public WheelCollider rightWheel;
    public bool motor; // is this wheel attached to motor?
    public bool steering; // does this wheel apply steer angle?
}
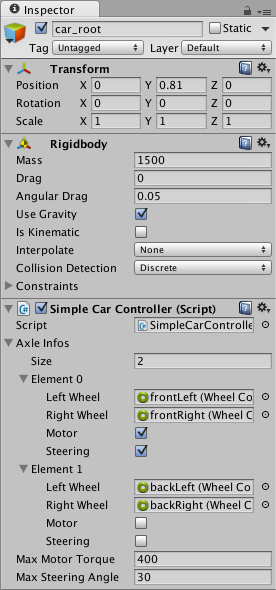
Just drop this snippet on the car_root object, tune the script parameters as shown below and kick off to play mode. Play around with the settings, Those shown below seem to work reasonably well:

You can have up to 20 wheels on a single vehicle instance with each of them applying steering, motor or braking torque.
Ahora nosotros nos moveremos a unas ruedas visuales. Como usted puede ver, los WheelColliders no aplican la simulación de la posición de la rueda y rotación de vuelta al transform del WheelCollider. Entonces agregar una rueda visual requiere de algunos trucos.
Nosotros necesitamos alguna geometría de rueda aquí. Nosotros podemos hacer una figura simple de una rueda de un cilindro.
Ahora puede haber varios acercamientos para agregar ruedas visuales: haciendo que nosotros tengamos que asignar ruedas visuales manualmente en las propiedades de script o escribir alguna lógica para encontrar la rueda visual correspondiente de manera automática. Nosotros seguiremos el segundo acercamiento.
Adjunte las ruedas visuales a los objetos wheel collider.
Ahora cambie el script del controlador:
using UnityEngine;
using System.Collections;
using System.Collections.Generic;

[System.Serializable]
public class AxleInfo {
    public WheelCollider leftWheel;
    public WheelCollider rightWheel;
    public bool motor;
    public bool steering;
}

public class SimpleCarController : MonoBehaviour {
    public List<AxleInfo> axleInfos;
    public float maxMotorTorque;
    public float maxSteeringAngle;

    // finds the corresponding visual wheel
    // correctly applies the transform
    public void ApplyLocalPositionToVisuals(WheelCollider collider)
    {
        if (collider.transform.childCount == 0) {
            return;
        }

        Transform visualWheel = collider.transform.GetChild(0);

        Vector3 position;
        Quaternion rotation;
        collider.GetWorldPose(out position, out rotation);

        visualWheel.transform.position = position;
        visualWheel.transform.rotation = rotation;
    }

    public void FixedUpdate()
    {
        float motor = maxMotorTorque * Input.GetAxis("Vertical");
        float steering = maxSteeringAngle * Input.GetAxis("Horizontal");

        foreach (AxleInfo axleInfo in axleInfos) {
            if (axleInfo.steering) {
                axleInfo.leftWheel.steerAngle = steering;
                axleInfo.rightWheel.steerAngle = steering;
            }
            if (axleInfo.motor) {
                axleInfo.leftWheel.motorTorque = motor;
                axleInfo.rightWheel.motorTorque = motor;
            }
            ApplyLocalPositionToVisuals(axleInfo.leftWheel);
            ApplyLocalPositionToVisuals(axleInfo.rightWheel);
        }
    }
}
- Un parámetro importante del componente WheelCollider es forceAppPointDistance. Esta es la distancia desde la base de la rueda en descanso del punto dónde las fuerzas de la rueda son aplicadas. El valor predeterminado es 0, lo que significa aplicar la fuerza en la base de la rueda descansando, pero en realidad, es sabio tener este punto ubicado en algún lugar debajo del centro de masa del carro.