Cluster Rendering
Información General
Unity’s Cluster Rendering technology allows multiple machines to simulate the same scene in-sync with each other, and display the result on a cluster of displays. This feature enables you to deploy your Unity environment to complex multi-screen environments like a video wall, a CAVE, a Dome or any custom layout of multiple displays.
Compared to other solutions in which only one machine is used to generate multiple display outputs, Unity’s Cluster Rendering has the ability to scale up to very large number of displays (up to 50 or more if networking capability is very high). With a single machine powering multiple displays, each display adds a computational cost to that machine. Even with a very powerful machine, this puts a low limit on the number of displays it can provide at a good framerate. In comparison, with Unity’s Cluster Rendering, the rendering load is shared over many machines, with each machine being responsible for rendering one display.
This works by having the same project installed on all machines, running in lock-step synchronization. Each machine runs the same simulation, but differs only in the rendering output, rendering only its portion of the entire multi-display setup.
This lock-step synchronization occurs over a local area network.
Hardware Setup
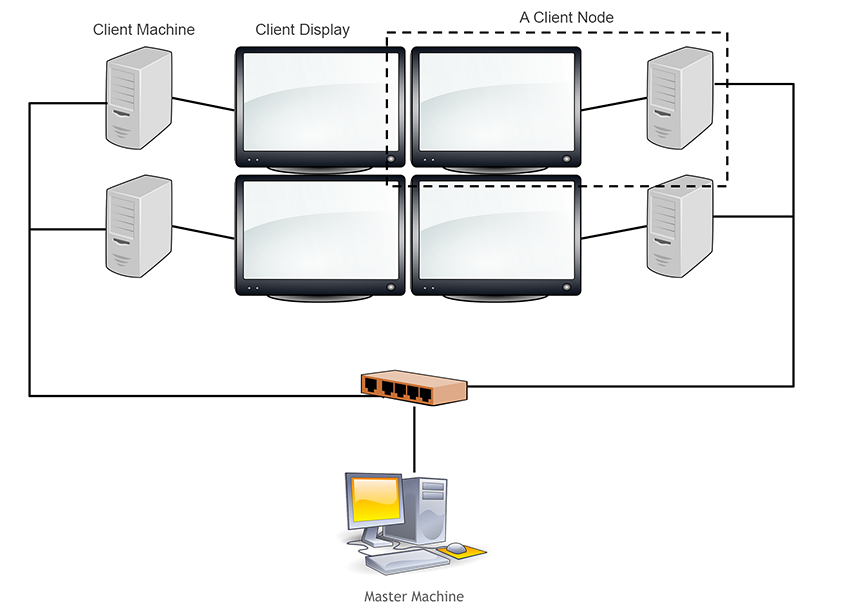
A Node in the cluster consists of a workstation and a display output. Each workstation runs a copy of the Unity application with Cluster Rendering enabled. There is one Master Node and multiple Client Nodes. The Client Nodes connect to the Master Node via a Local Area Network. A wired network is highly recommended for this. A WiFi network is generally not fast enough, and will result in inconsistencies in synchronization.

Unity Cluster under the hood
To start a Cluster Rendering group, you should start the Master and all Client machines at the same time. Then launch the application on each machine with the specific command line argument to define the master and client relationship.
The Master Node will then sync up all the client nodes with itself. The synchronization method is known as frame locking, or “lock step” synchronization. This means the Master Node will propagate an “update” signal at its own Update() call to all Client Nodes, once all clients have “checked in” with the master. Once the Master Node has sent out the Update signal, it will wait for the next full check-in by all the clients and repeat the cycle.
The Master Node also sends along data such as timing, the random number seed and input values. This will ensure the application will simulate identically across the master and all the clients. The data payload that gets synchronized between the Master and Client Nodes each frame is constant, regardless of the number or complexity of objects in the scene. This means the complexity of the scene does not have an impact on network performance, only the individual rendering performance of each node.
Splitting the displays across multiple machines
With all Client Nodes synchronized to the Master Node in the cluster, you must organize the Nodes so that each is rendering the portion of the view that it is supposed to render. The synchronization data does not include information about the Camera, so you are free to manipulate the camera individually in each node. Since all nodes are simulating the same scene, the trick is to manipulate the camera properties so that each node is rendering the correct portion of the overall display.
How you will achieve that will depend on how the multiple physical screens are set up, but the basic approach is to assign a different projection matrix to each node’s camera. See Camera.projectionMatrix for more information on how to do this.