XR Ray Interactor
Interactor used for interacting with interactables at a distance. This interactor uses ray casts to detect eligible interactable targets. You can configure the ray interactor to use straight or curved ray casts. In the starter assets and demo scene, an XR Ray Interactor component is used for locomotion as part of the Teleport Interactor Prefab.
Note
The Near-Far Interactor component provides a newer, more flexible design that replaces many uses of the XR Ray Interactor. For example, with the Near-Far Interactor, you can configure both direct interaction and interaction at a distance with one component.
Supporting components
You can use the following additional components with a ray interactor:
- XR Interactor Line Visual, Line Renderer, and Sorting Group: draw a visual line along the ray cast path.
- XR Interactable Snap Volume: Configure the interactor and an interactable such that the ray interactor's visual line and ray cast snap to the interactable. Refer to Supporting XR Interactable Snap Volume for more information.
- Simple Audio Feedback: Play audio clips when interactor events happen. (Replaces the Audio Events properties of the interactor.)
- Simple Haptic Feedback: Play haptic impulses when interactor events happen. (Replaces the Haptic Events properties of the interactor.)
- XR Interaction Group: Define groups of interactors to mediate which has priority for an interaction.
Base properties
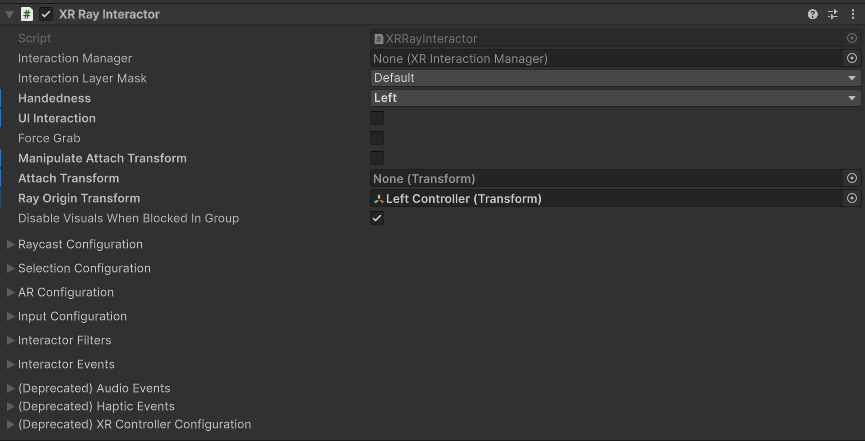
The XR ray interactor has many properties that you can set to modify how the interactor behaves. Some of these properties are organized into sections and don't appear in the Inspector window until you enable another property or expand a section.
| Property | Description |
|---|---|
| Interaction Manager | The XRInteractionManager that this interactor will communicate with (will find one if None). |
| Interaction Layer Mask | Allows interaction with interactables whose Interaction Layer Mask contains any Layer in this Interaction Layer Mask. |
| Handedness | Represents which hand or controller the interactor is associated with. |
| UI Interaction | Enable to affect Unity UI GameObjects in a way that is similar to a mouse pointer. Requires the XR UI Input Module on the Event System. When enabled, the options described in UI Interaction properties are shown in the Inspector. |
| Force Grab | Force grab moves the object to your hand rather than interacting with it at a distance. |
| Manipulate Attach Transform | Allows the user to move the Attach Transform using the thumbstick. When you enable this option, the Inspector displays additional properties to configure the way a user can manipulate the selected object. |
| Attach Transform | The Transform to use as the attach point for interactables.Automatically instantiated and set in Awake if None.Setting this will not automatically destroy the previous object. |
| Ray Origin Transform | The starting position and direction of any ray casts. Automatically instantiated and set in Awake if None and initialized with the pose of the XRBaseInteractor.attachTransform. Setting this will not automatically destroy the previous object. |
| Disable Visuals When Blocked In Group | Whether to disable visuals when this interactor is part of an Interaction Group and is incapable of interacting due to active interaction by another interactor in the Group. |
| Raycast Configuration | Controls how the raycast into the scene to detect eligible interactables behaves. Click the triangle icon to expand the section. |
| Selection Configuration | Controls selection behavior. Click the triangle icon to expand the section. Note that you configure the input controls used for selection in the Input Configuration section. |
| AR Configuration | Configure how the interactor behaves in an AR context. |
| Input Configuration | Specify input bindings for the select and activate actions. Click the triangle icon to expand the section. |
| Interactor Filters | Identifies any filters this interactor uses to winnow detected interactables. You can create filter classes to provide custom logic to limit which interactables an interactor can interact with. Filtering occurs after the interactor has performed a raycast to detect eligible interactables. |
| Interactor Events | The events dispatched by this interactor. You can add event handlers in other components in the scene or prefab and they are invoked when the event occurs. |
| (Deprecated) Audio Events | Assign an audio clip to play when an interactor event occurs. Replaced by the Simple Audio Feedback component, which provides more control over how a clip is played. |
| (Deprecated) Haptic Events | Assign a haptic impulse to play when an interactor event occurs. Replaced by the Simple Haptic Feedback component, which provides more options for defining a haptic impulse. |
| (Deprecated) XR Controller Configuration | Provides compatibility with the deprecated action- or device-based XR Controller components. The properties in this section are intended to aid migration of scenes created with version 2.6 or earlier versions of the toolkit. |
UI Interaction properties
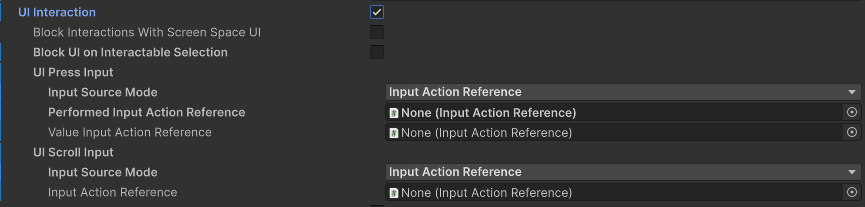
To enable UI interaction, enable the UI Interaction checkbox. When enabled, additional options are added to the Inspector.
Note
You must add the XR UI Input Module to the UI Event System in the scene for any interactors to interact with UI elements.
Use the options in the UI Interaction section to configure how the interactor operates with UI elements on a canvas.
| Property | Description |
|---|---|
| Block Interactions With Screen Space UI | Enable this to make the interactor ignore interactions when occluded by a screen space canvas. |
| Block UI on Interactable Selection | Enabling this option will block UI interaction when selecting interactables. |
| UI Press Input | The input used to press or select UI elements. Equivalent to a mouse button. |
| UI Scroll Input | The input to use to scroll UI elements. Equivalent to a mouse scroll wheel. |
Manipulate Attach Transform options
Interactors that operate at a distance, like Ray and Gaze interactors, provide additional options to control how the user can manipulate a selected interactable object. These options define whether the user can move, rotate, or scale an object and which controller input to use for each type of manipulation.
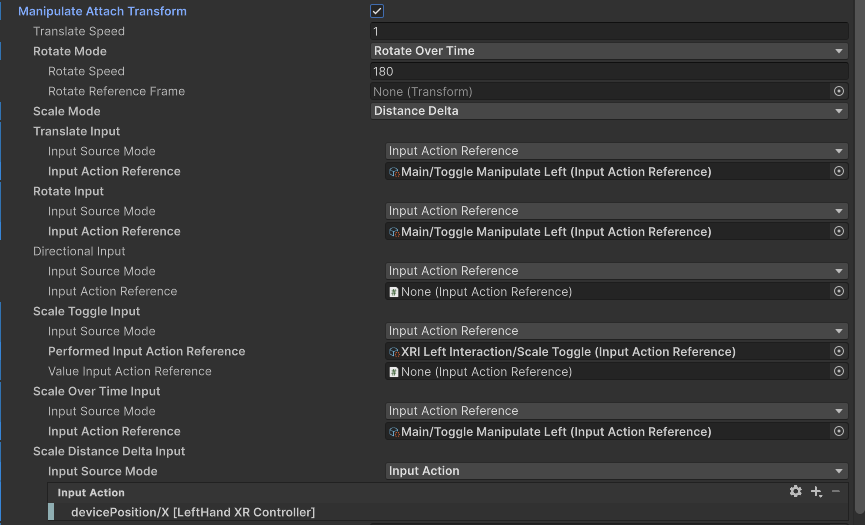
To enable the additional manipulation options, set Manipulate Attach Transform to true.
Refer to the following sections for information on the manipulation properties:
Translation properties
Use the Translation properties to adjust how the attached object moves along the ray cast by the interactor.
| Property | Description |
|---|---|
| Translate Speed | The maximum speed at which the interactable object can be translated in meters per second. |
| Translate Input | The input used to control translation. This must be a 2D axis input, such as a joystick. The standard input for translation is x axis of the primary 2D axis of the left controller, which is a thumbstick. In the XRI Default Input Actions asset, this is mapped to the action named XRI Left Interaction/Manipulation. |
Rotation properties
Use the Rotation properties to adjust how the attached object turns while selected.
| Property | Description |
|---|---|
| Rotate Mode | Specifies how input is applied when rotating interactable objects. |
| Rotate Speed | The maximum speed at which the interactable object can be rotated, specified in degrees per second. This property is only applicable when Rotate Mode is set to Rotate Over Time. |
| Rotate Reference Frame | The reference frame used for rotation. This can be set to either World or Local. |
| Rotate Input | The input used to control rotation. This must be a 2D axis input, such as a joystick. The standard input for rotation is y axis of the primary 2D axis of the left controller, which is a thumbstick. In the XRI Default Input Actions asset, this is mapped to the action named XRI Left Interaction/Manipulation. |
| Directional Input | The input used to control the direction of rotation. This must be a 2D axis input, such as a joystick. The standard input for teleportation direction is the primary 2D axis of the right controller, which is a thumbstick. In the XRI Default Input Actions asset, this is mapped to the action named XRI Right Interaction/Teleportation. |
Rotate Mode
Choose the way that a selected object rotates.
| Option | Description |
|---|---|
| Rotate Over Time | The interactable object rotates continuously based on the input from the Rotate Input property. The speed of rotation is determined by the value of the Rotate Speed property. In the standard toolkit interaction setup, Rotate Over Time mode is used for manipulating selected interactable objects with the left controller thumbstick. |
| Match Direction | The interactable object rotates to match the direction of the input from the Directional Input property. In the standard toolkit interaction setup, Match Direction mode is used for choosing the destination direction for teleportation with the right controller thumbstick. |
Scale properties
Use the Scale properties to adjust how the attached object turns while selected.
In the standard toolkit interaction setup, the left controller is used for both scaling and for translation/rotation. The user toggles between scaling and translation/rotation with a button press (as specified with the Scale Toggle Input property).
| Property | Description |
|---|---|
| Scale Mode | Specifies how input is applied when scaling objects. You can change the scale mode at runtime to enable or disable scaling. |
| Scale Speed | The maximum speed at which the interactable object can be scaled, specified in meters per second. This property is only applicable when Scale Mode is set to Scale Over Time. |
| Scale Input | The input used to control scaling. This must be a 2D axis input, such as a joystick. The standard input for scaling is the z axis of the primary 2D axis of the left controller, which is a thumbstick. In the XRI Default Input Actions asset, this is mapped to the action named XRI Left Interaction/Manipulation. |
| Scale Toggle Input | The input used to toggle between scaling and translation/rotation manipulation. This can be a button press or a float value. The standard input for toggling scaling is the primary button on the left controller, which is typically the X button. In the XRI Default Input Actions asset, this is mapped to the action named XRI Left Interaction/Select. |
| Scale Over Time Input | The input used to control scaling over time. This must be a 2D axis input, such as a joystick. The standard input for scaling over time is the z axis of the primary 2D axis of the left controller, which is a thumbstick. In the XRI Default Input Actions asset, this is mapped to the action named XRI Left Interaction/Manipulation. |
| Scale Distance Delta Input | The input used for scaling. This must be a float value representing the change from the previous frame |
Scale Mode
Choose the way that a selected object scales.
| Option | Description |
|---|---|
| None | Scaling is disabled. |
| Scale Over Time | The interactable object scales continuously based on the input from the Scale Input input reader property. The speed of scaling is determined by the value of the Scale Speed property. |
| Distance Delta | The interactable object scales based on a delta value from the previous frame. The delta value in a frame is read from the Scale Distance Delta Input input reader property. |
Raycast configuration
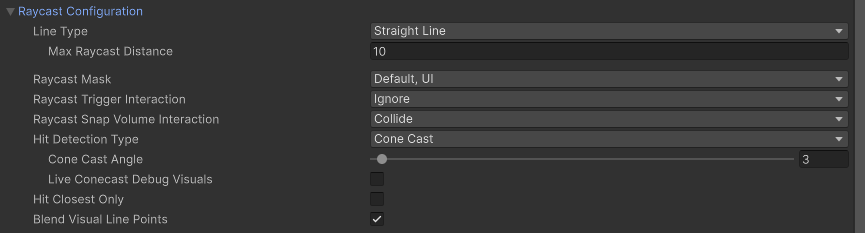
Use the options in the Raycast Configuration section to specify how the ray casts used to detect eligible interactables should behave. For example, you can specify whether the ray cast follows a straight or a curved path with these properties.
Interactors that operate at a distance, like Ray and Gaze interactors, use raycasts to detect valid interactable targets.
The raycast options include:
| Properties | Description |
|---|---|
| Line Type | The type of line used for the ray cast. |
| Raycast Mask | The layer mask used for limiting ray cast targets. The interactor can interact with interactables included in any of the layers in the mask. A mask setting of Everything includes all interactables. A mask setting of Nothing includes no interactables. |
| Raycast Trigger Interaction | The type of interaction with trigger colliders via ray cast. |
| Raycast Snap Volume Interaction | Whether ray cast should include or ignore hits on trigger colliders that are snap volume colliders, even if the ray cast is set to ignore triggers. If you are not using gaze assistance or XR Interactable Snap Volume components, you should set this property to Ignore to avoid the performance cost. |
| Raycast UI Document Trigger Interaction | Whether ray cast should include or ignore hits on trigger colliders that are UI Toolkit UI Document colliders, even if the ray cast is set to ignore triggers. |
| Hit Detection Type | Which type of hit detection to use for the ray cast. |
| Hit Closest Only | Whether Unity considers only the closest interactable as a valid target for interaction. Enable this to make only the closest interactable receive hover events. Otherwise, all hit interactables will be considered valid and this interactor will multi-hover. |
| Blend Visual Line Points | Blend the line sample points Unity uses for ray casting with the current pose of the controller. Use this to make the line visual stay connected with the controller instead of lagging behind. When the controller is configured to sample tracking input directly before rendering to reduce input latency, the controller may be in a new position or rotation relative to the starting point of the sample curve used for ray casting. A value of false will make the line visual stay at a fixed reference frame rather than bending or curving towards the end of the ray cast line. |
Line types
Set the Line Type to specify the shape of ray cast used to identify interactable targets.
| Option | Description |
|---|---|
| Straight Line | Set Line Type to Straight Line to perform a single ray cast into the scene with a set ray length. |
| Projectile Curve | Set Line Type to Projectile Curve to sample the trajectory of a projectile to generate a projectile curve. |
| Bezier Curve | Set Line Type to Bezier Curve to use a control point and an end point to create a quadratic Bezier curve. |
Straight lines
A straight ray cast projects from the position of the Ray Origin Transform in the direction of that transform's forward vector.
The straight line type provides one option, Max Raycast Distance, which specifies how far the ray cast extends. Increase this value to allow the ray cast to reach farther.

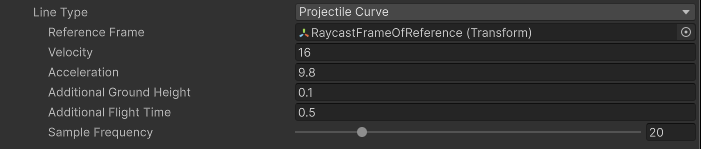
Projectile curves
A projectile curve ray cast follows the simulated path of a projectile launched from the ray origin. The particle launches along the forward vector of the Ray Origin Transform with the specified initial Velocity. The path terminates when the particle reaches the ground (x-z) plane determined by the Reference Frame transform, taking into account any adjustments you add with the Additional Ground Height property. The Acceleration property determines how fast the simulated particle falls. You can alter the flight time by setting the Additional Flight Time property.
| Property | Description |
|---|---|
| Reference Frame | The frame of reference for the curve that determines the ground (x-z) plane and the Up direction vector. If you do not set this property, the component uses the transform of the GameObject containing the XR Origin component, if it can find one. Otherwise, it uses the global (identity) transform. |
| Velocity | Initial velocity of the projectile. Increase this value to make the curve reach further. |
| Acceleration | Specifies the downward acceleration (gravity) of the projectile. The Reference Frame property determines which direction is considered down. |
| Additional Ground Height | Additional height below ground level that the projectile will continue to. Set a positive value to place the end point below the ground plane. Set a negative value to place the end point above the ground plane. |
| Additional Flight Time | Adjusts the simulated flight time of the projectile. Set a positive value to extend the path beyond the end point. Set a negative value to terminate the path before it reaches the end point. |
| Sample Frequency | The number of sample points Unity uses to approximate curved paths. Larger values produce a path that follows the curve better, but also increases the number of ray casts that must be performed. A value of n results in n−1 ray cast line segments. |
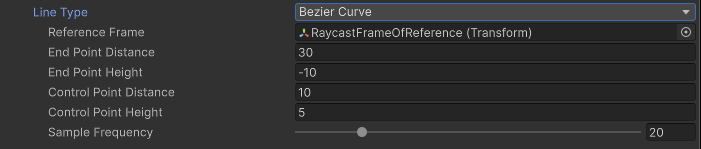
Quadratic Bezier curve
A quadratic Bezier curve ray cast projects from the Ray Origin Transform to the endpoint based on a control point.
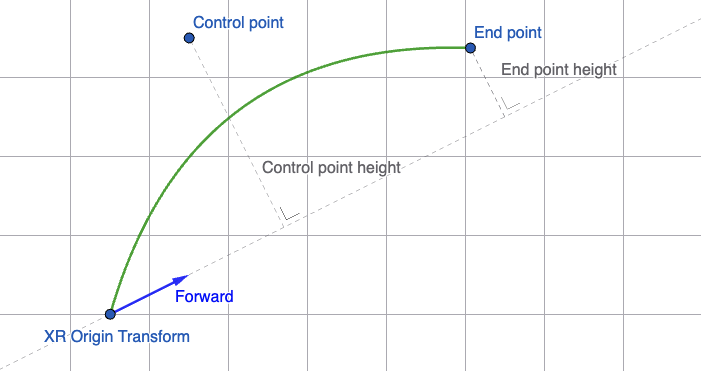
The relationship of the control and end points to the XR Transform Origin Forward vector
The curve and the control point are placed in the plane that intersects both the origin and end points and which is perpendicular to the ground (x-z) plane determined by the Reference Frame transform.
| Property | Description |
|---|---|
| Reference Frame | The frame of reference for the curve that determines the ground (x-z) plane and the Up direction vector. If you do not set this property, the component uses the transform of the XROrigin.Origin GameObject, if it can find it. Otherwise, it uses the global (identity) transform. |
| End Point Distance | Increase this value distance to make the end of the curve further from the start point. |
| End Point Height | The height of the end point relative to a line projected along the Ray Origin Transform Forward vector. Decrease this value to make the end of the curve drop lower relative to the start point. |
| Control Point Distance | Increase this value to make the peak of the curve further from the start point. |
| Control Point Height | The height of the control point relative to the line projected along the Ray Origin Transform Forward vector. Increase this value to make the peak of the curve higher relative to the start point. |
| Sample Frequency | The number of sample points Unity uses to approximate curved paths. Larger values produce a path that follows the curve better, but also increases the number of ray casts that must be performed. A value of n results in n−1 ray cast line segments. |
Hit detection type
Set the Hit detection type to specify whether to use a point, sphere, or cone shape when casting the ray used to detect interactable objects. At least one cast is performed for each line segment in the line or curve, with cone casts potentially performing multiple casts per segment.

| Property | Description |
|---|---|
| Ray cast | Use Physics.Raycast, which projects a thin, straight ray to detect collisions with interactables. |
| Sphere Cast | Use Physics.Spherecast, which sweeps a sphere along a ray to detect collisions with interactables. |
| Cone Cast | Use cone casting to detect collisions with interactables. |
Sphere cast hit detection
Uses a Physics.Spherecast.

Specify the size of the sphere with the Sphere Cast Radius property.
Cone cast hit detection
A cone cast uses a series of Physics.Spherecast. The radius of each successive sphere cast increases with distance to sweep a cone-shaped area.

| Property | Description |
|---|---|
| Cone Cast Angle | The angle between opposite sides of the cone. |
| Live Conecast Debug Visuals | Draws a wire frame for each sphere used in the cone cast using Gizmos.DrawSphere. The Unity Editor draws Gizmos to the Scene View. |
Note
To sweep a cone shaped area, multiple sphere casts of increasing size must be performed. Depending on the Sample Frequency, Cone Cast Angle, and distance of the cast, cone casting might impact performance.
Selection Configuration
Use the options in the Selection Configuration section to configure selection-related behavior. For example, you can specify whether the user must hold a button continuously to maintain selection or just press a button to toggle selection on and off.
Note
Configure the input for selection with the Select Input property in the Input Configuration section of the Inspector.

| Property | Description |
|---|---|
| Select Action Trigger | Choose how the configured Select Input control triggers the selection of an interactable object. |
| Keep Selected Target Valid | Whether to keep selecting an interactable after initially selecting it even when it is no longer a valid target. Enable to make the XRInteractionManager retain the selection even if the interactable is not contained within the list of valid targets. Disable to make the Interaction Manager clear the selection if it isn't within the list of valid targets.A common use for disabling this is for ray interactors used for teleportation to make the teleportation interactable no longer selected when not currently pointing at it. |
| Allow Hovered Activate | Controls whether to send activate and deactivate events to interactables that this interactor is hovered over but not selected when there is no current selection. By default, the interactor will only send activate and deactivate events to interactables that it has selected. |
| Target Priority Mode | Specifies whether interactables are tracked in the interactor's valid target list. Set to None if your application doesn't use this list. |
| Hover To Select | Enable to have interactor automatically select an interactable after hovering over it for a period of time. Will also select UI if UI Interaction is also enabled. |
| Starting Selected Interactable | The interactable that this interactor automatically selects at startup (optional, may be None). |
| Parent Interactable | An optional reference to a parent interactable dependency for determining processing order of interactables. Refer to Processing interactables for more information. |
| Auto Find Parent Interactable | Automatically find a parent interactable up the GameObject hierarchy when registered with the interaction manager. Disable to manually set the object reference for improved startup performance. |
Select Action Trigger
Use the Select Action Trigger to choose different styles for how the configured Select Input control triggers the selection of an interactable object. State Change is the default option and provides the most intuitive selection behavior for typical interactions.
The Select Action Trigger options are:
| Select Action Trigger option | Description |
|---|---|
| State | A selection can be triggered as long as the user keeps Select Input control activated. For example, if a user holds down a button configured as the Select Input before hovering on an interactable, the first interactable hovered while the button remains down will become selected. |
| State Change | A selection can be triggered only during the frame in which the user activates the Select Input control. The interactable remains selected until the Select Input is released. |
| Toggle | Like State Change except the selection persists until the second time the Select Input control is activated. |
| Sticky | Like Toggle, except the selection persists until the second time the Select Input control is released. |
Note
When Select Action Trigger is set to State and the user selects an interactable set to InteractableSelectMode.Single with more than one interactor at the same time, then the selection of the interactable can be passed back and forth between the interactors each frame. This can also cause the select interaction events to fire each frame. To avoid this behavior, set Select Action Trigger to State Change, which is the default and recommended option.
Target Priority Mode
The Target Priority Mode option determines whether the interactor creates a list of priority targets every frame and how many objects are included in the list. The list of targets is available from the interactor's GetValidTargets
The Target Priority Mode options are:
| Target Priority Mode option | Description |
|---|---|
| None | This interactor does not maintain a target list. |
| Highest Priority Only | The target list contains only the highest priority interactable that is eligible for selection in the scene during the current frame. |
| All | The target list contains all of the interactables eligible for selection in the scene during the current frame. |
Tip
You should leave the Target Priority Mode set to None, its default value, unless your application code uses the target list.
AR Configuration
Use the options in the AR Configuration section to control how the interactor behaves in an Augmented Reality context.

| Property | Description |
|---|---|
| Enable AR Raycasting | Allow the interactor to detect AR interactables in a scene. |
| Occlude AR Hits With 3D Objects | When enabled 3D objects in the scene block the ray cast and prevent AR interactables behind them from being detected. |
| Occlude AR Hits With 2D Object | When enabled 2D objects in the scene block the ray cast and prevent AR interactables behind them from being detected. |
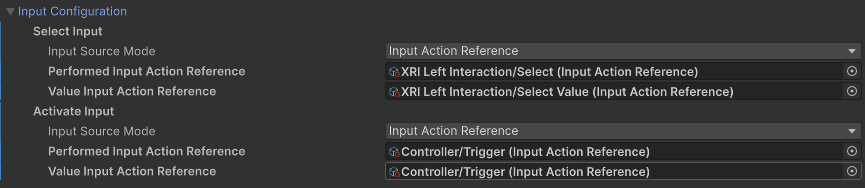
Input Configuration
Configure Input Reader properties to specify what kinds of input trigger select and activate interactions.
| Property | Description |
|---|---|
| Select Input | Choose what kinds of input trigger selection of a hovered interactable. |
| Activate Input | Choose what kinds of input trigger activation of a selected interactable. |
Refer to the Input section for information about how to configure input options.
Note
You can change how the Inspector shows Input Reader properties with the Editor Settings: Input Reader Property Drawer Mode property on the XR Interaction Toolkit setting page. You can find this settings page in the Project Settings under the XR Plug-in Management section.
Interactor Filters
Configure the starting set of filters that an interactor uses to determine which interactables are eligible for interaction. All of these filter properties are optional. If you do not assign them, the interactor uses default behavior.
Refer to Interaction filters for more information about implementing filters.
| Property | Description |
|---|---|
| Starting Target Filter | Filters the list of interactables that are eligible for interaction. |
| Starting Hover Filters list | Validates which potential hover targets are eligible for hover interaction. |
| Starting Select Filters list | Validates which potential select targets are eligible for select interaction. |
Interactor Events
You can assign listener functions for interaction events in the Inspector window and in a C# class. These events apply to interactors - objects that can interact with interactables.
The UI Hover Entered and UI Hover Exited events are not available on all interactor components. Only those interactors that implement IUIHoverInteractor and enable UI Interaction with the XR UI Input Module, such as XR Poke Interactor, will have these events.
For detailed code examples showing how to subscribe to events and work with the event arguments, refer to Handle interaction events.
| Property | Description |
|---|---|
| Hover Entered | The event that is called when this interactor begins hovering over an interactable. |
| Hover Exited | The event that is called when this interactor ends hovering over an interactable. |
| Select Entered | The event that is called when this interactor begins selecting an interactable. |
| Select Exited | The event that is called when this interactor ends selecting an interactable. |
| UI Hover Entered Event | Event triggered when a UI element is hovered over by this interactor. |
| UI Hover Exited Event | Event triggered when a UI element is no longer hovered over by this interactor. |
Note
Additional events might be available to listeners you assign in C# code. Refer to the XRBaseInteractor subclass documentation for specific information.
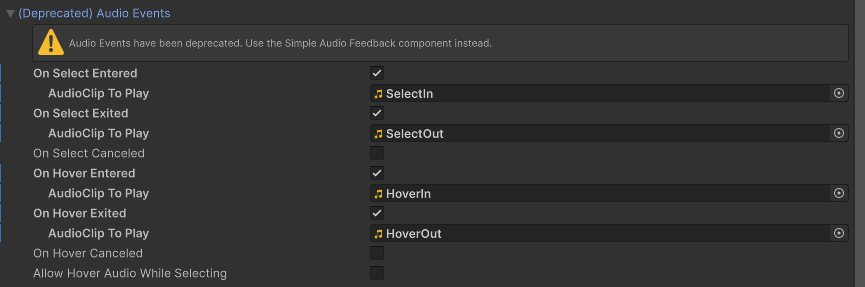
Audio Events (deprecated)
The Audio Events section is deprecated and might be removed in a future release. Use the Simple Audio Feedback component instead.
| Property | Description |
|---|---|
| On Select Entered | If enabled, the Unity editor will display UI for supplying the audio clip to play when this interactor begins selecting an interactable. |
| On Select Exited | If enabled, the Unity editor will display UI for supplying the audio clip to play when this interactor successfully exits selection of an interactable. |
| On Select Canceled | If enabled, the Unity editor will display UI for supplying the audio clip to play when this interactor cancels selection of an interactable. |
| On Hover Entered | If enabled, the Unity editor will display UI for supplying the audio clip to play when this interactor begins hovering over an interactable. |
| On Hover Exited | If enabled, the Unity editor will display UI for supplying the audio clip to play when this interactor successfully ends hovering over an interactable. |
| On Hover Canceled | If enabled, the Unity editor will display UI for supplying the audio clip to play when this interactor cancels hovering over an interactable. |
| Allow Hover Audio While Selecting | Whether to allow playing audio from hover events if the hovered interactable is currently selected by this interactor. This is enabled by default. |
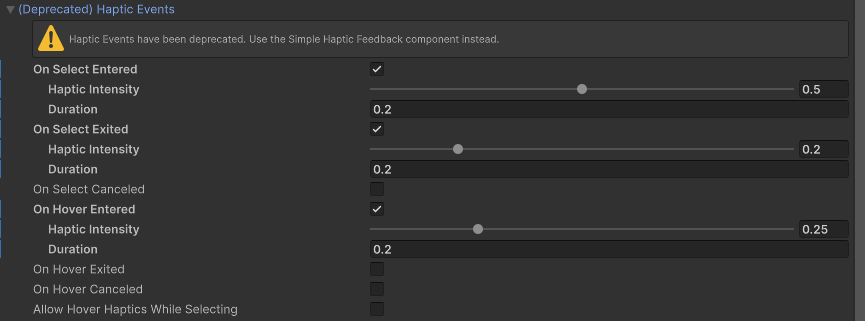
Haptic Events (deprecated)
The Haptic Events section is deprecated and might be removed in a future release. Use the Simple Haptic Feedback component instead.
| Property | Description |
|---|---|
| On Select Entered | If enabled, the Unity editor will display UI for supplying the duration (in seconds) and intensity (normalized) to play in haptic feedback when this interactor begins selecting an interactable. |
| On Select Exited | If enabled, the Unity editor will display UI for supplying the duration (in seconds) and intensity (normalized) to play in haptic feedback when this interactor successfully exits selection of an interactable. |
| On Select Canceled | If enabled, the Unity editor will display UI for supplying the duration (in seconds) and intensity (normalized) to play in haptic feedback when this interactor cancels selection of an interactable. |
| On Hover Entered | If enabled, the Unity editor will display UI for supplying the duration (in seconds) and intensity (normalized) to play in haptic feedback when this interactor begins hovering over an interactable. |
| On Hover Exited | If enabled, the Unity editor will display UI for supplying the duration (in seconds) and intensity (normalized) to play in haptic feedback when this interactor successfully ends hovering over an interactable. |
| On Hover Canceled | If enabled, the Unity editor will display UI for supplying the duration (in seconds) and intensity (normalized) to play in haptic feedback when this interactor cancels hovering over an interactable. |
| Allow Hover Haptics While Selecting | Whether to allow playing haptics from hover events if the hovered interactable is currently selected by this interactor. This is enabled by default. |
XR Controller Configuration (deprecated)
Use the XR Controller Configuration options when you are upgrading a Unity project that used an earlier version of the XR Interaction Toolkit package, but don't have time to immediately redo all of your input configuration. Version 3 of the toolkit introduced Input Readers as the primary way to configure interactor input and deprecated the XR Controller components. You can set the Input Compatibility Mode property to one of the following options to control how an interactor receives input:
- Automatic: Chooses the Force Deprecated Input mode if it finds an action- or device-based XR Controller component in the GameObject hierarchy. Otherwise, it chooses the Force Input Readers mode.
- Force Deprecated Input: Always use the older input method. An action- or device-based XR Controller component must exist in the GameObject hierarchy.
- Force Input Readers: Always use the input readers configured for the interactor instance. The interactor does not receive input for unconfigured input reader properties.
Tip
You can choose different options for different interactor components as you update them to use the newer input reader system.

| Property | Description |
|---|---|
| Input Compatibility Mode | Choose how an interactor instance receives input. |
| Hide Controller On Select | Controls whether this Interactor should hide the controller model on selection. This behavior was supported by earlier versions of the toolkit, but is deprecated and might be removed in a future version. |
Supporting XR Interactable Snap Volume
For an XR Ray Interactor to snap to an XR Interactable Snap Volume, the ray interactor must be properly configured. The Raycast Snap Volume Interaction property of the XR Ray Interactor must be set to Collide. Additionally, the XR Ray Interactor GameObject must have an XR Interactor Line Visual component with the Snap Endpoint If Available property enabled.