Configure a project from this template
Create a new project from the MR multiplayer tabletop template and configure the necessary project settings for your chosen platform.
To use this template, you must first Create a project from the Unity Hub, and then Configure project settings for your chosen platform. To check whether this template supports your chosen platform, refer to Supported platforms.
Create a project from this template
To create a project using the MR multiplayer tabletop template:
- Open the Unity Hub.
- Select New Project.
- Under Editor Version, select Unity 6000.0.23 LTS or newer.
- From the list of templates, select MR Multiplayer Tabletop.
- Before creating the project, make sure Connect to Unity Cloud in selected to automate the gaming services set up.
- Complete the other Project Settings and select Create Project.
When your project opens in the Unity Editor, Unity will prompt you to follow a tutorial to configure your project.
To understand the sample scene hierarchy, explore the Sample scene section.
Manage Unity Cloud
When you enable Connect to Unity Cloud during the project creation process, Unity will automatically set up your project’s gaming services. To manage access and other settings for your Unity Cloud project, go to the Projects section of Unity Cloud.
Configure project settings
You can manage the settings for your Chosen platform with the XR Plug-in Management settings (menu: Edit > Project Settings > XR Plug-in Management).
If you're targeting an OpenXR or Meta Quest headset, under XR Plug-in Management, select OpenXR and the Meta Quest feature group.
If you plan to use Quest Link, make sure you enable Initialize XR on Startup under XR Plug-in Management in the PC tab.
To learn more about project configuration, refer to the OpenXR and Meta OpenXR project configuration documentation.
Configure interaction profiles
This template supports both controller and hand input. You can configure the input profiles your project uses in the OpenXR tab of the XR Plug-in Management settings.
By default, this template enables the Oculus Controller Touch Profile.
Hand Tracking is enabled by default with the Meta Aim Hand OpenXR Feature.
You can add or remove input profiles for the platforms you target. To add a new interaction profile:
- Under Enabled Interaction Profiles, select the + icon.
- Select the relevant interaction profile from the list.
You can remove unused interaction profiles by selecting the profile, and clicking the - icon.
Android XR Support (Public Experimental Release)
While Unity’s Android XR package is an experimental package, you must complete some additional steps to set up this template for Android XR.
Install Android XR
You must install the Unity OpenXR: Android XR package to target Android XR devices in your project. You can install the Android XR package from the Package Manager as outlined in Install Android XR in the Android XR documentation.
You may also manually install the package by opening the Package Manager. Go to Window > Package Manager.
In Package Manager, click the plus symbol (
+) in the upper left corner and choose Install package by name... from the dropdown.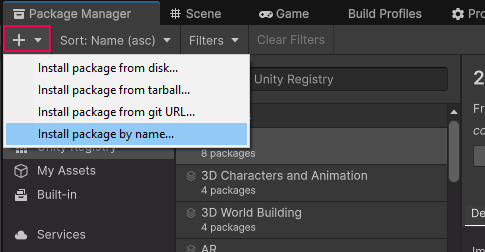
In the box that appears, enter the Android XR package name (
com.unity.xr.androidxr-openxr), leave the version field blank, and press the Install button.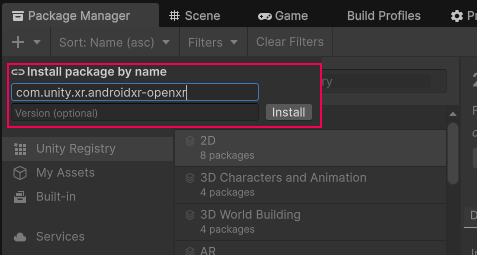
Configure project settings
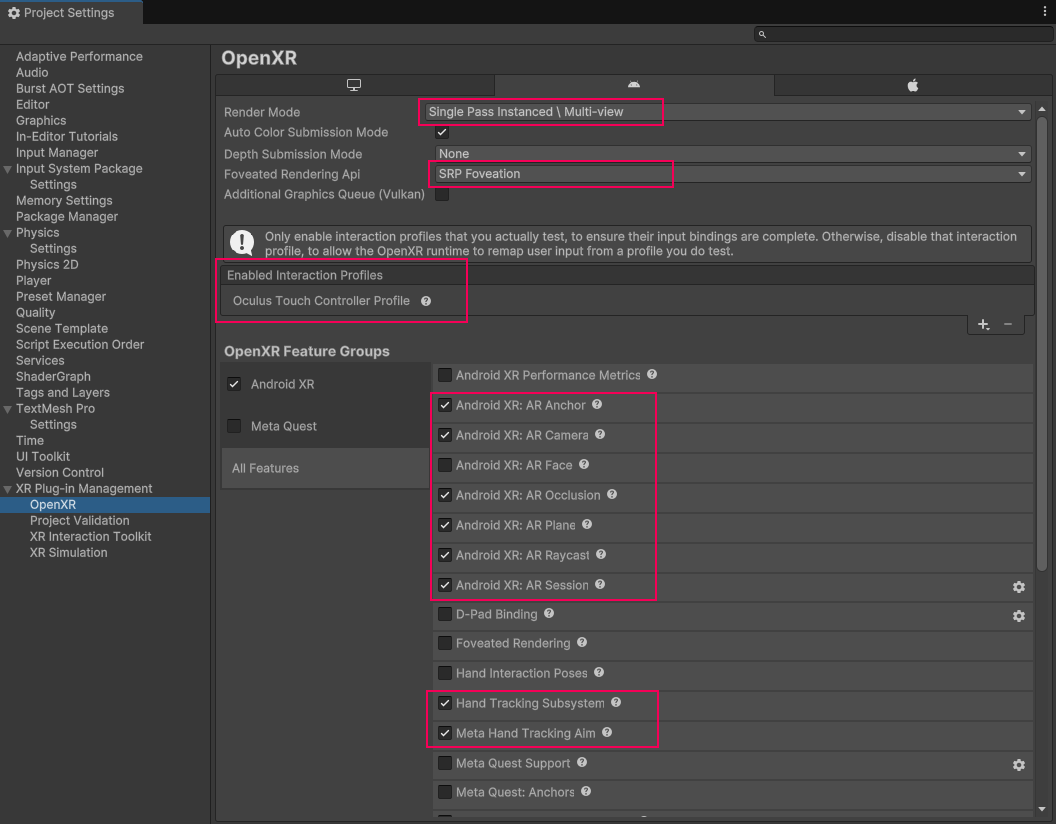
Once you have installed the Android XR package, you must Enable Android XR features and Add the Oculus Touch Controller Profile (Android XR documentation).
From the All Features list in the OpenXR tab (Edit > Project Settings > XR Plug-in Management > OpenXR), you must also enable Hand Tracking Subystem and Meta Quest Hand Tracking Aim.
For Android XR compatibility, you must also configure the following settings:
| Setting | Value |
|---|---|
| Render Mode | Single Pass Instanced \ Multi-view |
| Foveated Rendering Api | SRP Foveation |
The following image demonstrates the correct configuration of project settings with Android XR features enabled:
Note
You can only enable one of Meta Quest feature group and Android XR feature group at a time.
In the Project Settings window, navigate to the XR Plug-in Management settings in the left-hand pane. Under the Android build target, enable the Android XR feature group option under the OpenXR option in the Plug-in Providers list.
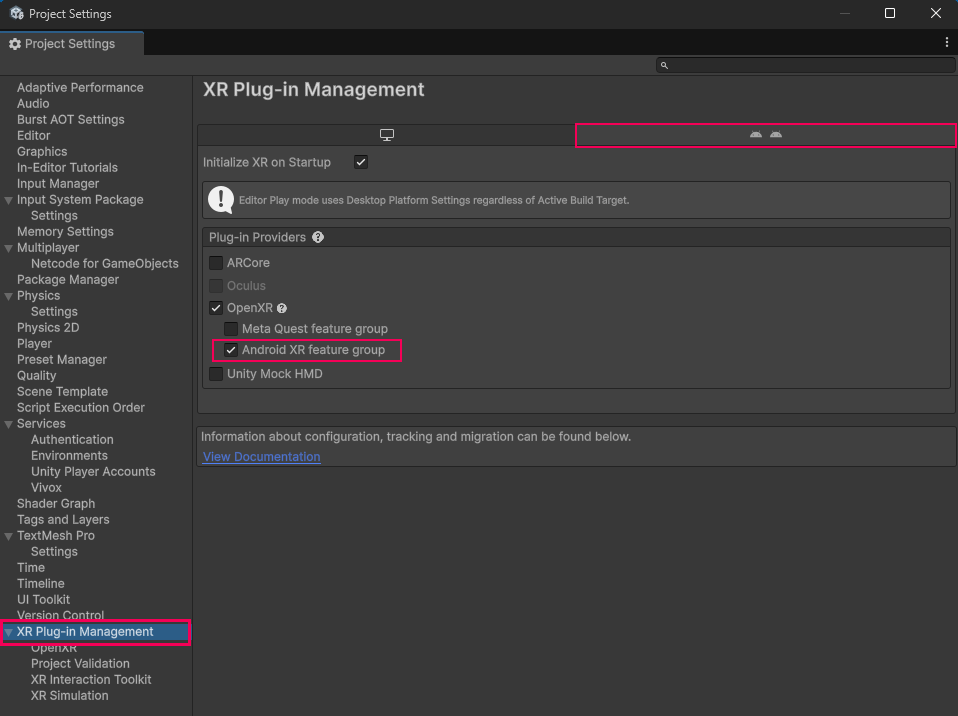
Note
If you do not see the Android XR option in the OpenXR Feature Groups, make sure to enable the Android XR feature group in the XR Plug-in Management settings window. This step is documented above.
Additional resources
- OpenXR Project Configuration (OpenXR)
- OpenXR Meta Manual (OpenXR Meta)
- Android XR Manual (Android XR)